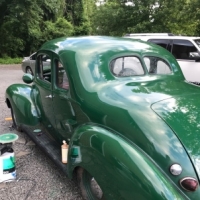
S shape door molding

bobbydamit
Expert Adviser
OK, stupid question time. I have a real nice S shape set of door moldings for the front doors. I have never replaced one. The old ones look like they are molded to a metal plate and secured with screws. The new ones, from K gap are plain rubber. Very nice parts I might add. Do I just glue them in? I don't want to wreck them but I am not sure of the correct glue to use if that is the way to secure them either. Any help would be appreciated. I'm tired of washing the care and mopping out the front floors.
By the way K gap has parts and ships really fast. Kaylene stepped on a nail :eek:, but is slowly healing, just difficult to get around the warehouse. And they got broken into lately too :mad:, so be patient. The quality parts and good folks, Dany/Kaylene, are well worth it.
By the way K gap has parts and ships really fast. Kaylene stepped on a nail :eek:, but is slowly healing, just difficult to get around the warehouse. And they got broken into lately too :mad:, so be patient. The quality parts and good folks, Dany/Kaylene, are well worth it.
0
Comments
-
I used clear weatherstrip adhesive. I just want to let you know- the new rubbers don't compress as easily as the old ones, resulting in you having to slam your doors. Some people shave some of the rubber off of the backside before they permanently mount them. I have put mine in the vise between a pair of 1x4's and compressed the living h_ll out of them to try and further soften them. If you don't do something you'll be an official Hudson door slammer! It is not KGAP's fault, it is just the new materials...0
-
bobbydamit wrote:OK, stupid question time. I have a real nice S shape set of door moldings for the front doors. I have never replaced one. The old ones look like they are molded to a metal plate and secured with screws. The new ones, from K gap are plain rubber. Very nice parts I might add. Do I just glue them in? I don't want to wreck them but I am not sure of the correct glue to use if that is the way to secure them either. Any help would be appreciated. I'm tired of washing the care and mopping out the front floors.
By the way K gap has parts and ships really fast. Kaylene stepped on a nail :eek:, but is slowly healing, just difficult to get around the warehouse. And they got broken into lately too :mad:, so be patient. The quality parts and good folks, Dany/Kaylene, are well worth it.
Yeh, K Gap is just wonderful- Kaylene has a million excuses, and big tales, then they ignore you. those S pieces arent much of a reproduction part, they wont work as recieved.0 -
bobbydamit wrote:OK, stupid question time. I have a real nice S shape set of door moldings for the front doors. I have never replaced one. The old ones look like they are molded to a metal plate and secured with screws. The new ones, from K gap are plain rubber. Very nice parts I might add. Do I just glue them in? I don't want to wreck them but I am not sure of the correct glue to use if that is the way to secure them either. Any help would be appreciated. I'm tired of washing the care and mopping out the front floors.
By the way K gap has parts and ships really fast. Kaylene stepped on a nail :eek:, but is slowly healing, just difficult to get around the warehouse. And they got broken into lately too :mad:, so be patient. The quality parts and good folks, Dany/Kaylene, are well worth it.
I have the answer to install those for ya but can't type fast and get'n ready for a swap meet ---pm me for my number and I'll talk ya through it0 -
Anybody have these problems? How much do you shave off?? Is there other substitutes that work better?? what about the metal backing plates?? There muct have been a million of these successfully installed over the years.???0
-
Ok, they are in, and they fit like a glove. No, the doors do not need to be slammed. The strikers needed to be adjusted slightly, so the plate is as far out as possible, and the doors close easily now and they hit the second latch with mild effort. This on evident as the door lock works, It will not, if it is on the first latch. The fit is so good I can pour water down there all day, and the jam and floor have not even a drop that got by the new gaskets.
It is important while gluing in place, to put a small film of Vaseline on the gasket face/mating surface, to allow the gasket to relax and find its proper place. Then carefully close the door and let be over night. The next day, clean off the Vaseline, and the job is done. I might add, the around the door gasket needs to be trimmed to just mate the new {S} gasket.
Pleased in Savage,
Bobby0 -
Can you tell me how you preped the rubber and what glue you used as mine would not hold even after 12 hours with the door closed. Thanks0
-
Yes I will be happy to share this as it did work great.
The glue is really [sorry for the name] FORD gasket cement. I think it is used to glue on side molding and maybe door gaskets, but it is black so take care not to use too much. FOMOCO.
I will fish the tube out of the trash and post it later, as it was the end of it and I pitched it. Then I cleaned the back of the gasket with denatured alcohol to remove any mold release left on the rubber, this is why most glue does not work in the first place. Then after cleaning the door with the same alcohol, [I use denatured because the isopropyl is miscible with water], I made a dry run to make sure the door frame gasket was trimmed with only a slight 1/4 inch over lap, again to avoid slamming issue, and the small 1/4 inch dia. finger at the end of the gasket fits outside the channel, not inside.
Now I did the glue run, starting with a small amount of Vaseline on the fender which is the area where the gasket meets to make its seal. Then, making sure my hands are clean of petroleum jelly, I added several beads of black glue to the back side, and set it in place. Carefully holding the 1/4 finger at one end and the top end of the gasket in place, I closed the door, gently, first latch only. I moved the gasket carefully with a wooden chopstick to make sure the molded in rain channel of the gasket was exposed and the ¼ “ finger was not twisted. Next day clean up, and admire done perfectly gasket.
Add this one to the Tech Spec list. I think it will save many frustrated restorers.") 0
0
This discussion has been closed.
Categories
- 37K All Categories
- 115 Hudson 1916 - 1929
- 21 Upcoming Events
- 94 Essex Super 6
- 28.6K HUDSON
- 576 "How To" - Skills, mechanical and other wise
- 995 Street Rods
- 151 American Motors
- 180 The Flathead Forum
- 49 Manuals, etc,.
- 78 Hudson 8
- 44 FORUM - Instructions and Tips on using the forum
- 2.8K CLASSIFIEDS
- 609 Vehicles
- 2.2K Parts & Pieces
- 77 Literature & Memorabilia
- Hudson 1916 - 1929 Yahoo Groups Archived Photos