Column wiring Question
![[Deleted User]](https://openforum.hetclub.org/applications/dashboard/design/images/defaulticon.png)
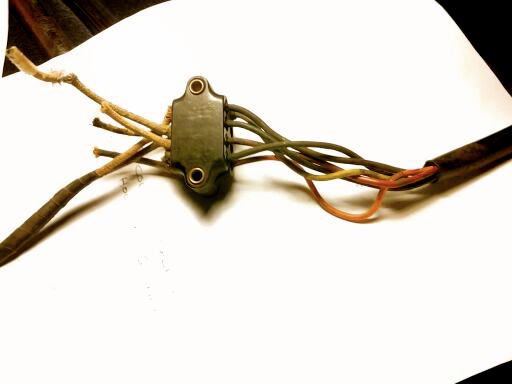
Hello, I am rewiring my '52 and pulled the steering column apart and the turn signal housing area looks to have been updated... or at least not original... so I'm not going to touch it. I plan on splicing my new wires from the new wiring harness to these however I have no idea what goes where in this section. There are six wires total: green, blue, brown, red, yellow, and orange. Would someone please tell me what to wire and where? Thank you! Also the nice folks at Rhode Island wiring sent me a small wiring diagram per my request... looks to be a copy that I already had but can't really read it. Does anyone have a detailed proper wiring diagram for a '52 Hornet for sale or do they even exist? Thank guys.


0
Comments
-
I understand how confusing this is,A friend lent this to me and got me squared away. It is for a 54 so it might be a bit differant from yours.0
-
Thank you for the response and posting the diagram up... it's actually the clearest I've seen. In this diagram, are the two little boxes that look like dominos next to the flasher switch -are they under the dash? Thanks and I'm unsure if this is compatible to my hornet, anyone else feel free to chime on in!
0 -
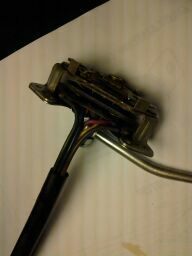
FoundKat, Hotrodman's diagram wiring is almost identical to that which is in your car. The two boxes that show on the diagram are actually the back and front of one wiring connector block. This block is the same block shown in the picture you posted with your question. The connector block when installed in the car is mounted under the dash on the support beam at the left underside of the dash. You will find the bullets swegded to each of the wires is a bit larger than those found in the parts bins of Radio Shack etc. The size of the bullets assures a proper electrical connection. I suggest you salvage the electrical pieces and attach them to the wiring harness you are installing in your car. This can be accomplished by soldering the bullet to the appropriate wire and covering each joint with electrical shrink tubing. The attached wiring diagram is for the 1953 Hudsons with signal lights installed. The 1952-53 cars utilize the same electrical components and wiring interfaces. Hope this will aid you in the rewiring of your signal lights.0
-
Thanks oldfarmer1947, I can't find any of those bullet connectors at a local store so I'm taking your advice and re-using the existing ones.0
-
Actually, I think you may be able to find them at certain stores. Advance Auto is a chain here on the East Coast and they carry them (at least on their website): http://shop.advanceautoparts.com/buy/products/93057-22-18-gauge-male-female-set-bullet-connectors-157-inch-by-dorman-conduct-tite-part-85474.html0
-
I just rewired both front and rear junction boxes on my '54 Jet. I used 12-10 bullet connectors and they were a perfect fit. Found some on e-bay for $4.99. Couldn't find that size in any hardware stores or auto parts store around here.0
-
Rhode Island Wiring has them, all sizes.0
-
So does McMaster Carr but cant just buy a couple,
Roger0 -
Thanks guys! Does it matter which wire goes where on the wiring block, are they terminal sensitive? I'm not the best at explaining stuff... so if you look at my top photo in the original post. I'm going to plug in my new wires where the old cloth wires were... is there a correct order, or can I just plug them in, in any female connection? Thank you!0
-
Absolute correct order. Are you sure the old wires are in the correct holes. Reallly eyeball that schematic hard to make sure all the colored wires are in the proper holes. Cause if not it them becomes a small nightmare. Especially when someone before you miswired it, and you have to undo what they did, and try to determine where to go from there. It also affects the rear junction box also, as it is dependent on the junction box that you are working on.0
-
Thanks grandpa... oh boy, why can't it ever be simple! No I'm not sure if the old wires were in the correct holes and I don't know what the old wires even went to. Some of the old existing wiring was in shambles and I just started cutting it out. Fun, fun, fun, I'll get through it and couldn't have gotten this far without everyone on this forums help.0

This discussion has been closed.
Categories
- 37K All Categories
- 117 Hudson 1916 - 1929
- 22 Upcoming Events
- 98 Essex Super 6
- 28.6K HUDSON
- 581 "How To" - Skills, mechanical and other wise
- 995 Street Rods
- 151 American Motors
- 181 The Flathead Forum
- 49 Manuals, etc,.
- 78 Hudson 8
- 44 FORUM - Instructions and Tips on using the forum
- 2.8K CLASSIFIEDS
- 610 Vehicles
- 2.2K Parts & Pieces
- 78 Literature & Memorabilia
- Hudson 1916 - 1929 Yahoo Groups Archived Photos