new frame rails

coverton
Expert Adviser
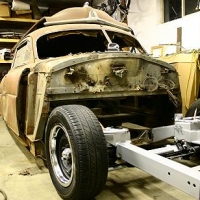
We have a restoration project at Wayne Comm College Automotive Dept which involves a 54 Wasp as the basic car. Right now we are past the tear down stage and have bought an old junk yard Firebird subframe.We have sand blasted it,taken all apart for rebuild and for very litttle money have gained a new style front end with disc brakes,ball jt suspension and PS,PB. We plan to spline the steering col into the new steering gear hub.It simply unbolted from the GM frame and I think we can attach it to the Hudson with little problem.Has anyone out there done this ??
Carroll Overton,Goldsboro,NC
Carroll Overton,Goldsboro,NC
0
Comments
-
Carroll,
Been there, done that! It makes a logical transplant. It's inexpensive, has disk brakes and power steering all in one. Mine worked out that it would just weld to the rear horizontal brace where the OEM clip was bolted to the body. I have other pics if this grabs you.
I also welded 2 additional 2" x 3" rectangular pieces connecting the new front clip with the rear OEM frame giving it a complete frame down the center of the car.
Peace,
Chaz0 -
Chaz,
This is exactly what we have planned.Any foresight or advice is well recieved.
Thank you Carroll O0 -
Chaz,
Isn't yours a LWB and aren't they working with a SWB Wasp.
They may have to shorten the rear stubs on the clip.
Just a thought.
Larry0 -
Larry,
1. Yes you are correct but it seems that all that needs to be done is to move the rear portion of the clip back more to get the correct wheel base length. It still rides in the same position of the original clip.
2. Each of the GM cars have different clip lengths. So some would more compatible with the Hudson than others.
3. In actuality the wheel base of the Firebird is closer the that of the Wasp than to the wheel base of the Commedore.
Carroll,
My gosh! Where do I start?
1. I cannot stress this enough. Measure, measure, measure and cross measure using the triangular method from known points on the Wasp body to the OEM clip before removing it. (points like where the radiator core support attaches to the OEM clip, center line of wheel axis, bumper bolts centers, etc, etc.)
For me, I even made a bird cage framework template which I could bolt on and off to find my old points.
2. Make sketches of the body and clip and write down the these measurements on the sketches.
3. Take many photos of everything and from all different angles. This will aid you when everything is going back together.
4. You MUST have a FLAT, LEVEL place to set the body on before beginning this work of attaching the new clip to the body. I took my body over to a buddy of mine's shop to set it up for alignment purposes.
5. I set the body on the flat surface with 4 steel rims of the exact width under it and then re-leveled the body all around, then attached the new clip. Keeping in mind to keep cross measuring (triangulation method) to make everything is square.
6. Almost forgot! double check the Firebird clip for straightness and remember that sometimes the opposite sides of any clip (especially GM) may not necessarily be the same as the other side.
I have many pics and some have appeared in some of my previous posts. You can check out previous posts for them.
I will continue to answer any questions you have if I can answer them.
Peace,
Chaz
Please note: Everyone has their own way of doing things to obtain the same result. I chose this way. You do not have to do it this way. Being an Artist, I deal in 1/100ths of an inch daily so I have a difficult time dealing with something that's just 1/16" off.
Notice by using this bird cage template I have the correct placements for the holes for the radiator core support, the correct placement for the bumper bracket bolts and the measurement for the center line for the front OEM spindles. All of this off my unboltable bird cage template. I just stored it until I was ready for it. I repeat, you do not have to do this.0 -
I'm sure most of you have seen this write up on welding in a FatMan stub frame, but if you haven't, there might be some useful info here. Looks like a fun school project.......good luck!!!
http://www.webrodder.com/article.php?AID=62&SID=16
http://www.webrodder.com/article.php?AID=63&SID=16
Now that I read back through Carroll's original email, the question might just center around the steering box swap.
Lee0 -
Lee,
Carroll is talking about everything not just the steering column! Most guys use everthing. I went with another steering column since I didn't have the original Camero column.
I'm using a '72 Chevy truck tilt steering column in mine which fits great. You are still going to need to add in some U-joints and steering shafts to do this.
Peace,
Chaz0 -
Thank all of you for the input.So far all we have done is take the car apart. I do plan to post as much o the progress as possible,but since it is a college automotive dept project it has to progress as the scheduled courses go. the body awaits a new rotissary we receive via a grant to arrive, and Once we "fix" the body it will go on the old frame machine and then we will have a datum plane established so proper alignment will be forced. We are fortunate enough to have a machine shop, welding shop as well as a new body shop annex so we have no excuse for this poject not going smoothly. These instructors are all certified so I am sort of the novice. I am redoing two other Hudsons so I will be begging help as long as its avaliable.
Never ceases to amaze me at the help you get on this forum.
Thanks again for a good start,Carroll Overton,Goldsboro,NC
coverton4@nc.rr.com0 -
mrsbojigger wrote:Lee,
Carroll is talking about everything not just the steering column! Most guys use everthing. I went with another steering column since I didn't have the original Camero column.
I'm using a '72 Chevy truck tilt steering column in mine which fits great. You are still going to need to add in some U-joints and steering shafts to do this.
Peace,
Chaz
Hi Chaz....beautiful work as usual :-) I'll need to do something similar to this on mine! Is there a year range of truck columns that fit well? I've heard if you get the right wiring harness plug, then a reproduction harness will plug right in???
Thanks!
Lee0 -
Lee,
As you know you can make anything fit with a good cutting torch.
The trick is to find something requires the minimum amout of time, effort installing, little money and compatibility. I think I need to explain something about myself. I am on a fixed income therefore my car building hobby has to be on the "cheap". I did not say lack of quality, just cheap.
I did a lot of research some years ago on the ergonomics of mid-40's to late 50's car interiors (lots of measurements) and found it to be very similar to the interiors of the '67-72 Chevy/GMC pickups. Obviously other years will work but for the price and looks I prefer the '67-'72 Chevy/GMC steering columns. You get all the late model wiring, turn signals, choice of shift levers, tilt (if needed) at a very low price. As for wiring connections, my column plugs directly into a Painless Performance's wiring harness with no alterations. Other wiring harness manufacturers allow you to purchase harnesses with the GM connections.
Here is a pic of my award winning '47 Ford with my $25 Chevy truck steering column. So you can see I like these columns.
Peace,
Chaz
P.S. Speaking of building on the "cheap". That sheet metal surrounding the A/C controls came from a Briggs & Stratton lawn mower engine shroud.0


This discussion has been closed.
Categories
- 37.1K All Categories
- 121 Hudson 1916 - 1929
- 21 Upcoming Events
- 101 Essex Super 6
- 28.7K HUDSON
- 595 "How To" - Skills, mechanical and other wise
- 995 Street Rods
- 151 American Motors
- 185 The Flathead Forum
- 49 Manuals, etc,.
- 79 Hudson 8
- 45 FORUM - Instructions and Tips on using the forum
- 2.9K CLASSIFIEDS
- 612 Vehicles
- 2.2K Parts & Pieces
- 78 Literature & Memorabilia
- Hudson 1916 - 1929 Yahoo Groups Archived Photos