Hudson 212 engine Valve Guide Modification
While I know this will upset many many Hudson owners because they like to keep their cars all original, I can’t always follow that path. Sure I love an old engine but I love it even more when I can make it better (read more power) with modern technology. So at the risk of upsetting someone’s apple cart, I’m going to share a cheap & easy modification one can do to their valve guides.
In the spring I discovered my valves needed replacement as did the valve guides in my 1937 Hudson 212ci 6 cylinder Coupe. I soon found I could use 1938 & newer valves & guides to get a narrower valve stem. Old stem was 3/8” replacement stem 11/32” which was around a 20 gram weight savings on each valve. Definitely taking stress off the valve train being lighter weight plus better flow with narrower stems. A 3-angle valve job to the seats and a 30 degree backcut to the valve certainly will help too.
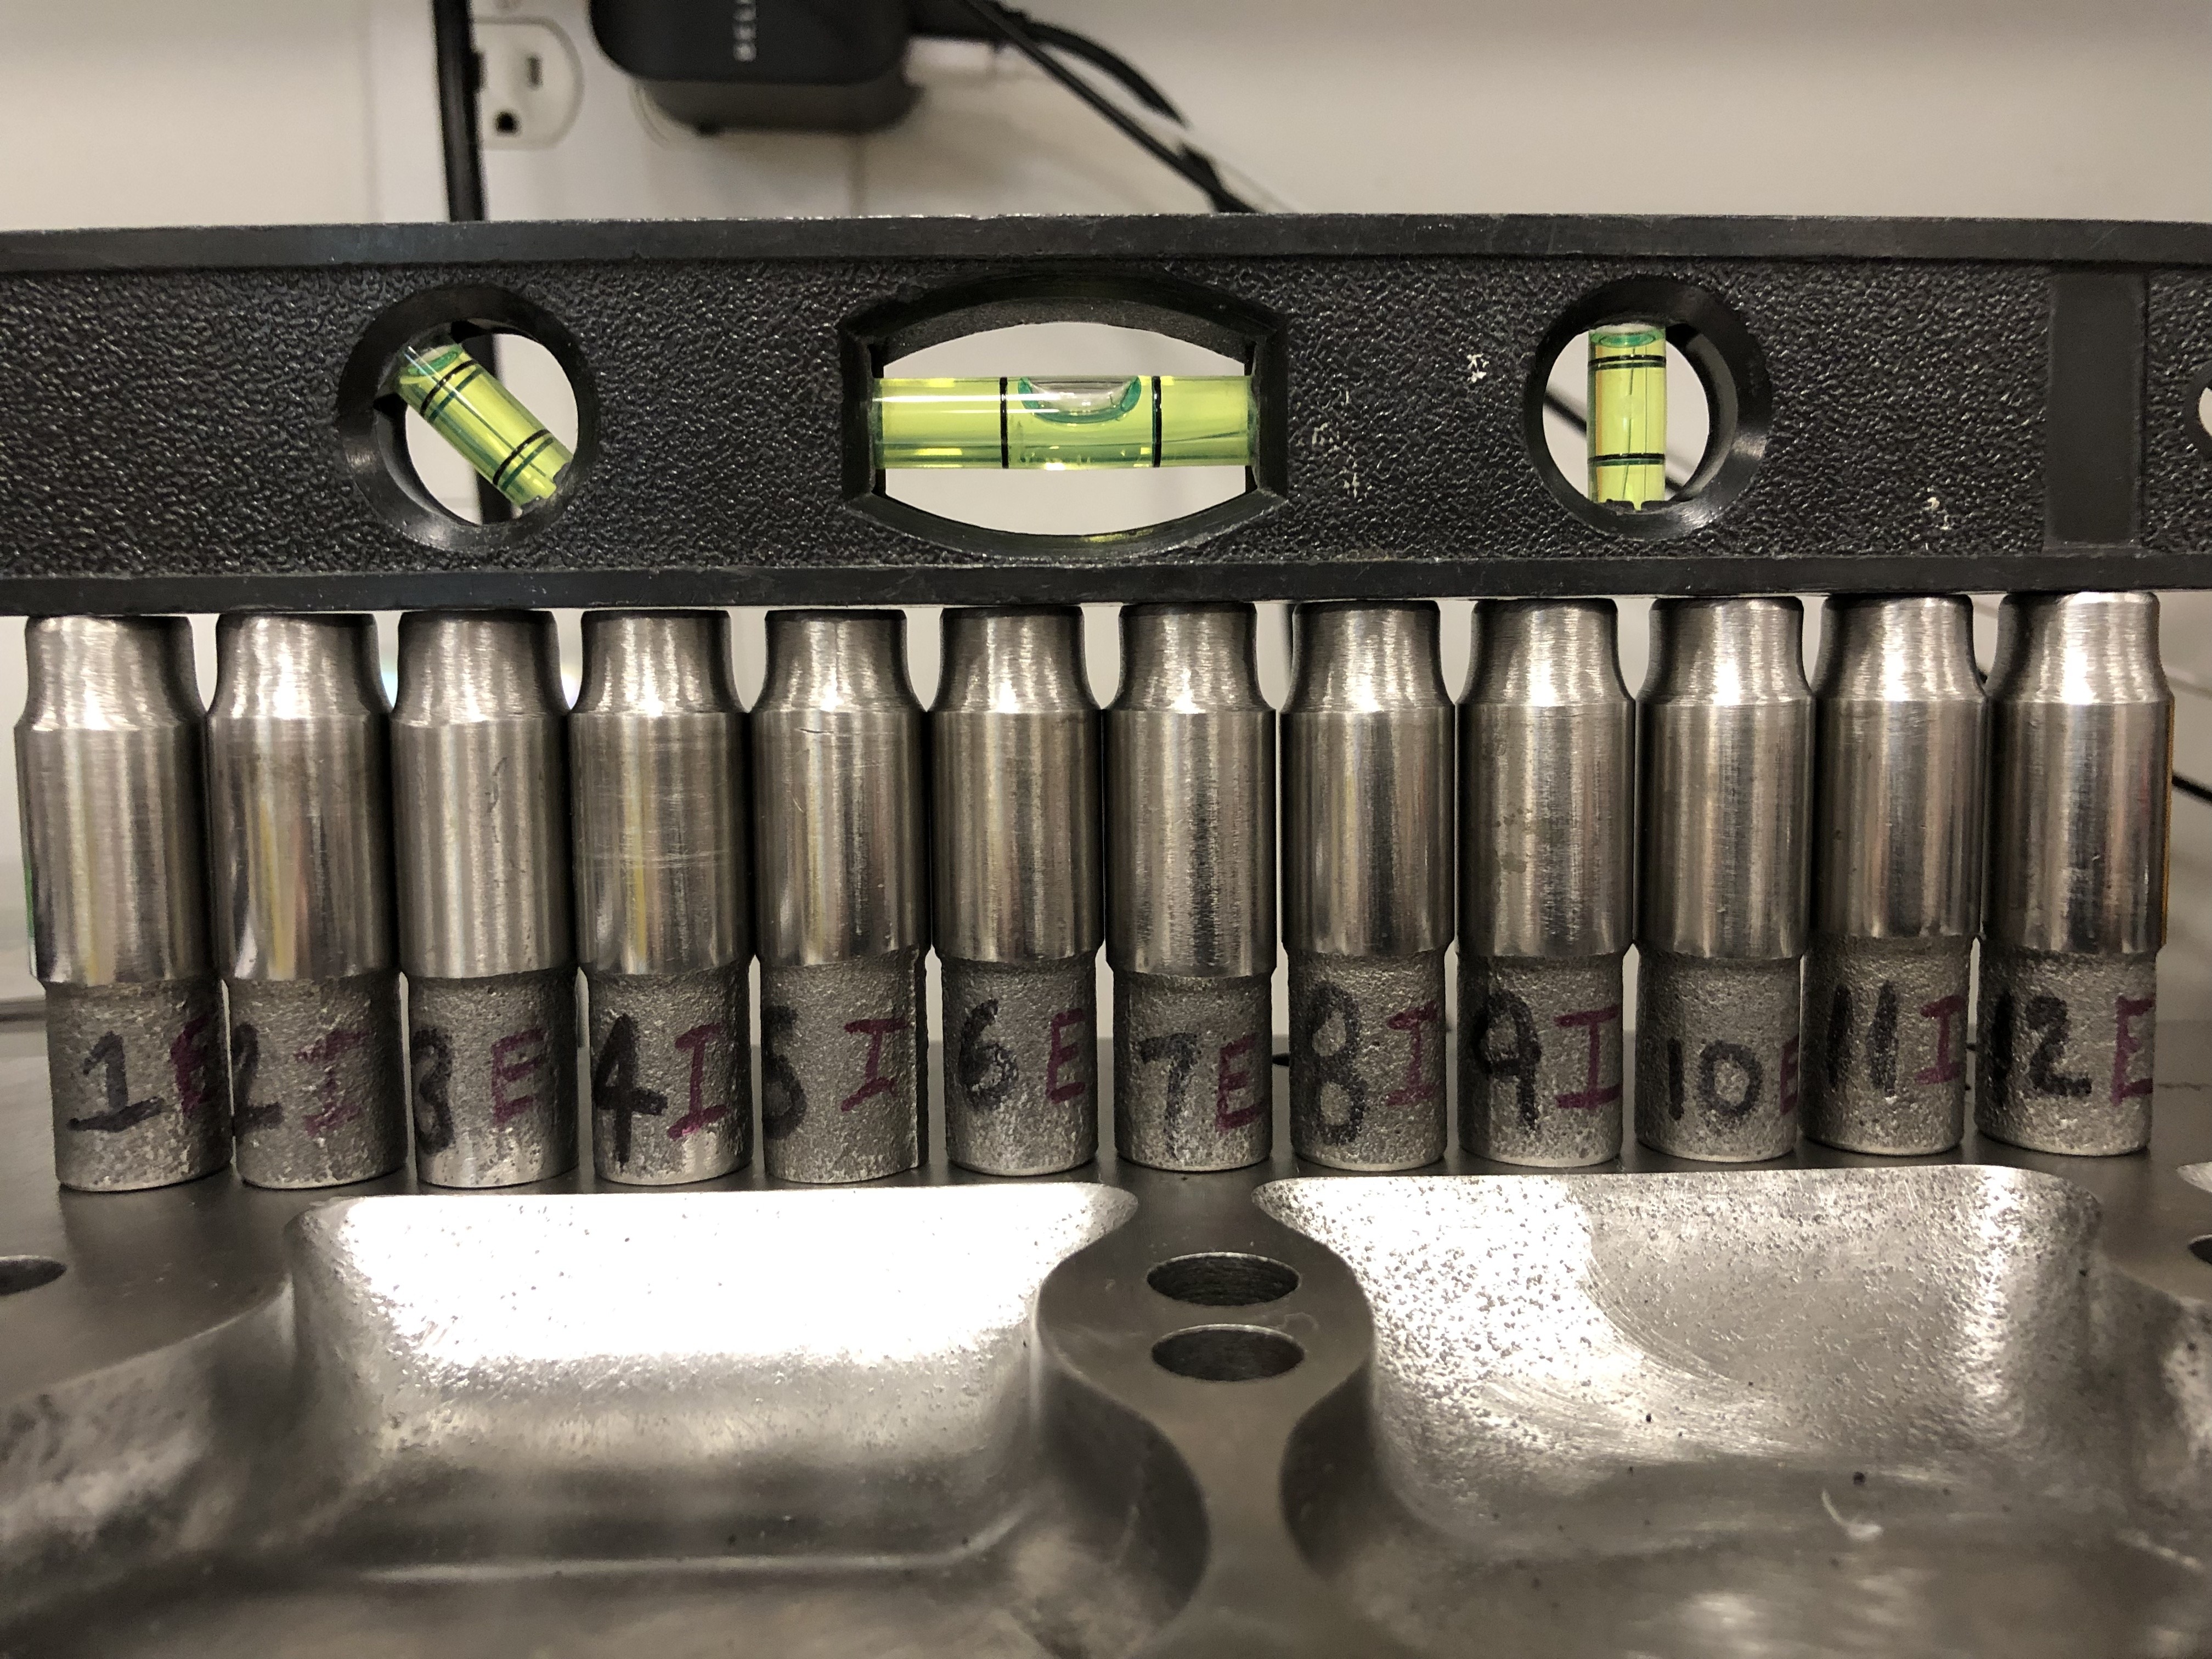
To the new guides I cut off the top 1/2” of each guide. For the exhaust guide it didn’t change the amount of contact with the stem since the top 1/2” was an oversized chimney which never touched the stem anyway. To the intake, yes I took 1/2” of the contact height off, plain & simple. I wasn’t worried since it’s going to be limited driving in a short Montana summer and with the stems not at an angle there’s no extra wear from that and quite frankly my very skilled machinist friend felt it was no problem doing a 2” guide. For all the nay sayers, my boy knows his flatheads, he has 10 Bonneville land speed records in a late 20’s 4 cylinder flathead engine & has built winning endurance race flatheads to complete in the 9000 plus mile Peking to Paris race plus many many flatheads for the street. As mom always said, “if you don’t have something nice to say then don’t say anything”
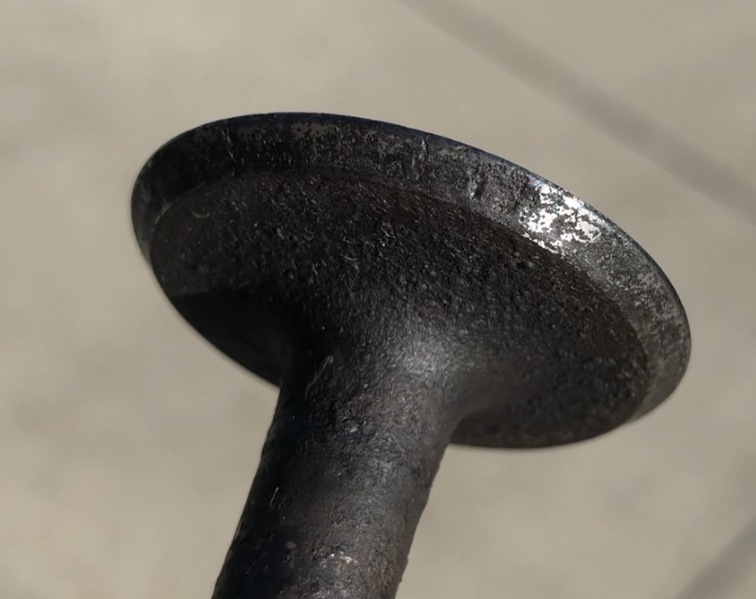
Bad valve:
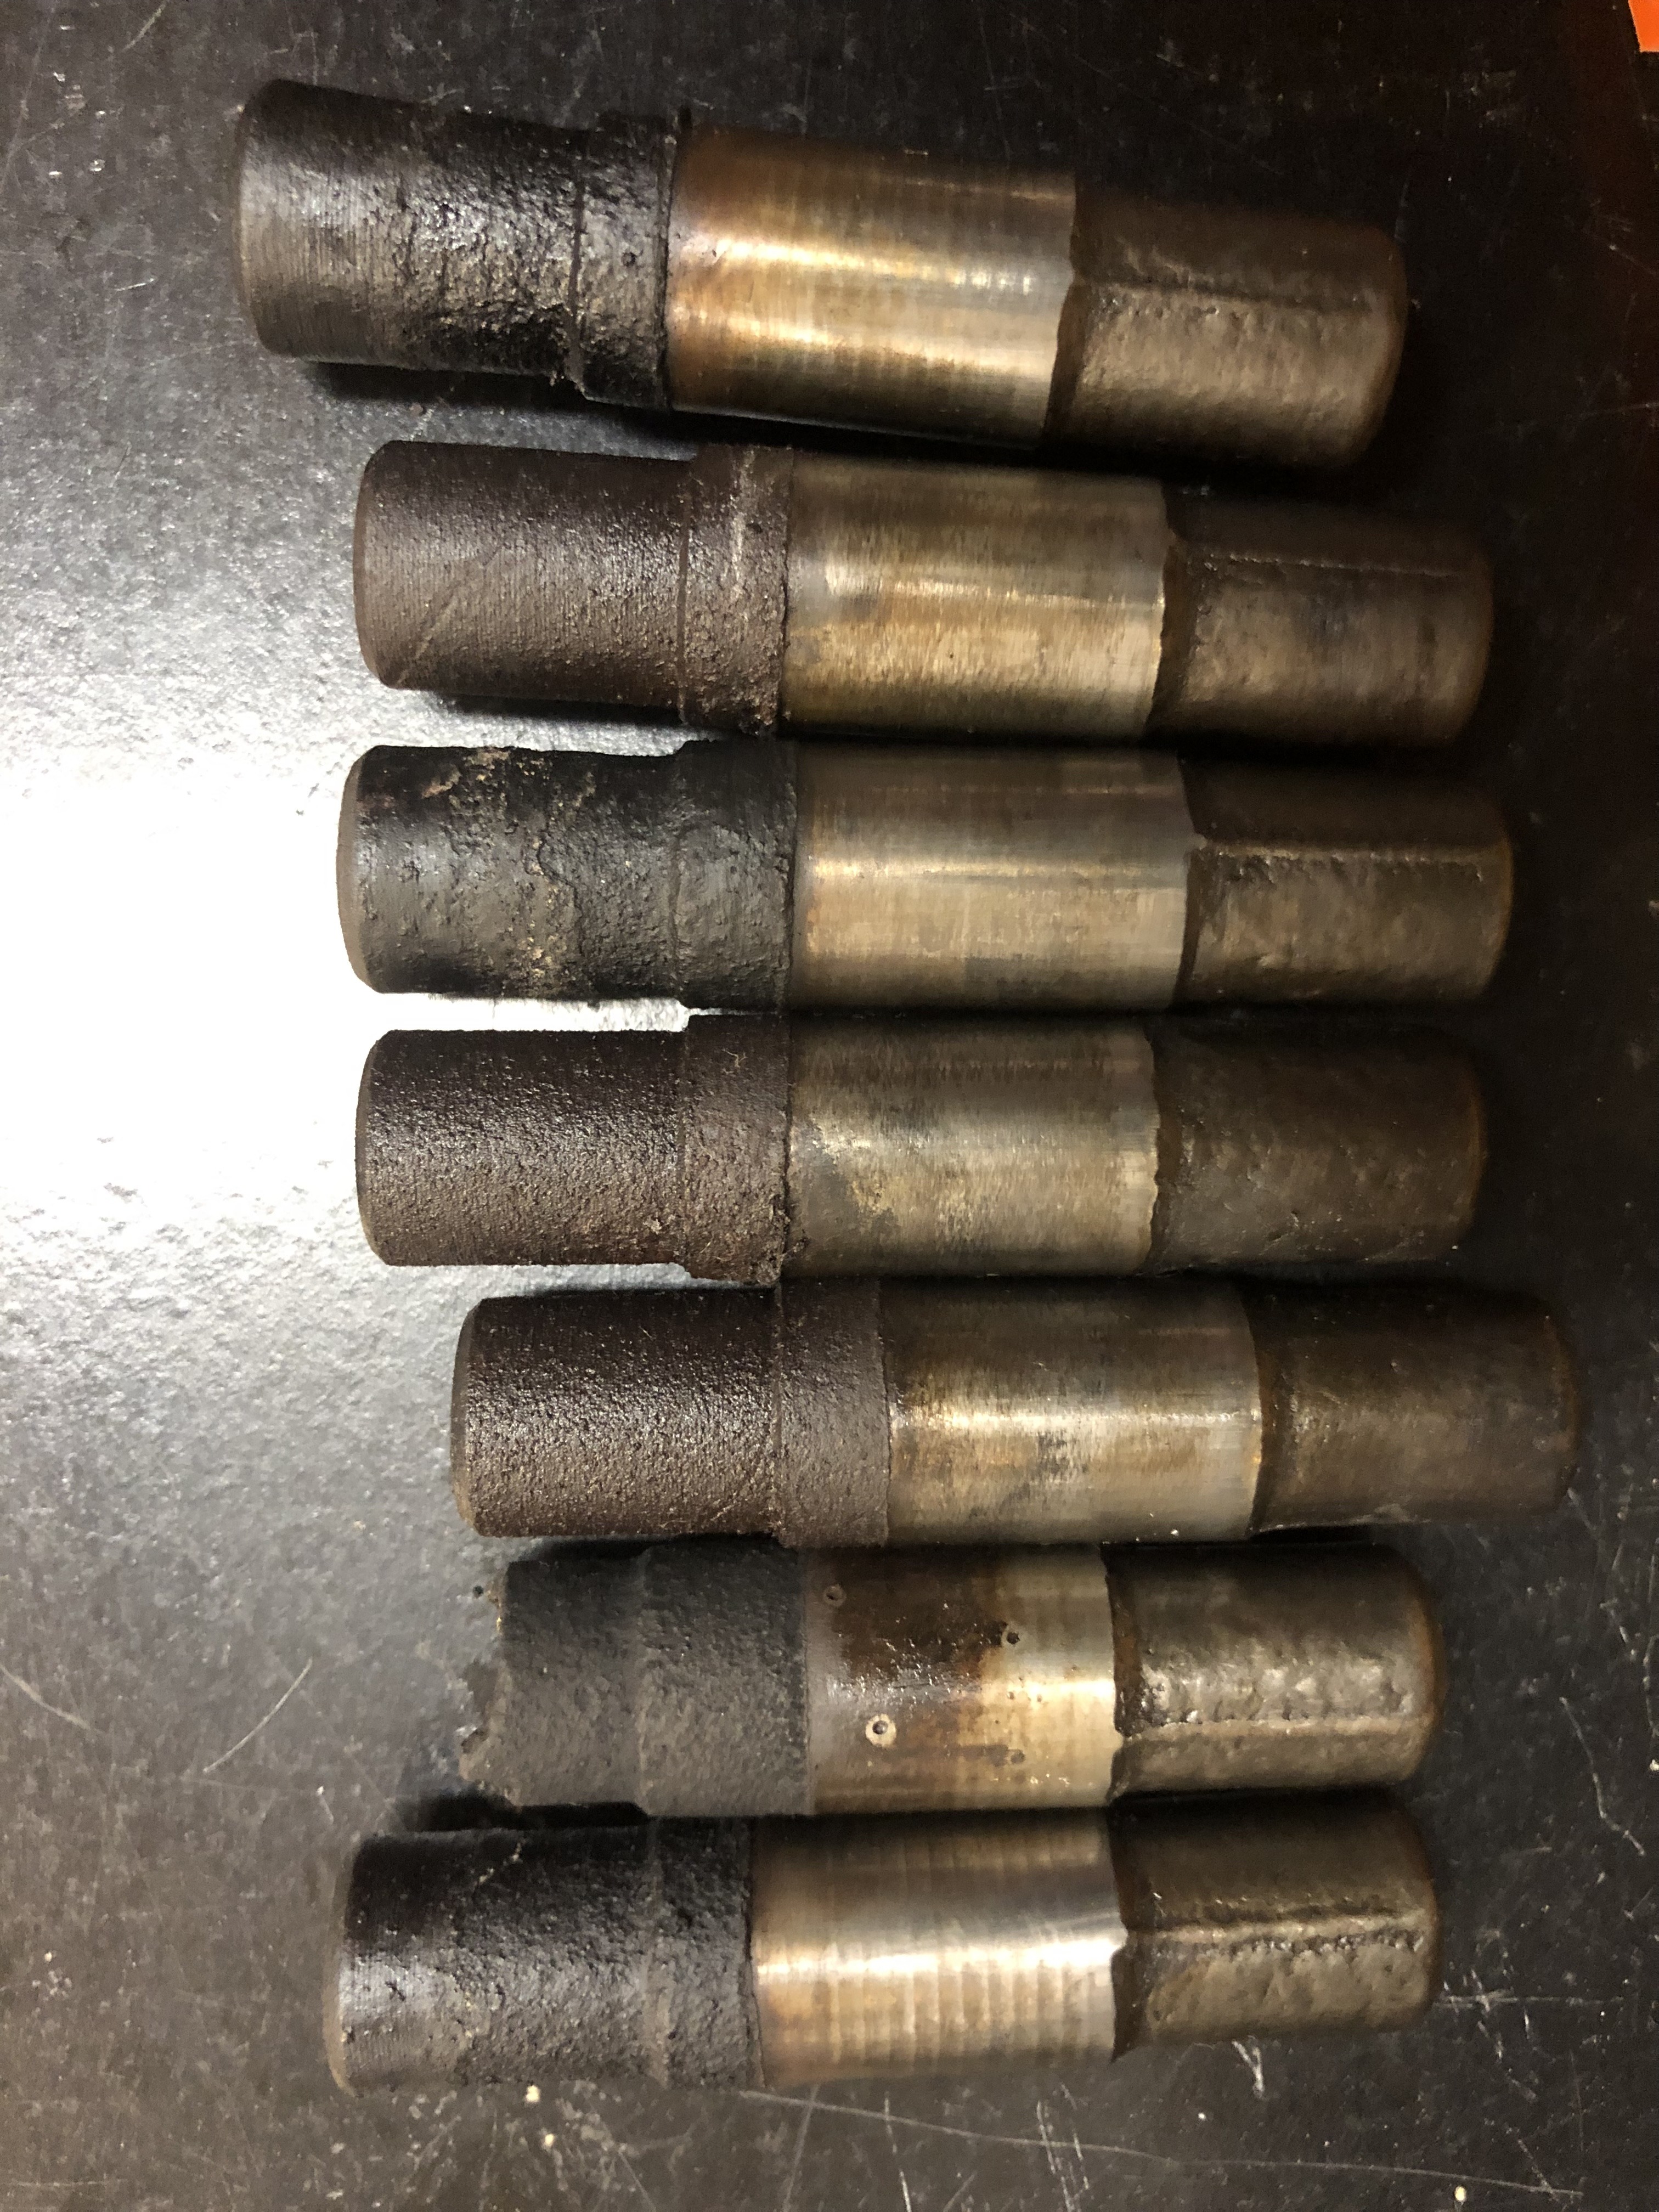
Old guides:
Approximate 1” of guide in the intake & exhaust ports.
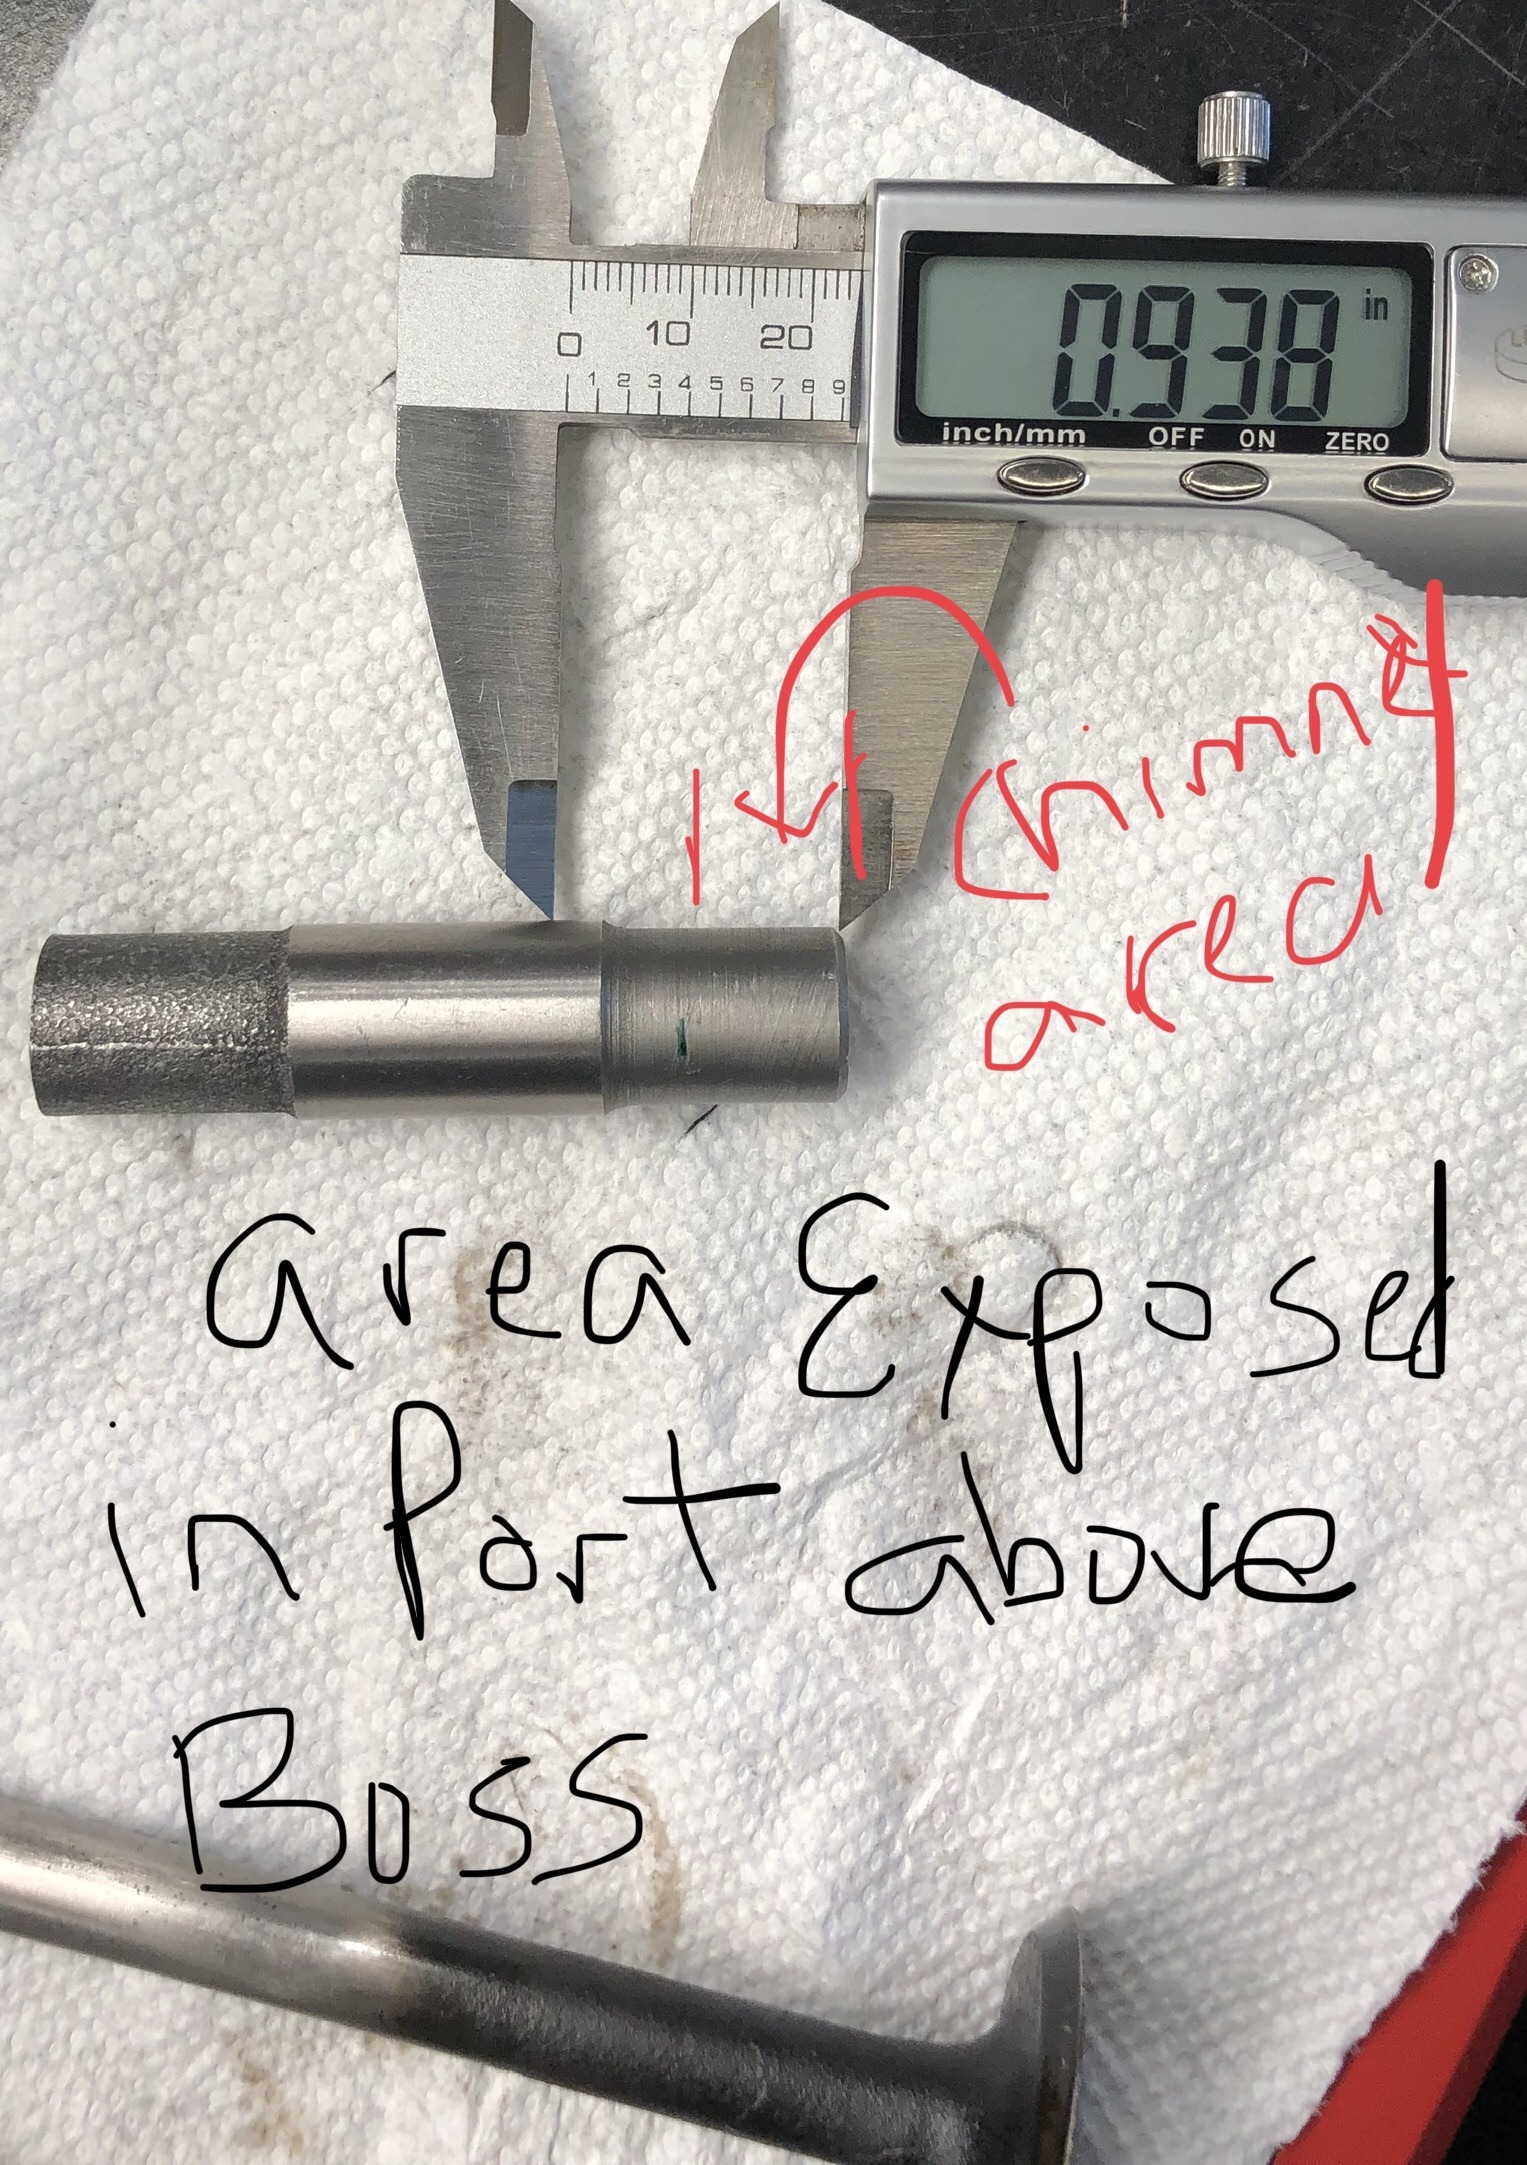
Initial cut with end spot faced,
height & shape vs old guide,
all guides done.
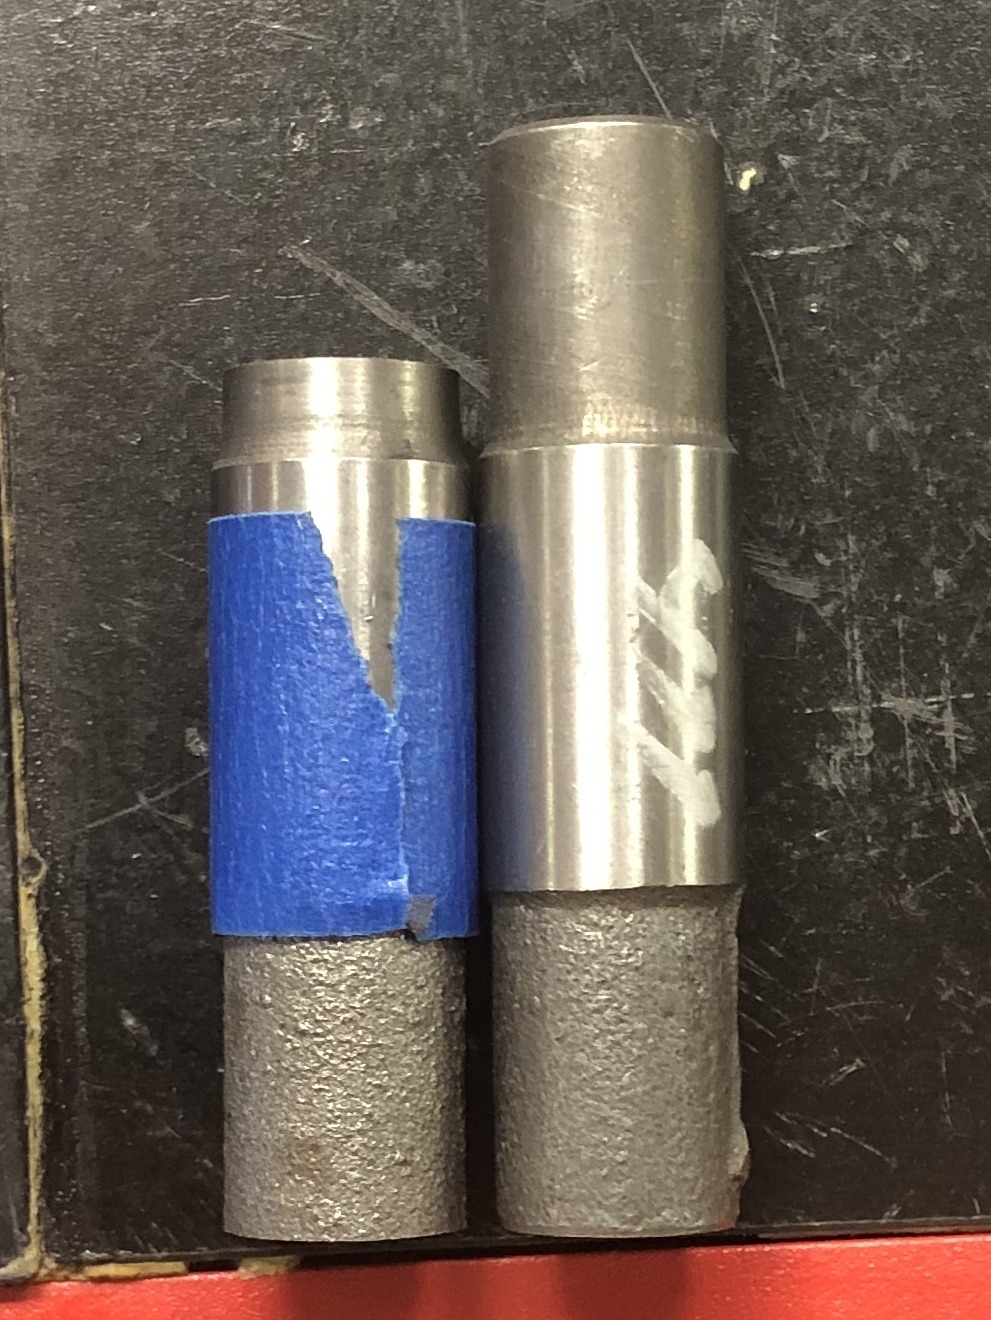
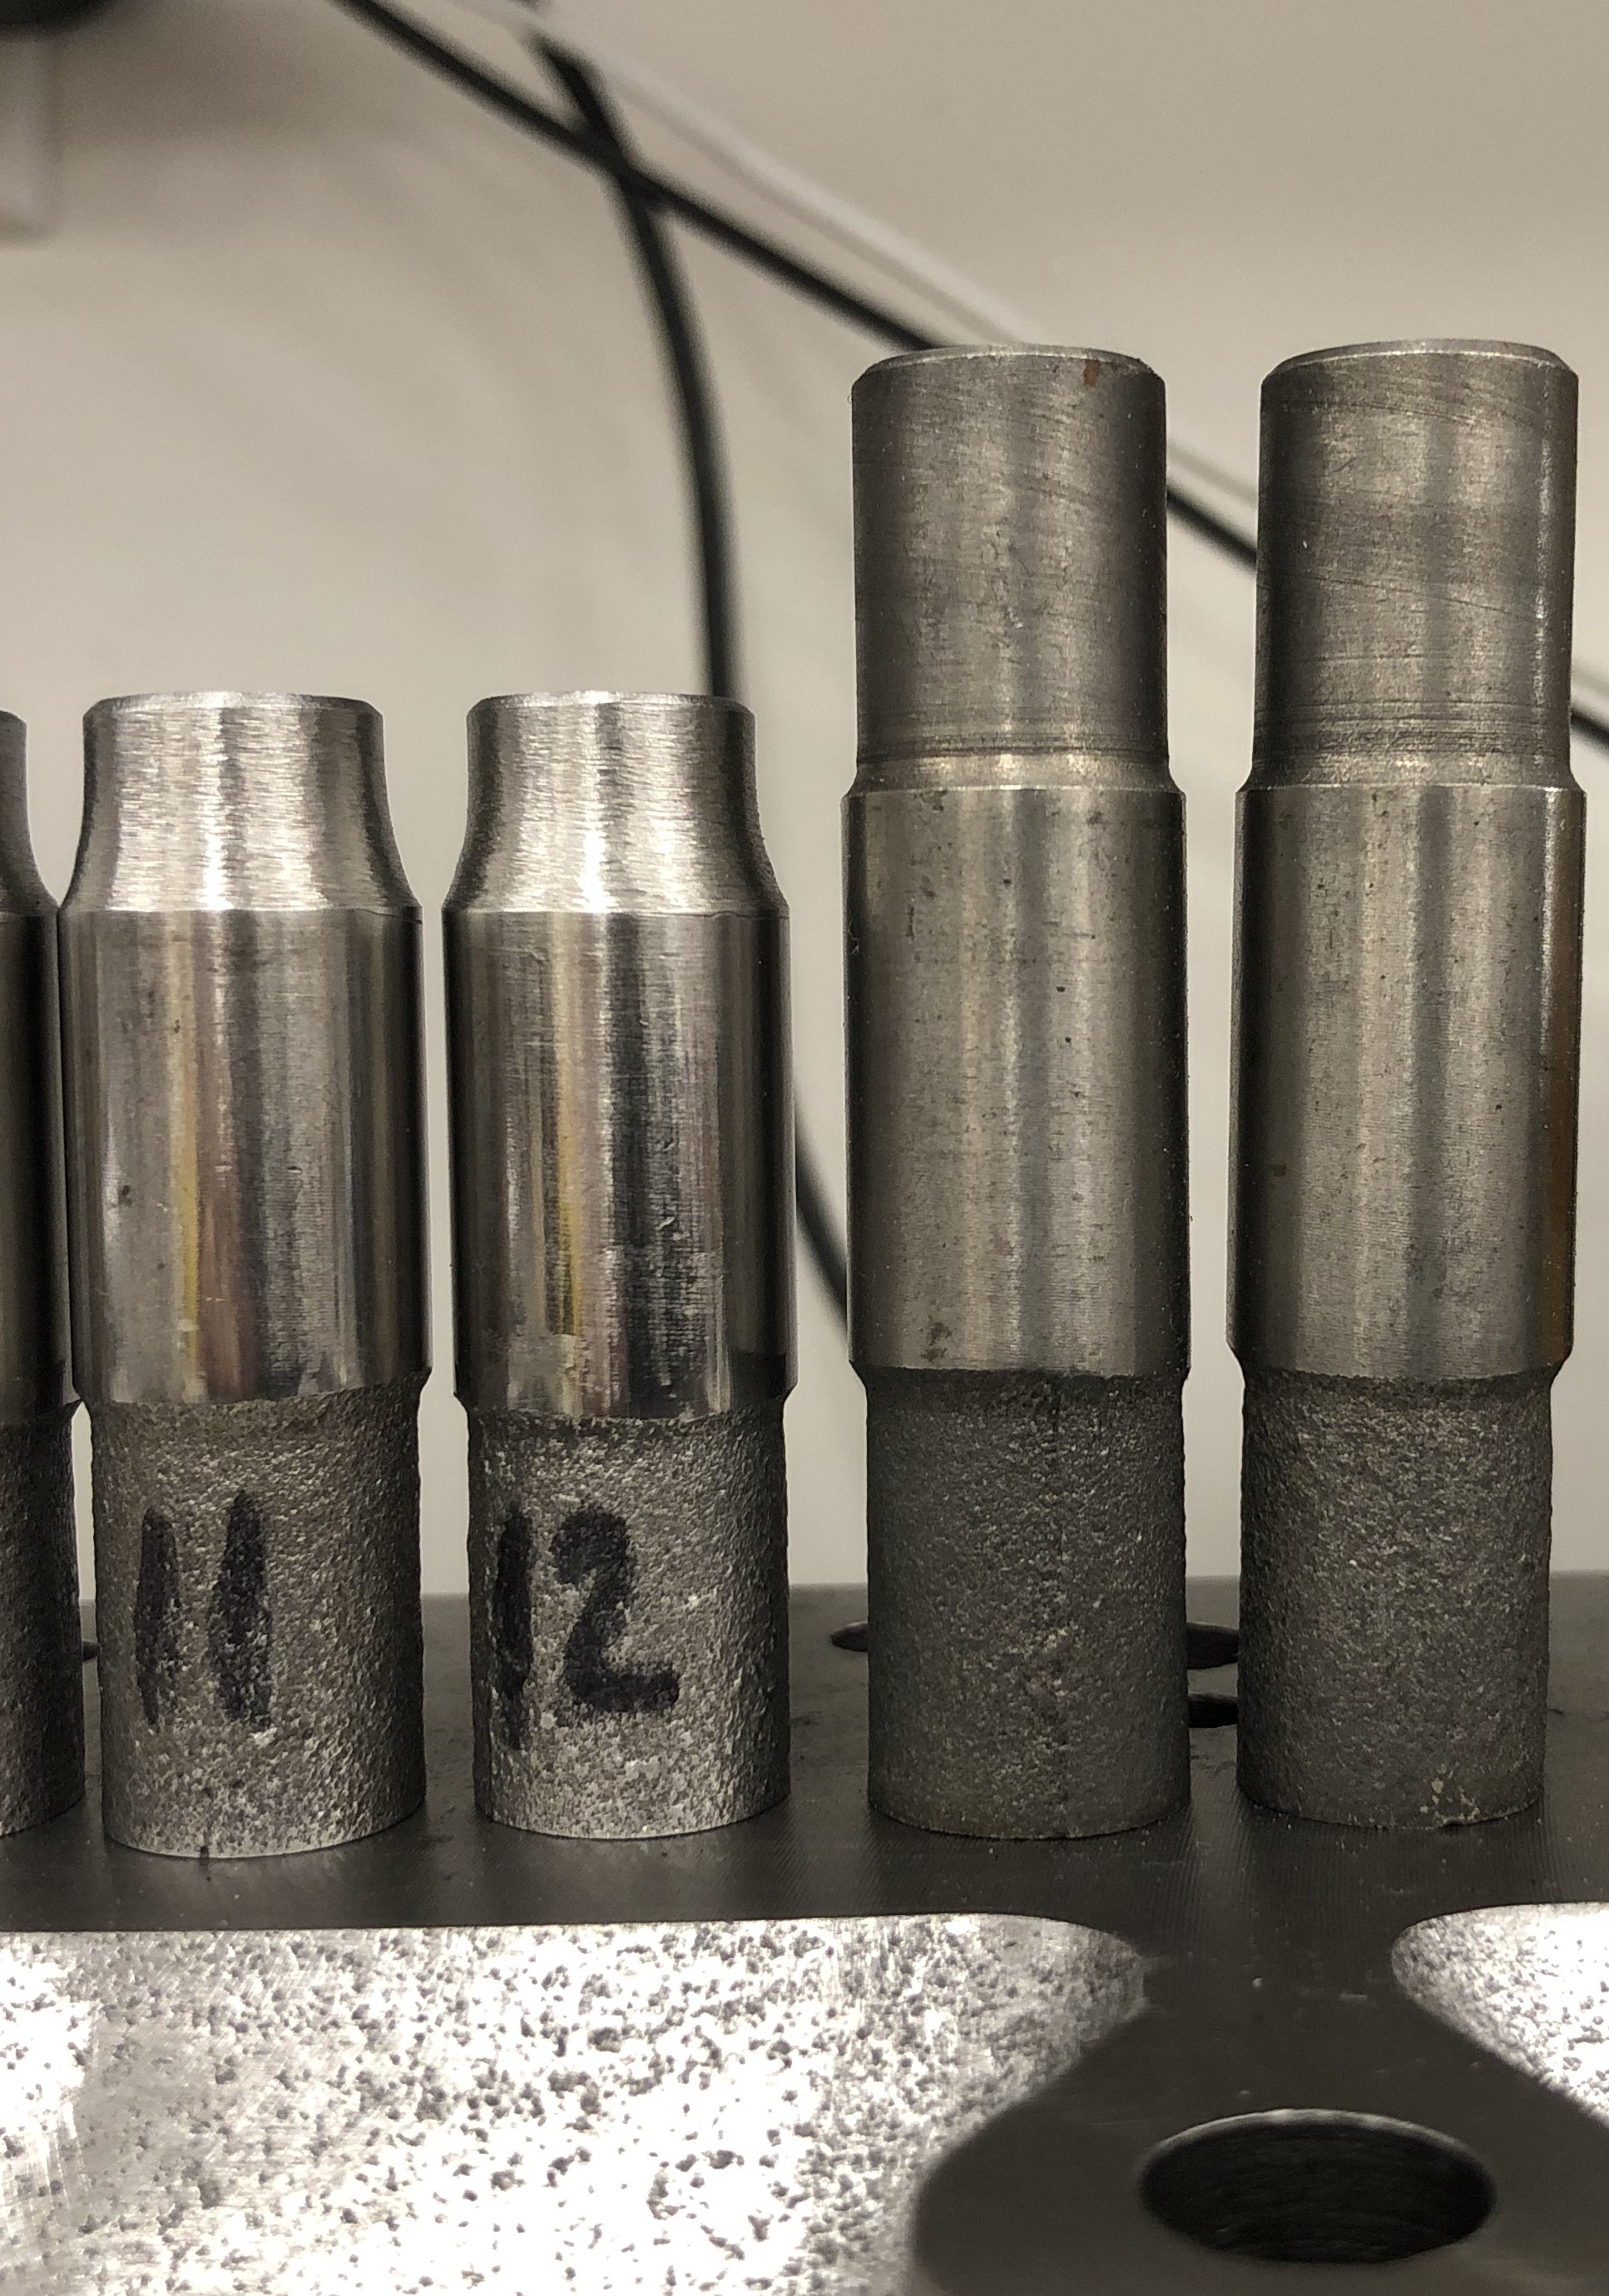
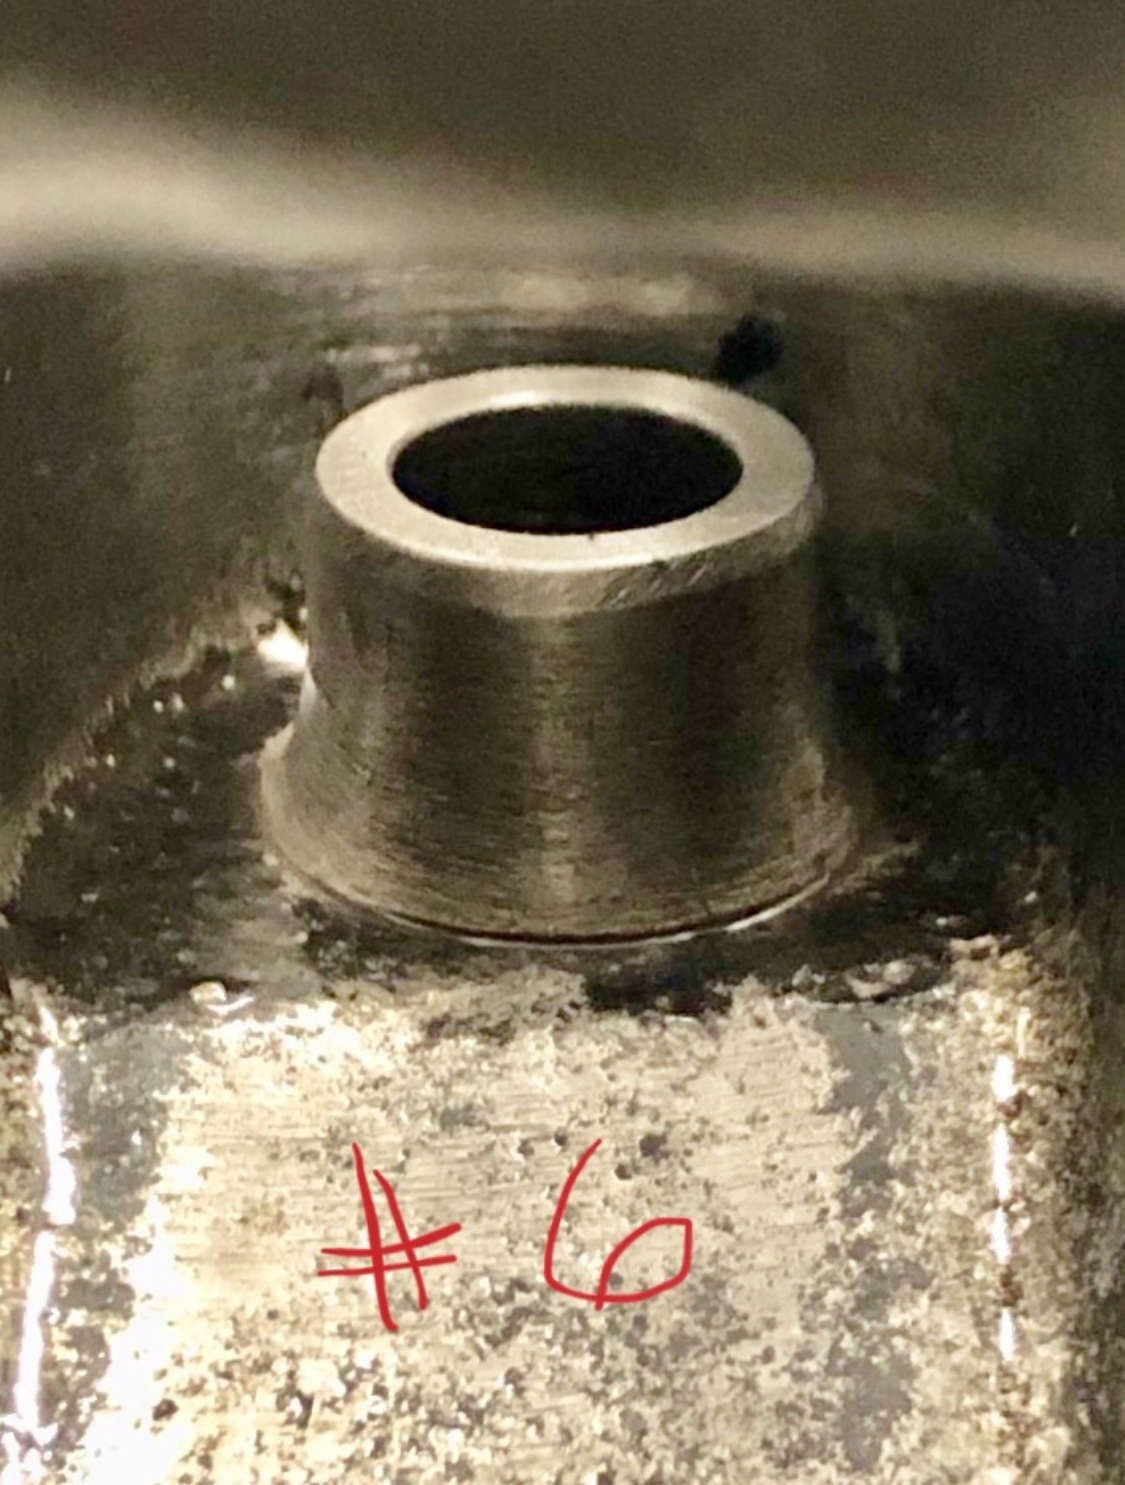
Original guide in top photo & modified guide in 2nd picture.
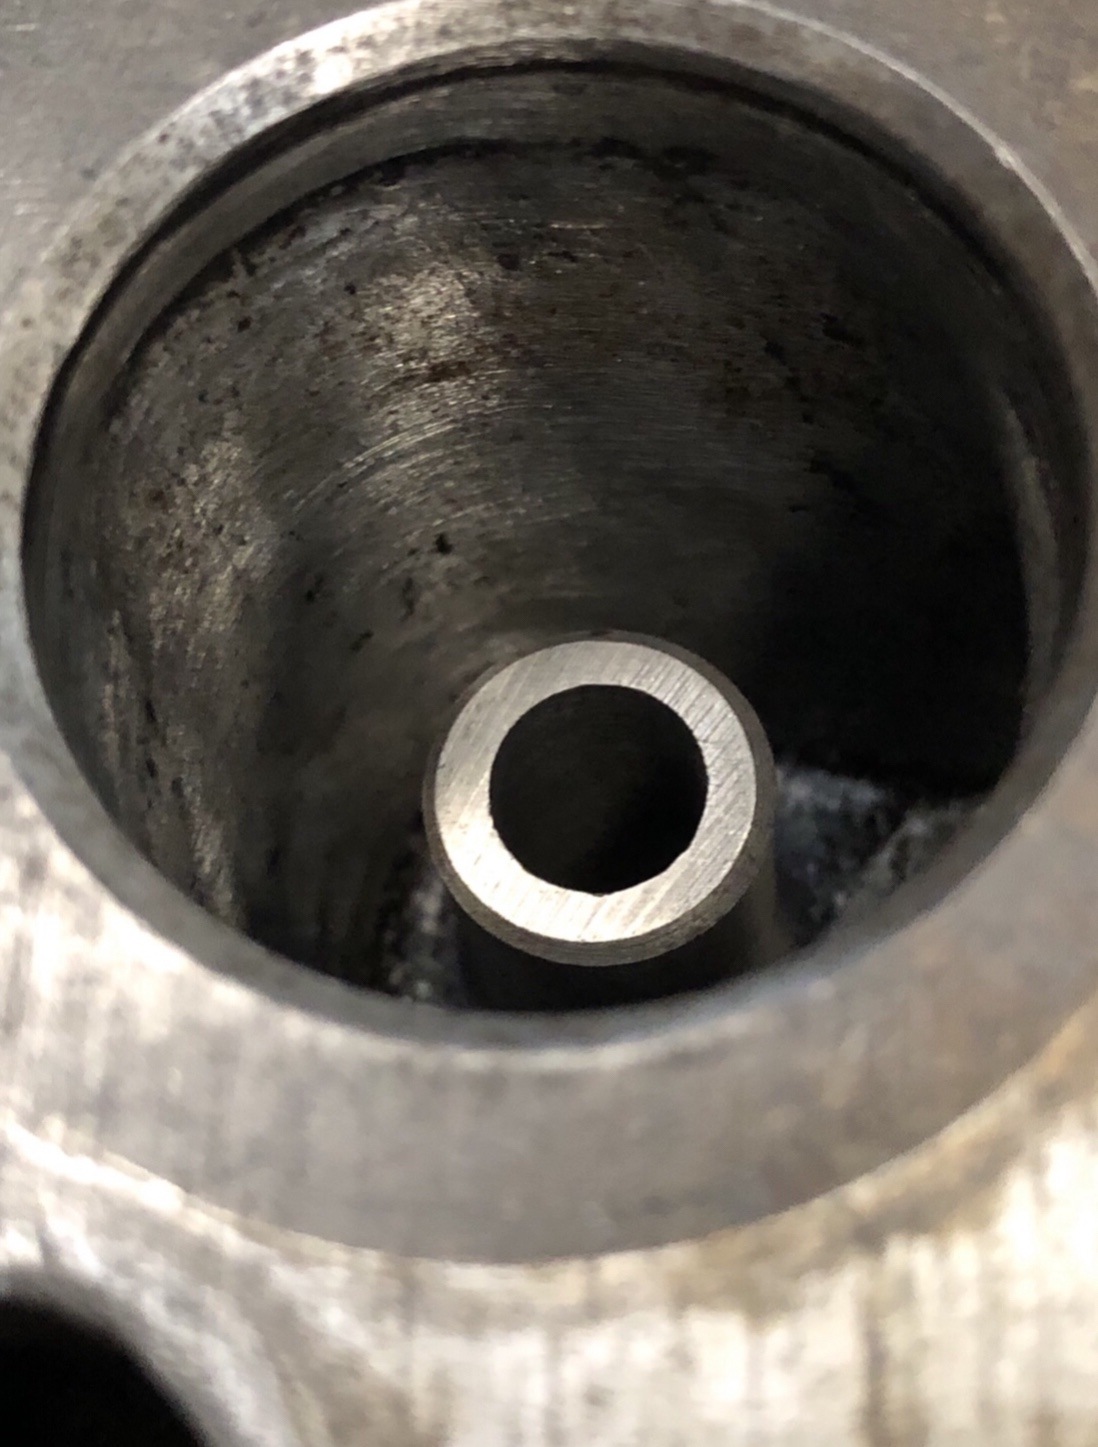
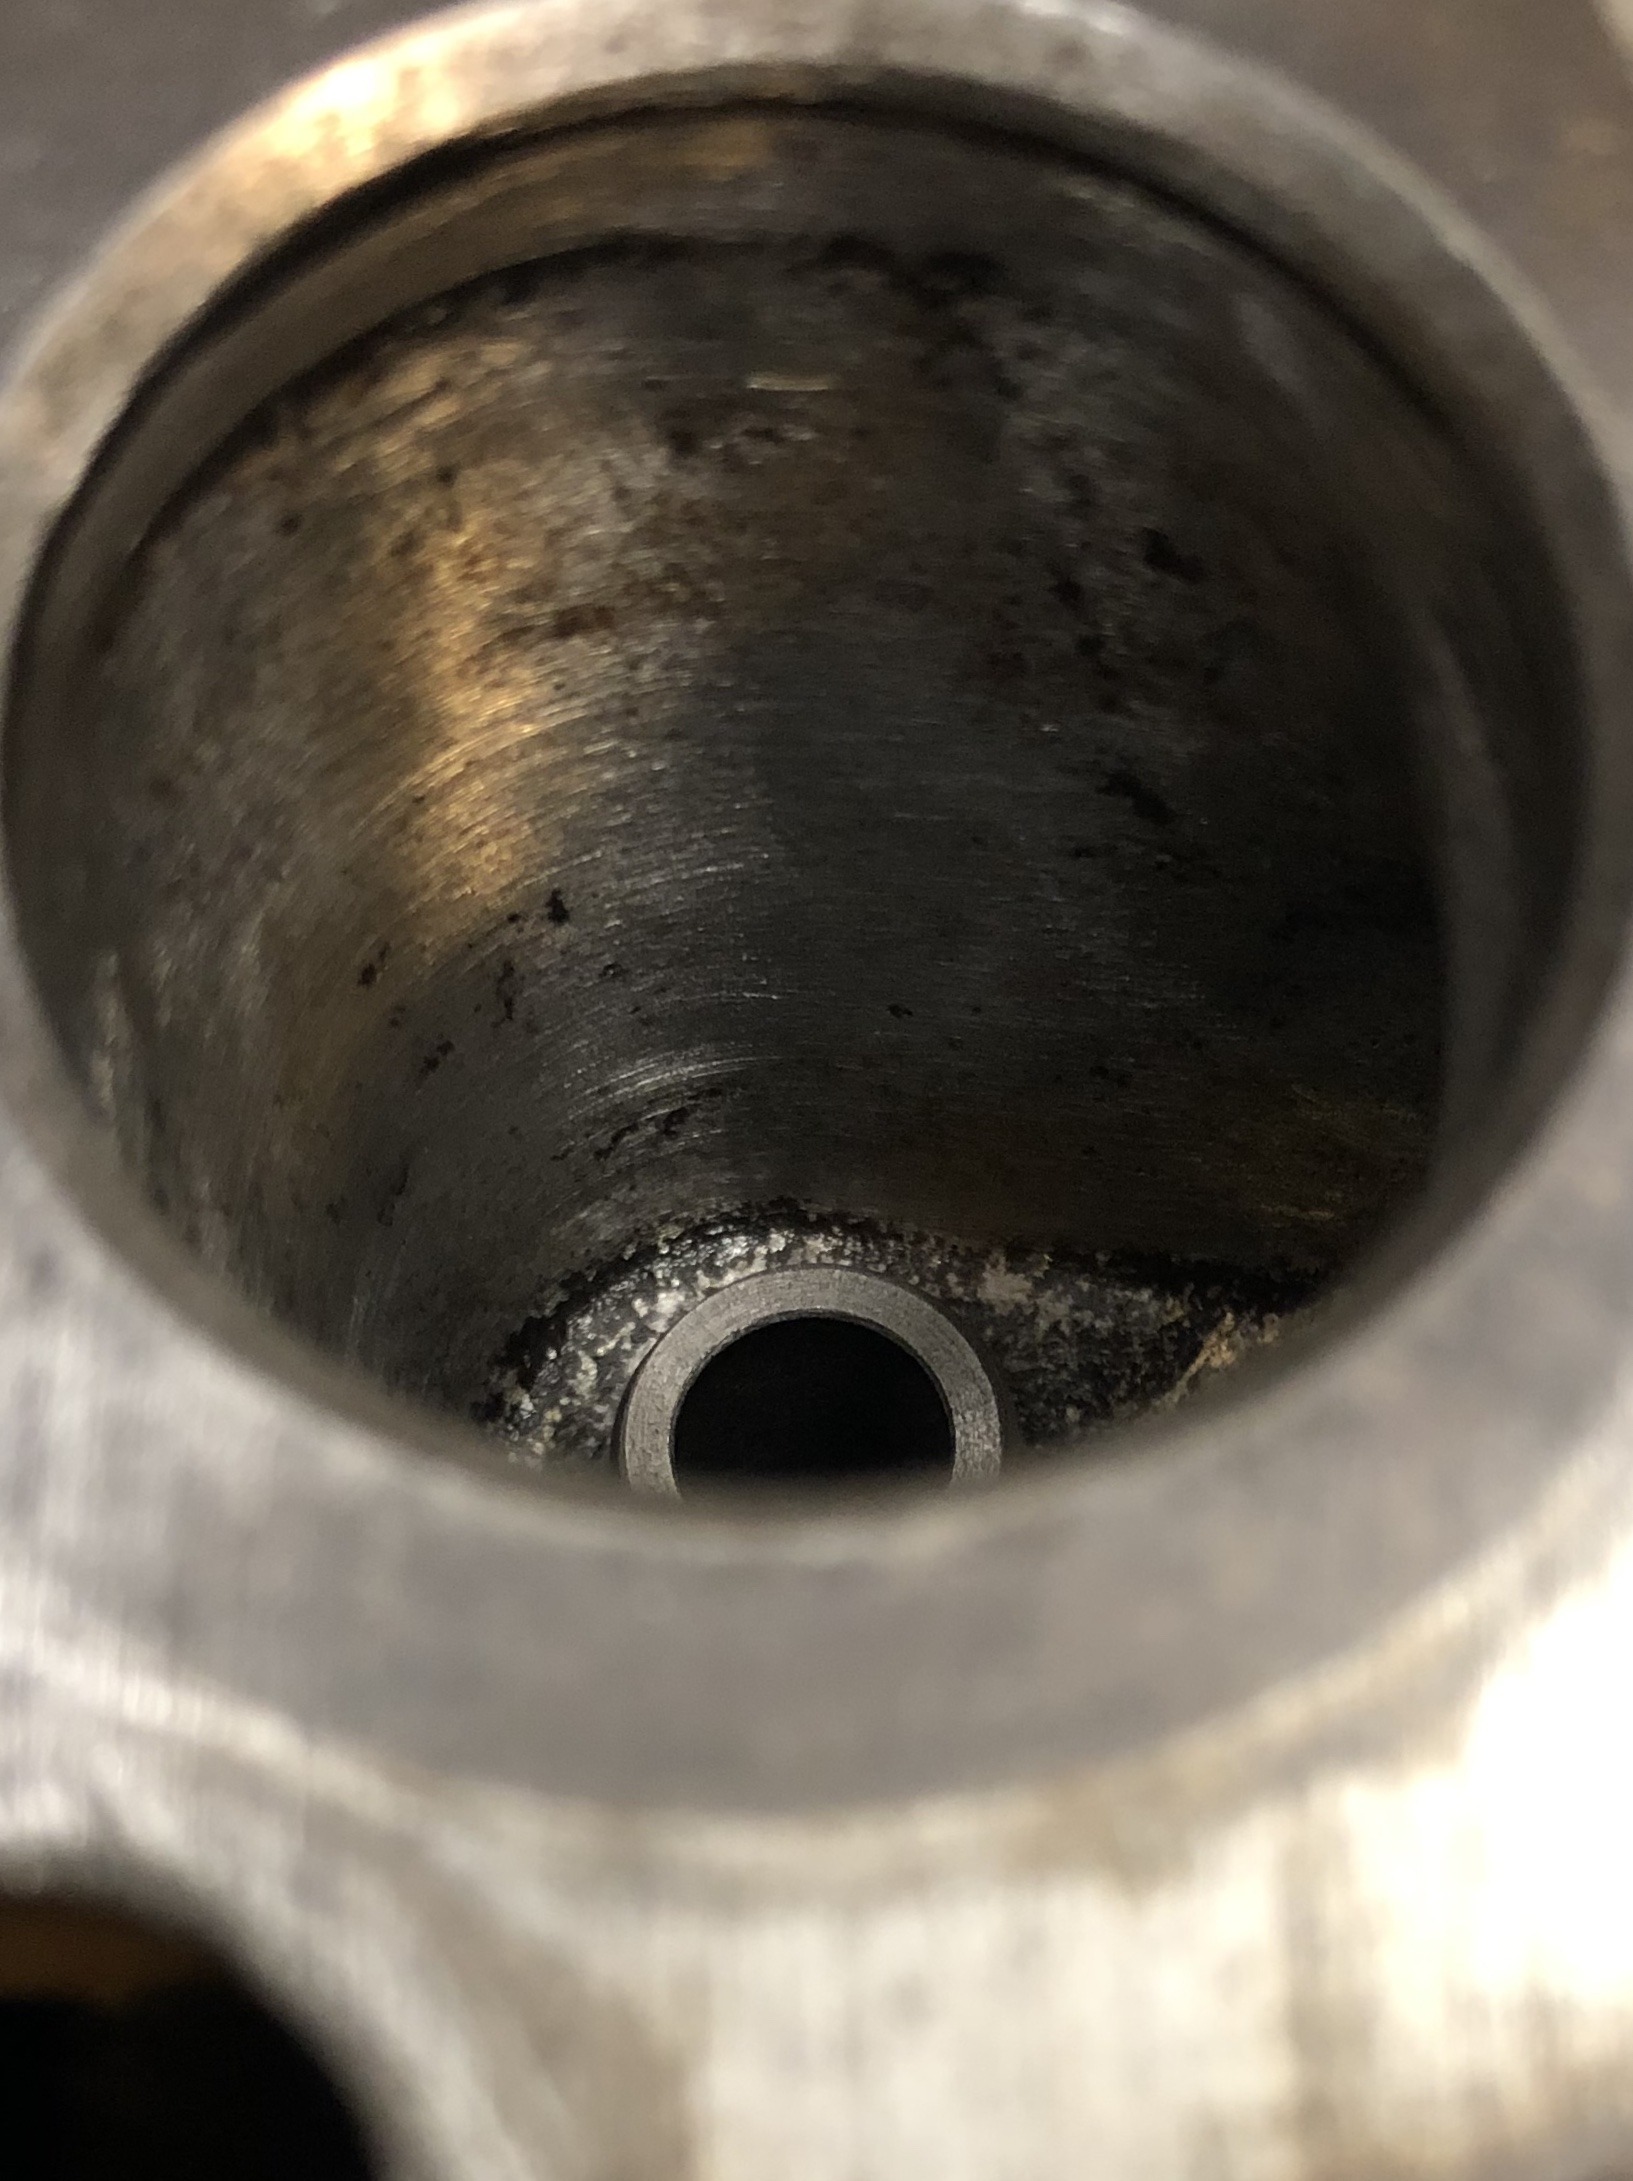
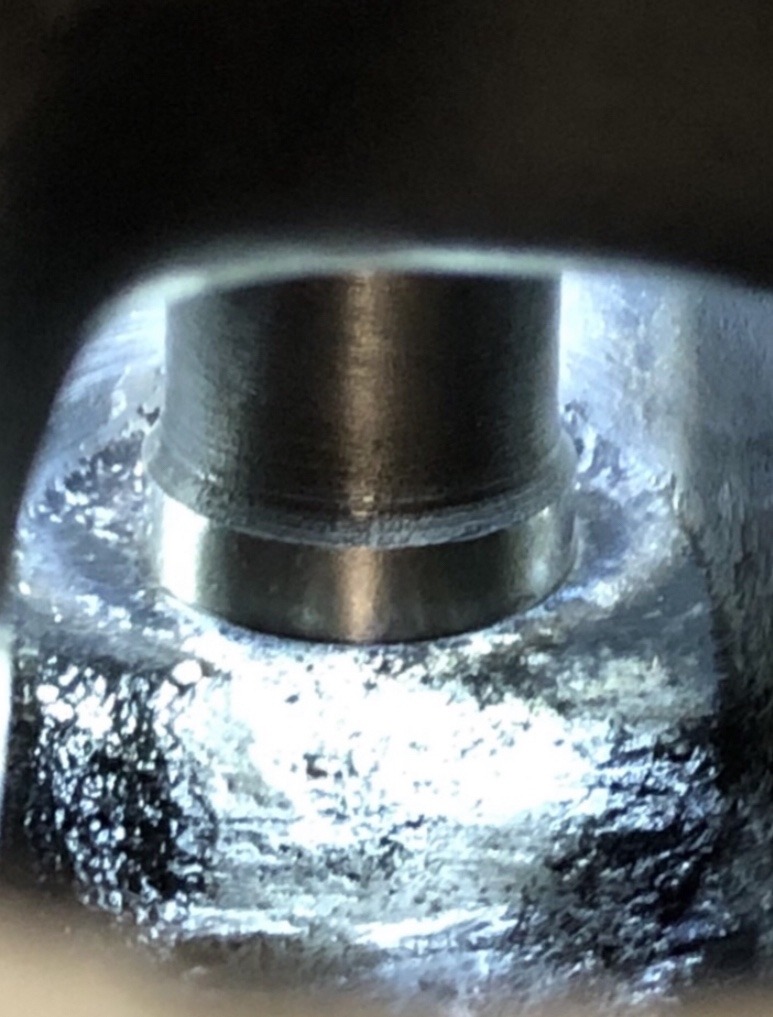
Looking at the guide in place, original & Modified guides.
In the spring I discovered my valves needed replacement as did the valve guides in my 1937 Hudson 212ci 6 cylinder Coupe. I soon found I could use 1938 & newer valves & guides to get a narrower valve stem. Old stem was 3/8” replacement stem 11/32” which was around a 20 gram weight savings on each valve. Definitely taking stress off the valve train being lighter weight plus better flow with narrower stems. A 3-angle valve job to the seats and a 30 degree backcut to the valve certainly will help too.
To the new guides I cut off the top 1/2” of each guide. For the exhaust guide it didn’t change the amount of contact with the stem since the top 1/2” was an oversized chimney which never touched the stem anyway. To the intake, yes I took 1/2” of the contact height off, plain & simple. I wasn’t worried since it’s going to be limited driving in a short Montana summer and with the stems not at an angle there’s no extra wear from that and quite frankly my very skilled machinist friend felt it was no problem doing a 2” guide. For all the nay sayers, my boy knows his flatheads, he has 10 Bonneville land speed records in a late 20’s 4 cylinder flathead engine & has built winning endurance race flatheads to complete in the 9000 plus mile Peking to Paris race plus many many flatheads for the street. As mom always said, “if you don’t have something nice to say then don’t say anything”
Bad valve:

Old guides:

Approximate 1” of guide in the intake & exhaust ports.

Initial cut with end spot faced,
height & shape vs old guide,
all guides done.


Original guide in top photo & modified guide in 2nd picture.


Looking at the guide in place, original & Modified guides.


0
Comments
-
Here are a couple more pictures of the work done on the 212 6 cylinder engine.
Valve seats before reworking them, pitted & only one 45 degree cut.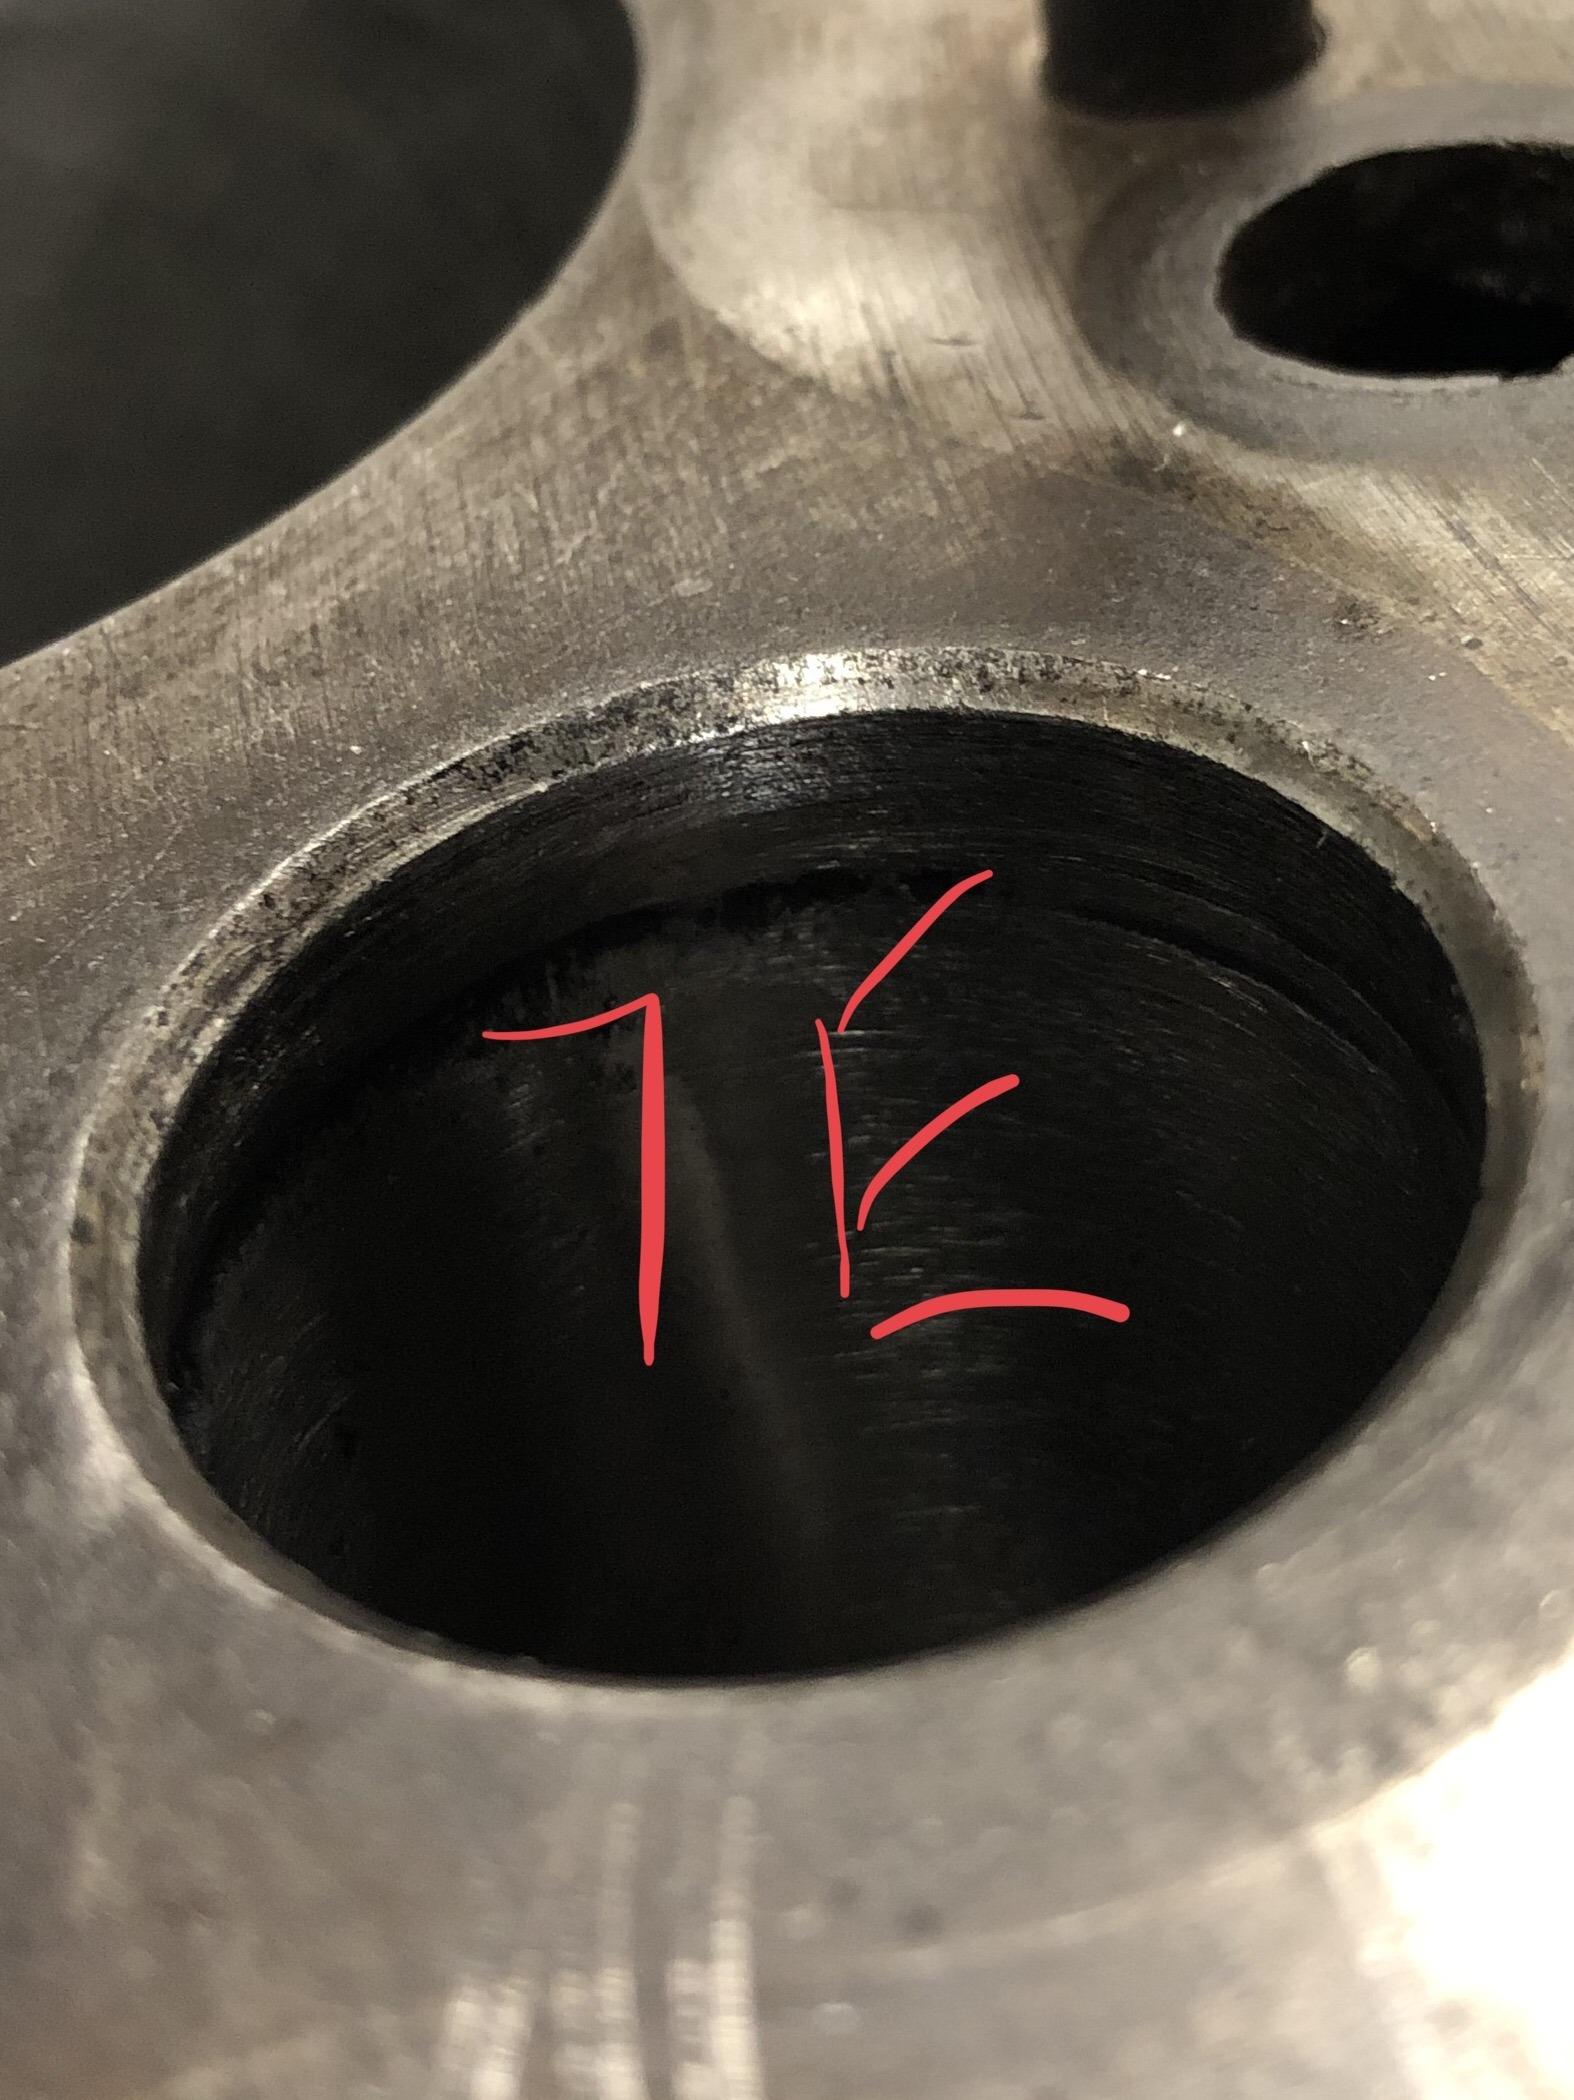
I bought a set of Neway seat cutters with 30, 45 & 60 degree cutters in a 1&1/2” size so I could cut the 8 cylinder’s intake seats in the future too. I found that cutting the 45 degree 1st to get the seats concentric to the new guides & remove pits, etc., worked best. I then followed that with the 60 degree throat cut until I got it up to the desired location on the valve face. Finally I did the 30 degree cut at the deck. This I did the 30 last as one wants to just give it a vey slight kiss on top, since airflow is best achieved on the flatheads if the 45 seat is closest to the deck. However on some seats I ended up doing more 30 degree cut than I wanted to because I had to put the contact width & placement on the valve in the correct spot after cutting more 45 degree to remove a few deep pits. If this was a full rebuild I’d deck the block to clean it up & get all the valves as close to the deck as possible. Ultimately using the 30 & 60 degree cutters improves airflow & helps prevent reverse flow of the exhaust back into the combustion chamber. However, they are a must when doing a proper valve job because they allow one to adjust the placement of the contact with the valve & the width of the contact on the valve. Doing this allows one to get the proper valve to seat width & keep from burning valves.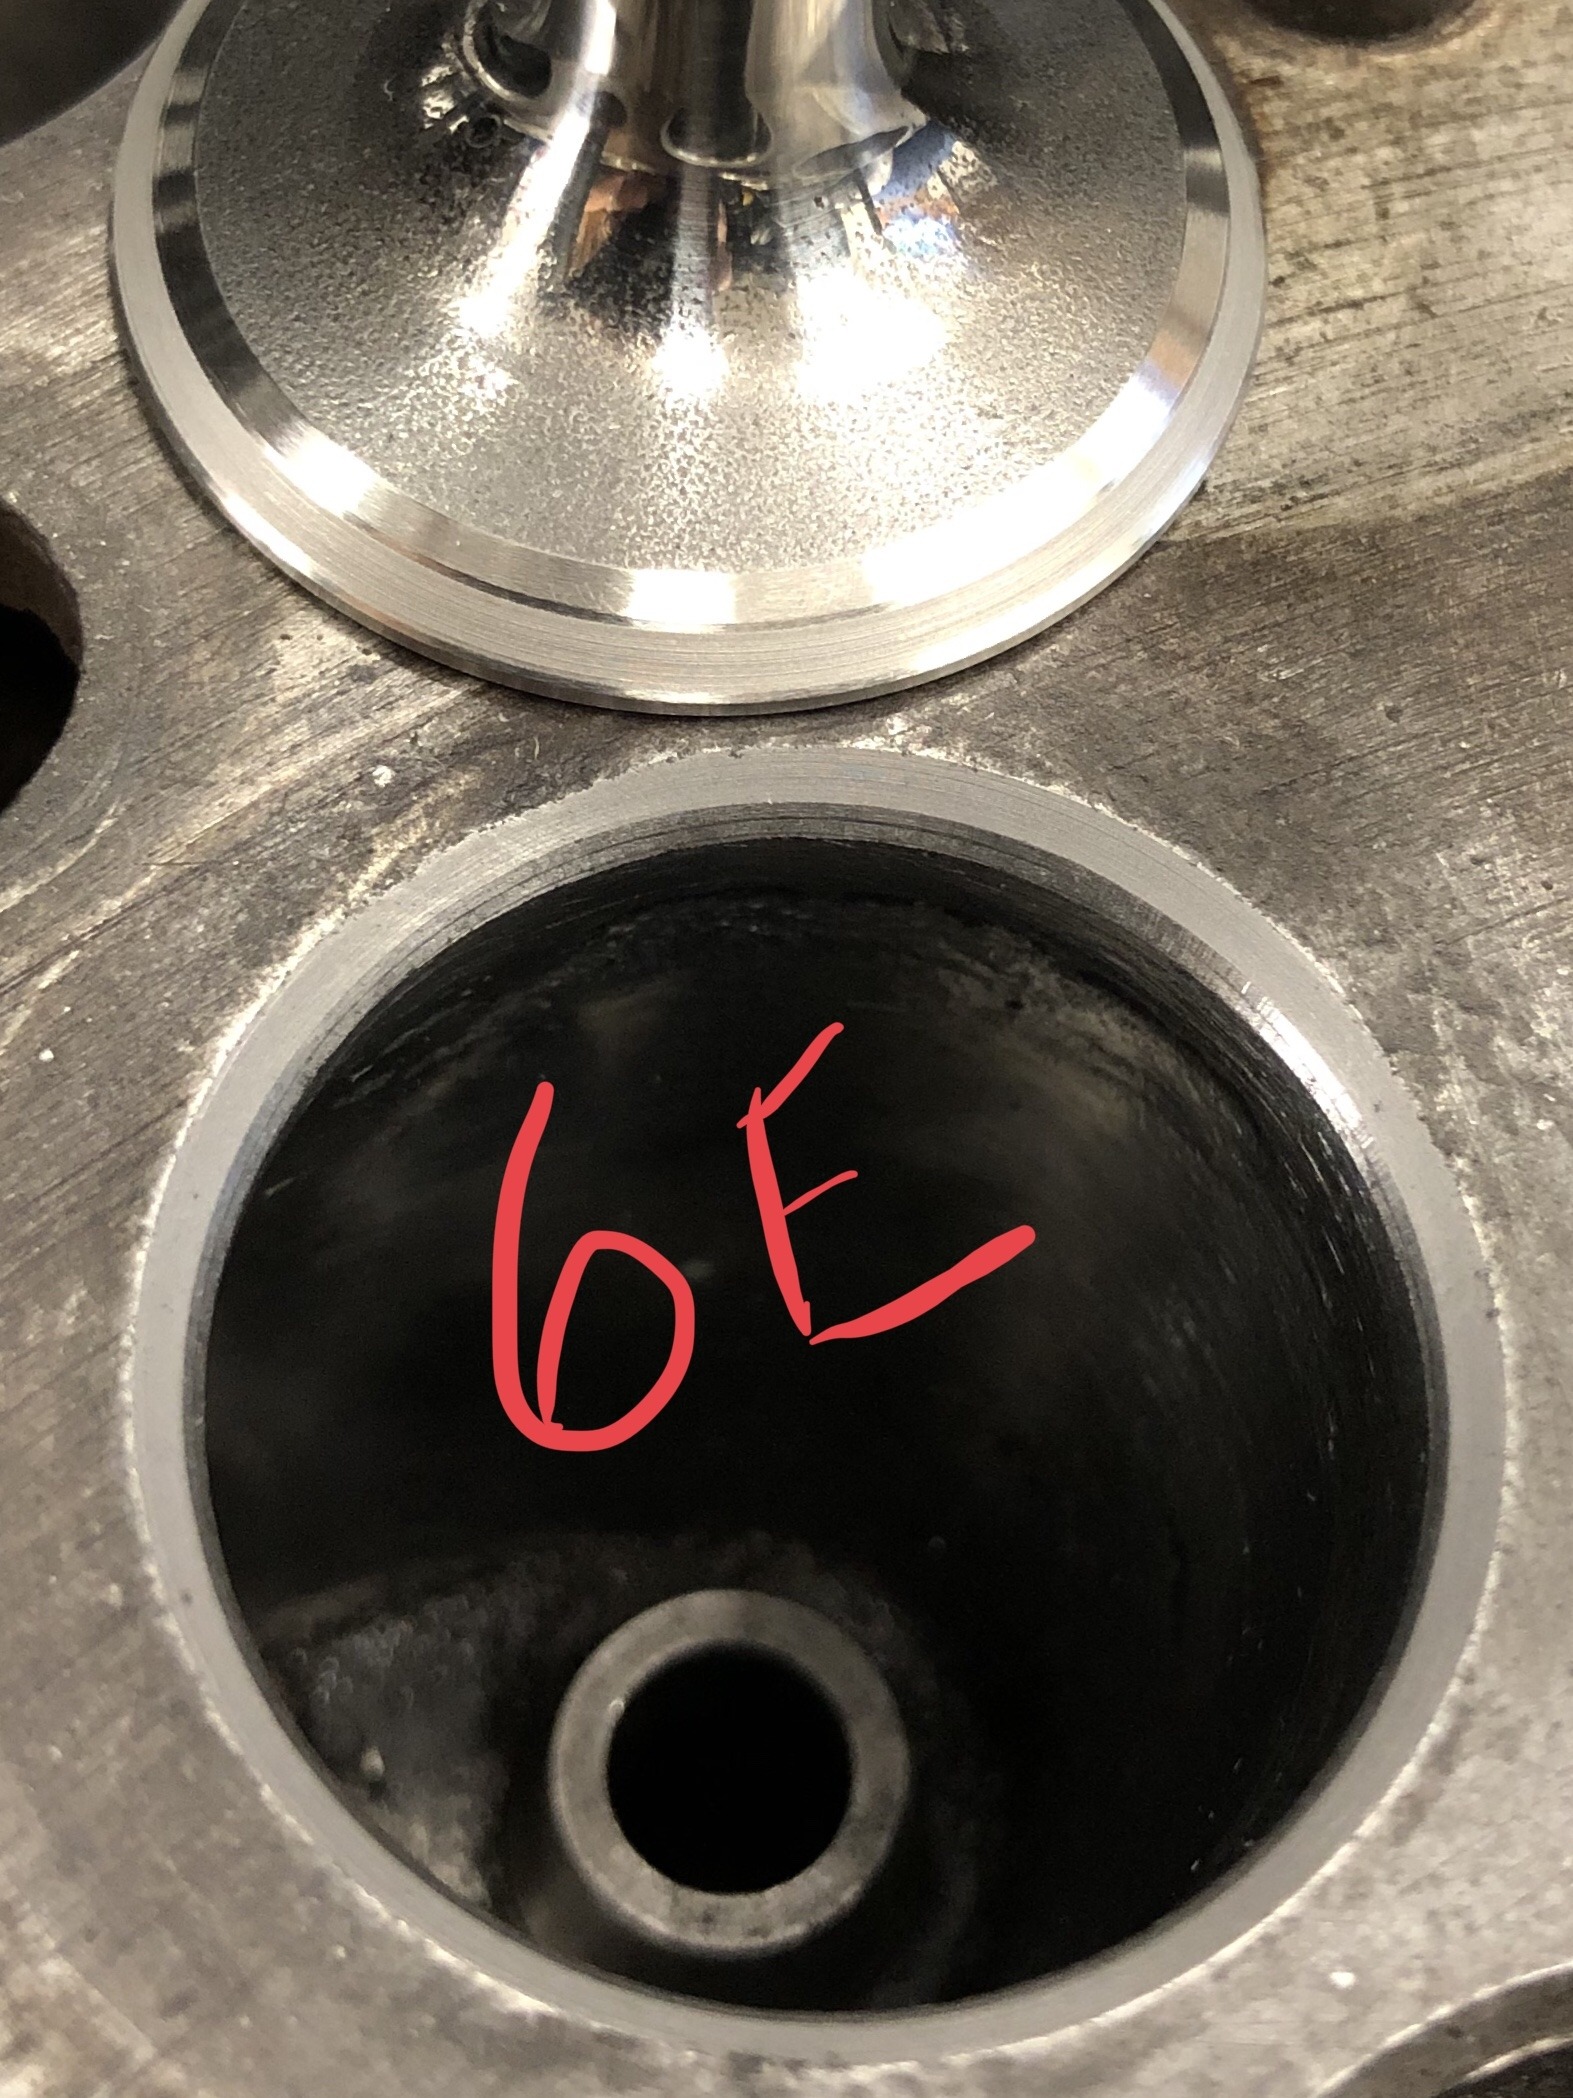
When working to achieve the valve seat to valve face placement & width I tried numerous ways to find where the contact was occurring on the valve face. In the end I preferred using a big fat black sharpie. It would adhere well enough to really see the actual seat placement on the valve face unlike a dry erase marker that came off too easily & gave incorrect feedback. Dykem held on too well to spin the valve in place & get it to come off as needed. However after I felt the valve to seat placement & width were where I wanted them, I would use dykem on the valve face with some lapping compound & hand lap. This way it was very visible exactly where & how wide the contact was between the valve & seat.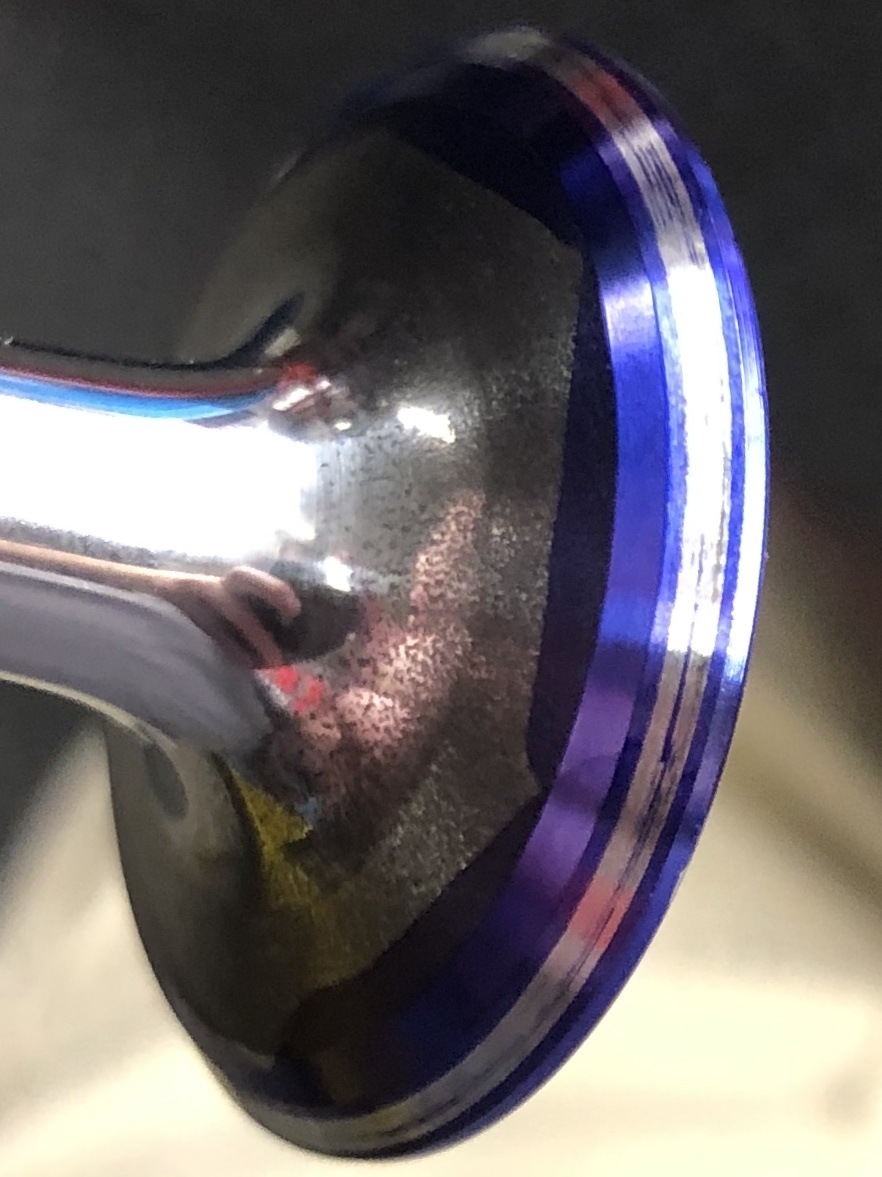
Heres a picture of the 30 degree backcut on an intake valve, it's the cut angle closest to the stem. This was also done on the exhaust valve.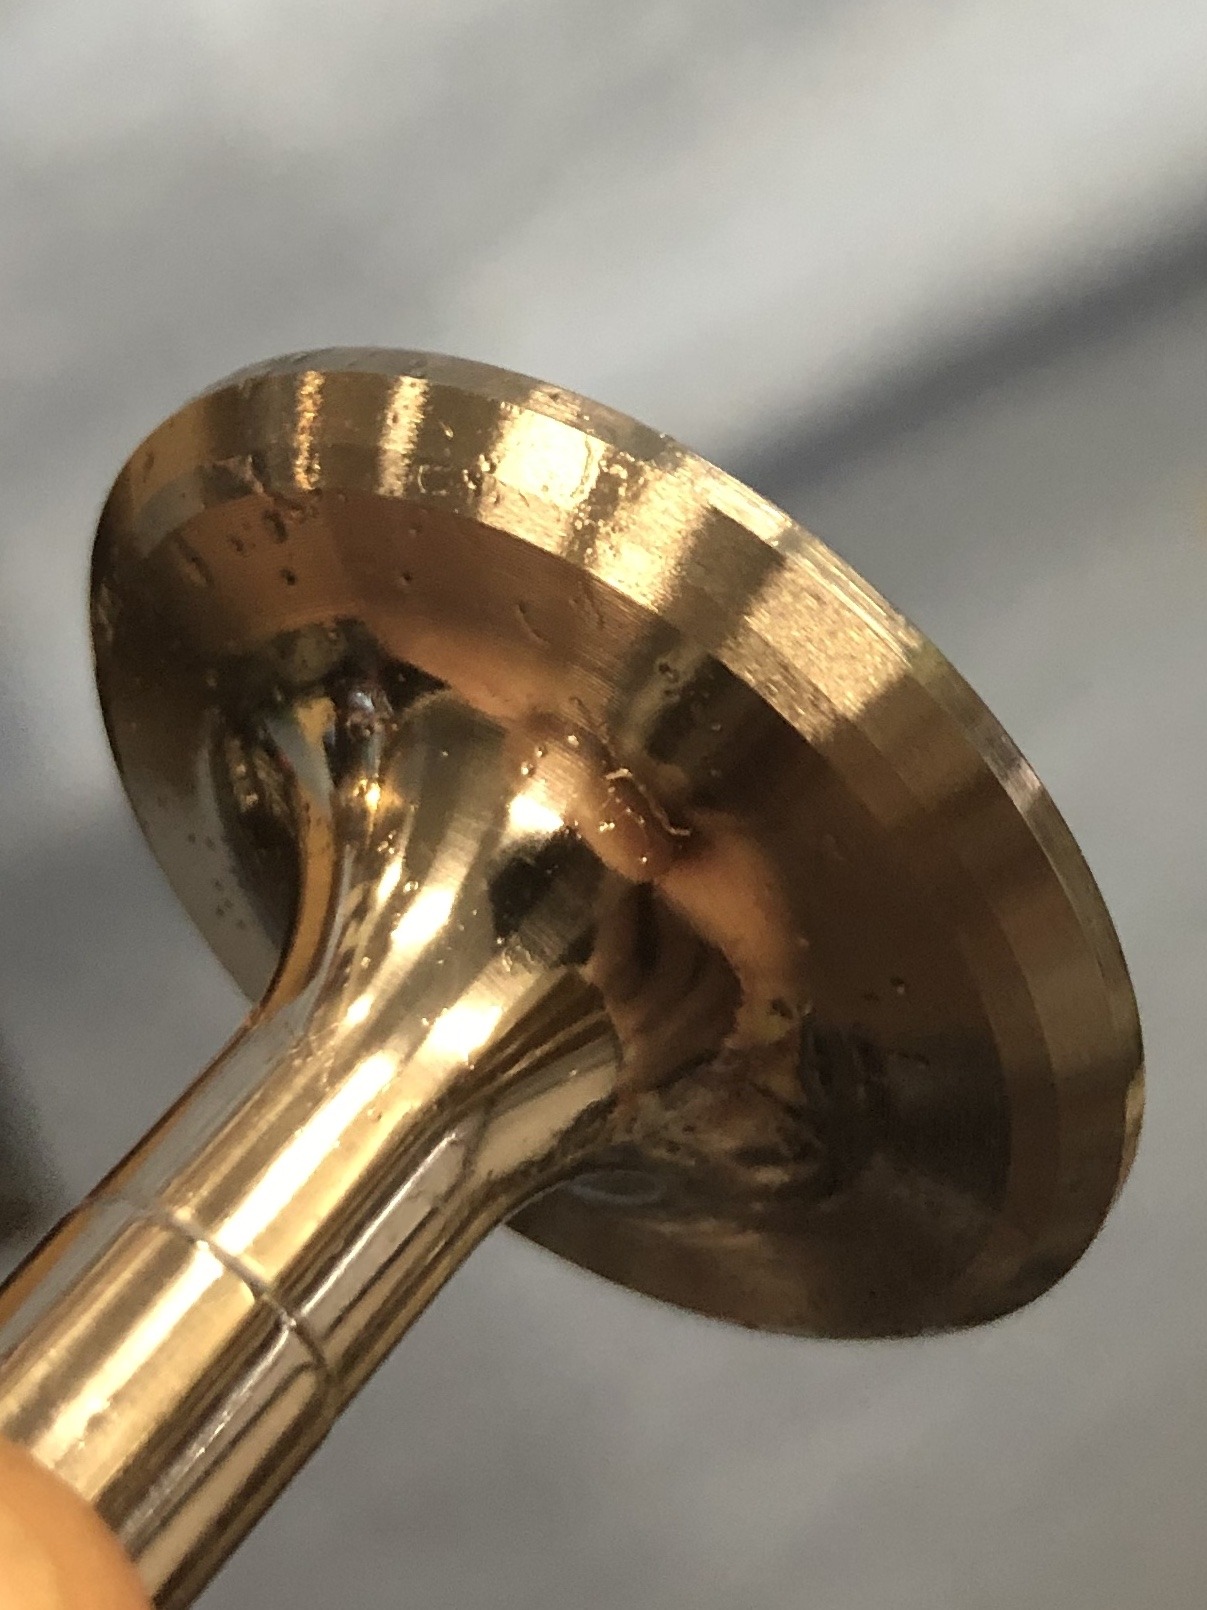
0 -
Nice write up - Thank you! The new guide installation looks great - and will certainly help with airflow!
I've had a similar experience with Dykem. last couple of valve grinds have been by Sharpie as well. I felt like I was cheating (Dad told me I was - he's a tool and die guy, and that can has been a go-to for over 50 years) so it's nice to see someone else doing it.
Your valves and seats look good good, too! The velocities are highest right at the seat, so that 3 angle job does indeed add power. Please let us know how the engine runs afterwards!
0 -
Great write up and how to. Looks great!!! Thanks for posting this!0
-
Will be interesting to see how your engine stands up in the long run, and whether the theoretical increase in performance takes place. I could see major benefits in a high spinning short-stroke motor, but have my doubts about the benefits in a low-revving long stroker. One thing to consider with the shorter guides is valve cooling, and build up around the stems. Be keen to hear the end result eventually.0
-
Design conditions for valves are at the lip of the valve, and the greatest amount of heat transfer occurs when the valve is on the seat. Yes, the valve guide does absorb some heat, but it's keeping the lip cool which prevents burning and losing a valve head.Geoff said:Will be interesting to see how your engine stands up in the long run, and whether the theoretical increase in performance takes place. I could see major benefits in a high spinning short-stroke motor, but have my doubts about the benefits in a low-revving long stroker. One thing to consider with the shorter guides is valve cooling, and build up around the stems. Be keen to hear the end result eventually.
As for the stem, buildup is possible. A Ford Flathead runs a fairly deep valve pocket and none of the valve guide protrudes into the port. They're not know for valve issues, rather heat cracking the siamesed center port exhausts into the cylinder bore.
0 -
Chuck is correct, from everything I’ve read on cooling of the valves, it’s said that approximately 75% of the cooling occurs through the valve seat to the block and 25% through the valve stem to the valve guide then to the block. Of course the block is then cooled by the radiator fluid flowing through the block. Thus having the proper valve to seat contact width (0.060 to 0.080 for exhaust & 0.040 to 0.060 for intake - as a general rule) and placement in the middle of the 45 degree face of the valve is so crucial for cooling of the valve, otherwise a burnt valve can occur particularly an issue with the exhaust valves. Intake valves have the benefit of cool fresh air flowing around them into the combustion chamber to help aid in cooling thus they don’t need as wide of a contact width.
To get the proper valve to seat contact width & placement, one truly must do a 3 angle valve job, with the top 30 degree cutter & bottom (throat) 60 degree cutter. Through the use of the 30 & 60 degree cutters one can narrow the width & move the placement of the seat contact on the valves 45 degree face.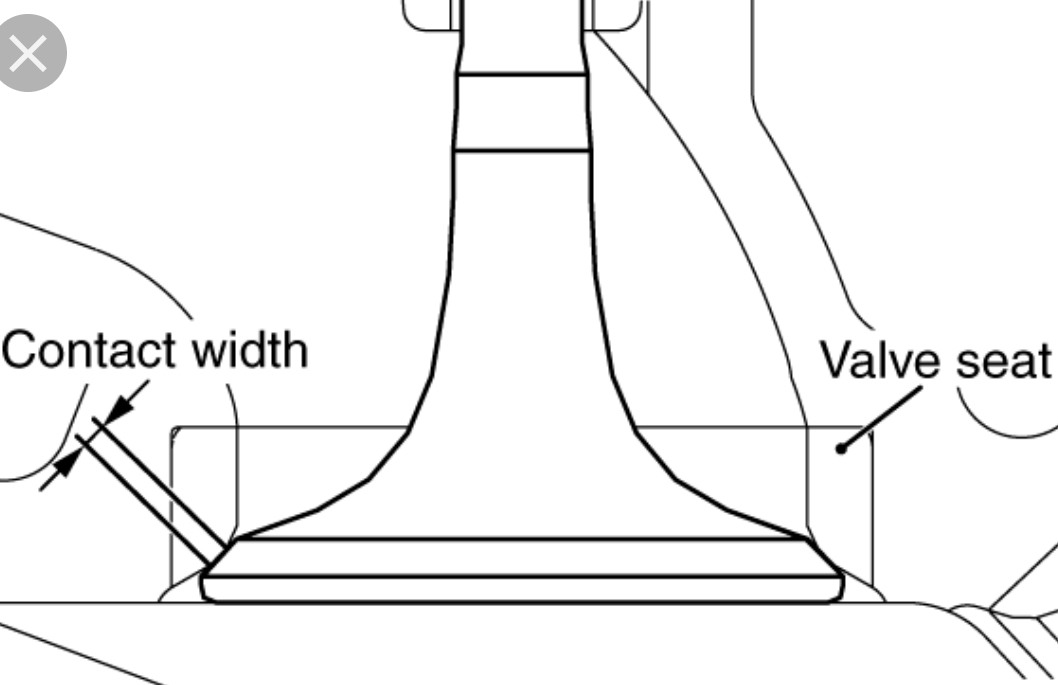
Mathematically looking at the original valve guide length of approximately 2.5”, by reducing the length by 0.5” I’ve shortened the guide by 20%. So now let’s say I’ve removed 20% of the 25% of cooling through the valve guide, there would be a theoretical 5% total loss in heat reduction through the valve guide.
To be fair though, I could see one arguing that in reality the heat reduction loss is less than 5% because the heat is still transferred to the block through the same contact area of valve guide to block. Likewise, I could see it argued that the effect is greater as well. Overall, if one even goes with the theoretical change of 5%, it would seem to “me” to be acceptable, others may see it differently. The biggest concern to me was possibly wearing out the guide or valve sooner because I’ve reduced the surface contact area by 20%. So if I figure a theoretical 20% reduction in life, well I’m still ok with that.
I also spoke to quite a few Ford flathead engine builders concerning the mods they do to those engines. Very little of the valve guides in the flathead Ford engine even enters the ports to begin with but they still taper that which does. Here’s a photo of the tapering of their guides: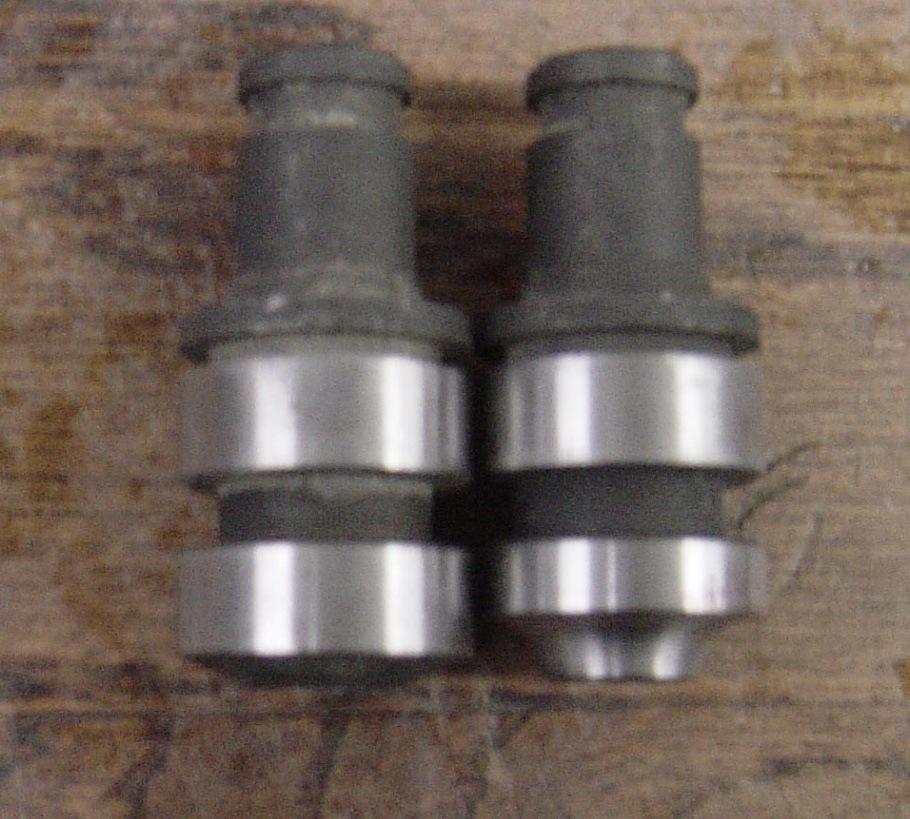
0 -
Mine were flush with the port in the 8BA I dressed out as a 59A. There wasn't anything worth tapering, so I left mine alone. Truth be told, the part of the guide which protrudes does very little cooling, as it's heated by the exhaust gas. Close inspection of a worn guide and valve stem will often reveal coking in the section in the port, as temps exceed design limits of oil. In reality, the 5% reduction is less - more like 1 or 2%. I'd have to dig up my heat transfer math to tighten up that number, and it's a complex calculation involving the specific heat of the guide and LMTD between the surface temp of the block where the guide makes contact and the surface temp of the valve stem immediately above the valve. LMTD stands for Log Mean Temperature Differential, and LMTD determines rate of heat transfer.BigSky said:Chuck is correct, from everything I’ve read on cooling of the valves, it’s said that approximately 75% of the cooling occurs through the valve seat to the block and 25% through the valve stem to the valve guide then to the block. Of course the block is then cooled by the radiator fluid flowing through the block. Thus having the proper valve to seat contact width (0.060 to 0.080 for exhaust & 0.040 to 0.060 for intake - as a general rule) and placement in the middle of the 45 degree face of the valve is so crucial for cooling of the valve, otherwise a burnt valve can occur particularly an issue with the exhaust valves. Intake valves have the benefit of cool fresh air flowing around them into the combustion chamber to help aid in cooling thus they don’t need as wide of a contact width.
To get the proper valve to seat contact width & placement, one truly must do a 3 angle valve job, with the top 30 degree cutter & bottom (throat) 60 degree cutter. Through the use of the 30 & 60 degree cutters one can narrow the width & move the placement of the seat contact on the valves 45 degree face.
Mathematically looking at the original valve guide length of approximately 2.5”, by reducing the length by 0.5” I’ve shortened the guide by 20%. So now let’s say I’ve removed 20% of the 25% of cooling through the valve guide, there would be a theoretical 5% total loss in heat reduction through the valve guide.
To be fair though, I could see one arguing that in reality the heat reduction loss is less than 5% because the heat is still transferred to the block through the same contact area of valve guide to block. Likewise, I could see it argued that the effect is greater as well. Overall, if one even goes with the theoretical change of 5%, it would seem to “me” to be acceptable, others may see it differently. The biggest concern to me was possibly wearing out the guide or valve sooner because I’ve reduced the surface contact area by 20%. So if I figure a theoretical 20% reduction in life, well I’m still ok with that.
I also spoke to quite a few Ford flathead engine builders concerning the mods they do to those engines. Very little of the valve guides in the flathead Ford engine even enters the ports to begin with but they still taper that which does.
On a side note, I designed a dual circuit cooling system for a turbocharged offshore racer. 180 degree coolant in the block, twelve degrees over ambient water temp in the head. 180 maintained proper piston to cylinder clearance, and the low temp coolant in the head reduced the surface temp of the combustion chamber, minimizing preignition at elevated boost levels. It was a 352 inch Chevrolet big block custom cast at the Detroit foundry, and we tested it at McLaren Engines in Livonia, MI. It ran flat out for hours on end making 1000 HP at about 22# of boost. We had an A/F ratio computer fail at WOT and the engine lasted only a few seconds before it grenaded, sticking chunks of the block into a cinderblock wall. The only recognizable bit of the engine was the crank flange. The year was 1988, if I recall correctly.
0 -
Good to see a technical discussion on optimising our engines. I know from the the simple work I did on my 212 the results were quite astonishing. I'm very interested in Bigsky's final compression ratio using the high compression 112 head and his work on the optimum squish clearance. I would think that the ignition advance curve will need to be reworked on a chassis dyno to get the most out of the increased efficiency and ensure no destructive detonation is occurring.
One easy task with the valve gear open now would be to look at reprofiling the cam follower radius to optimise the valve timing duration. Not sure though whether further improvement is possible on these later engines but in the earlier engines it was. If there is a groove worn in the followers that could suggest the tip of the cam may be a bit reduced so I would check cam lift against specs to be sure you're not losing any precious lift.
I'm interested on thoughts on using a 1/2" versus a 3/8" plug. I used the former with great results as otherwise the plug tip was recessed significantly in the spark plug hole.0 -
Yes indeed, an advance in the distributor would be very welcome as I don’t believe my 37 has that in it. I’m hopeful to find a chassis dyno somewhat local to me, it would definitely be key in maximizing the power!
Here’s what my lifters looked like, cleaned & then re-lubed with engine assembly before I put them back. They were in good shape, this was the worst one. & the cam lobes looked good too. Although I’m fighting the desire to put a cam in it as I write this! I marked the two parts so I could put them back in the way they came apart & the correct location too.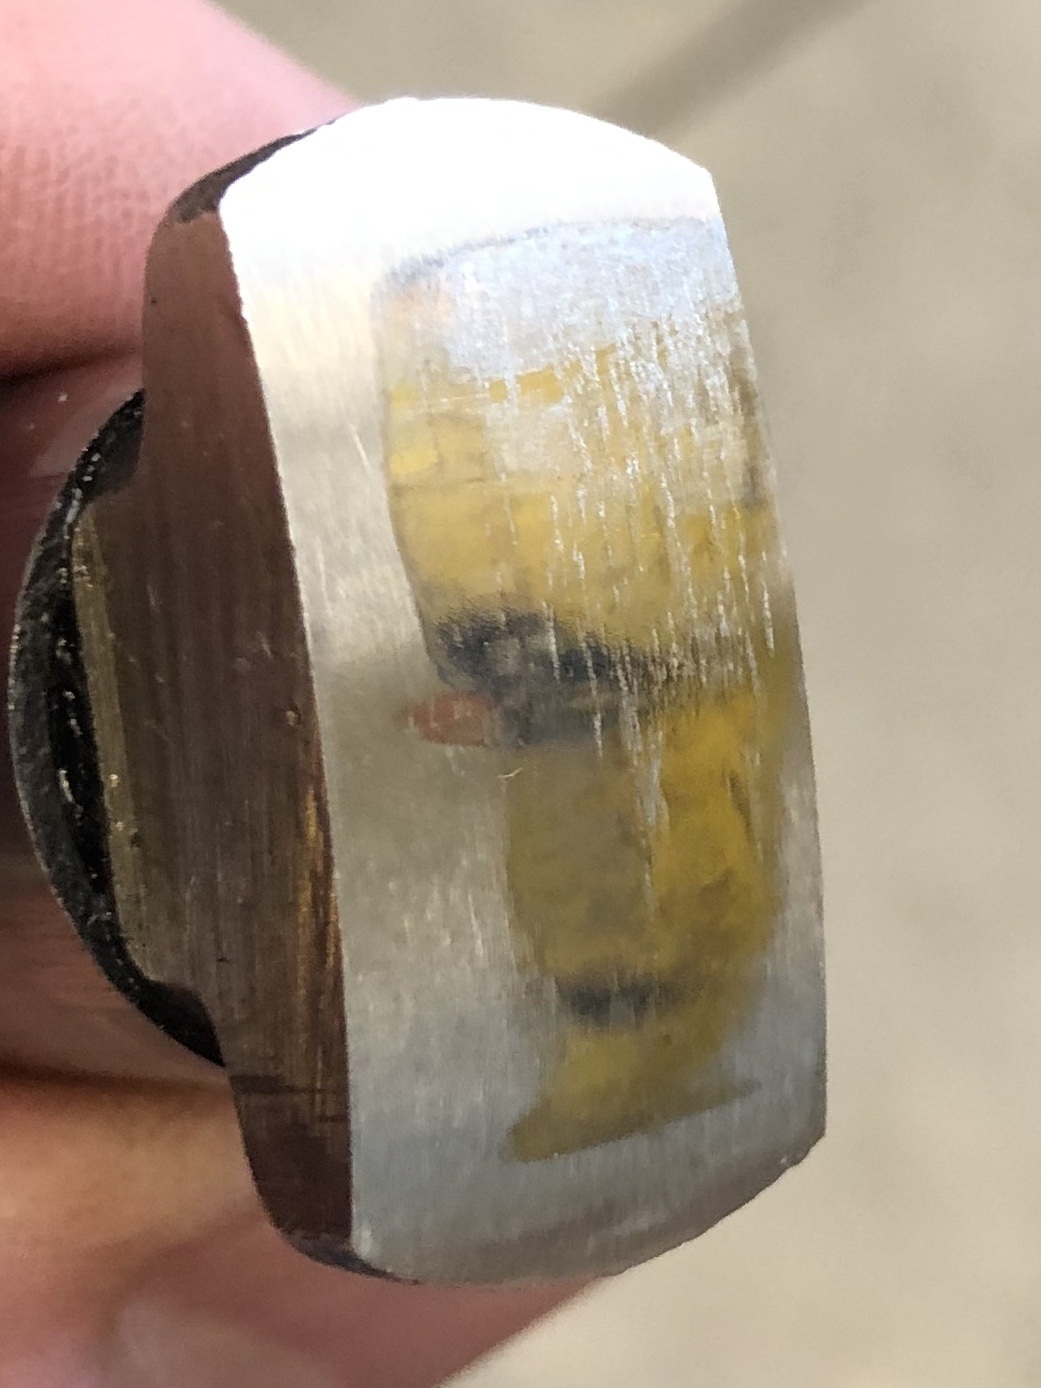
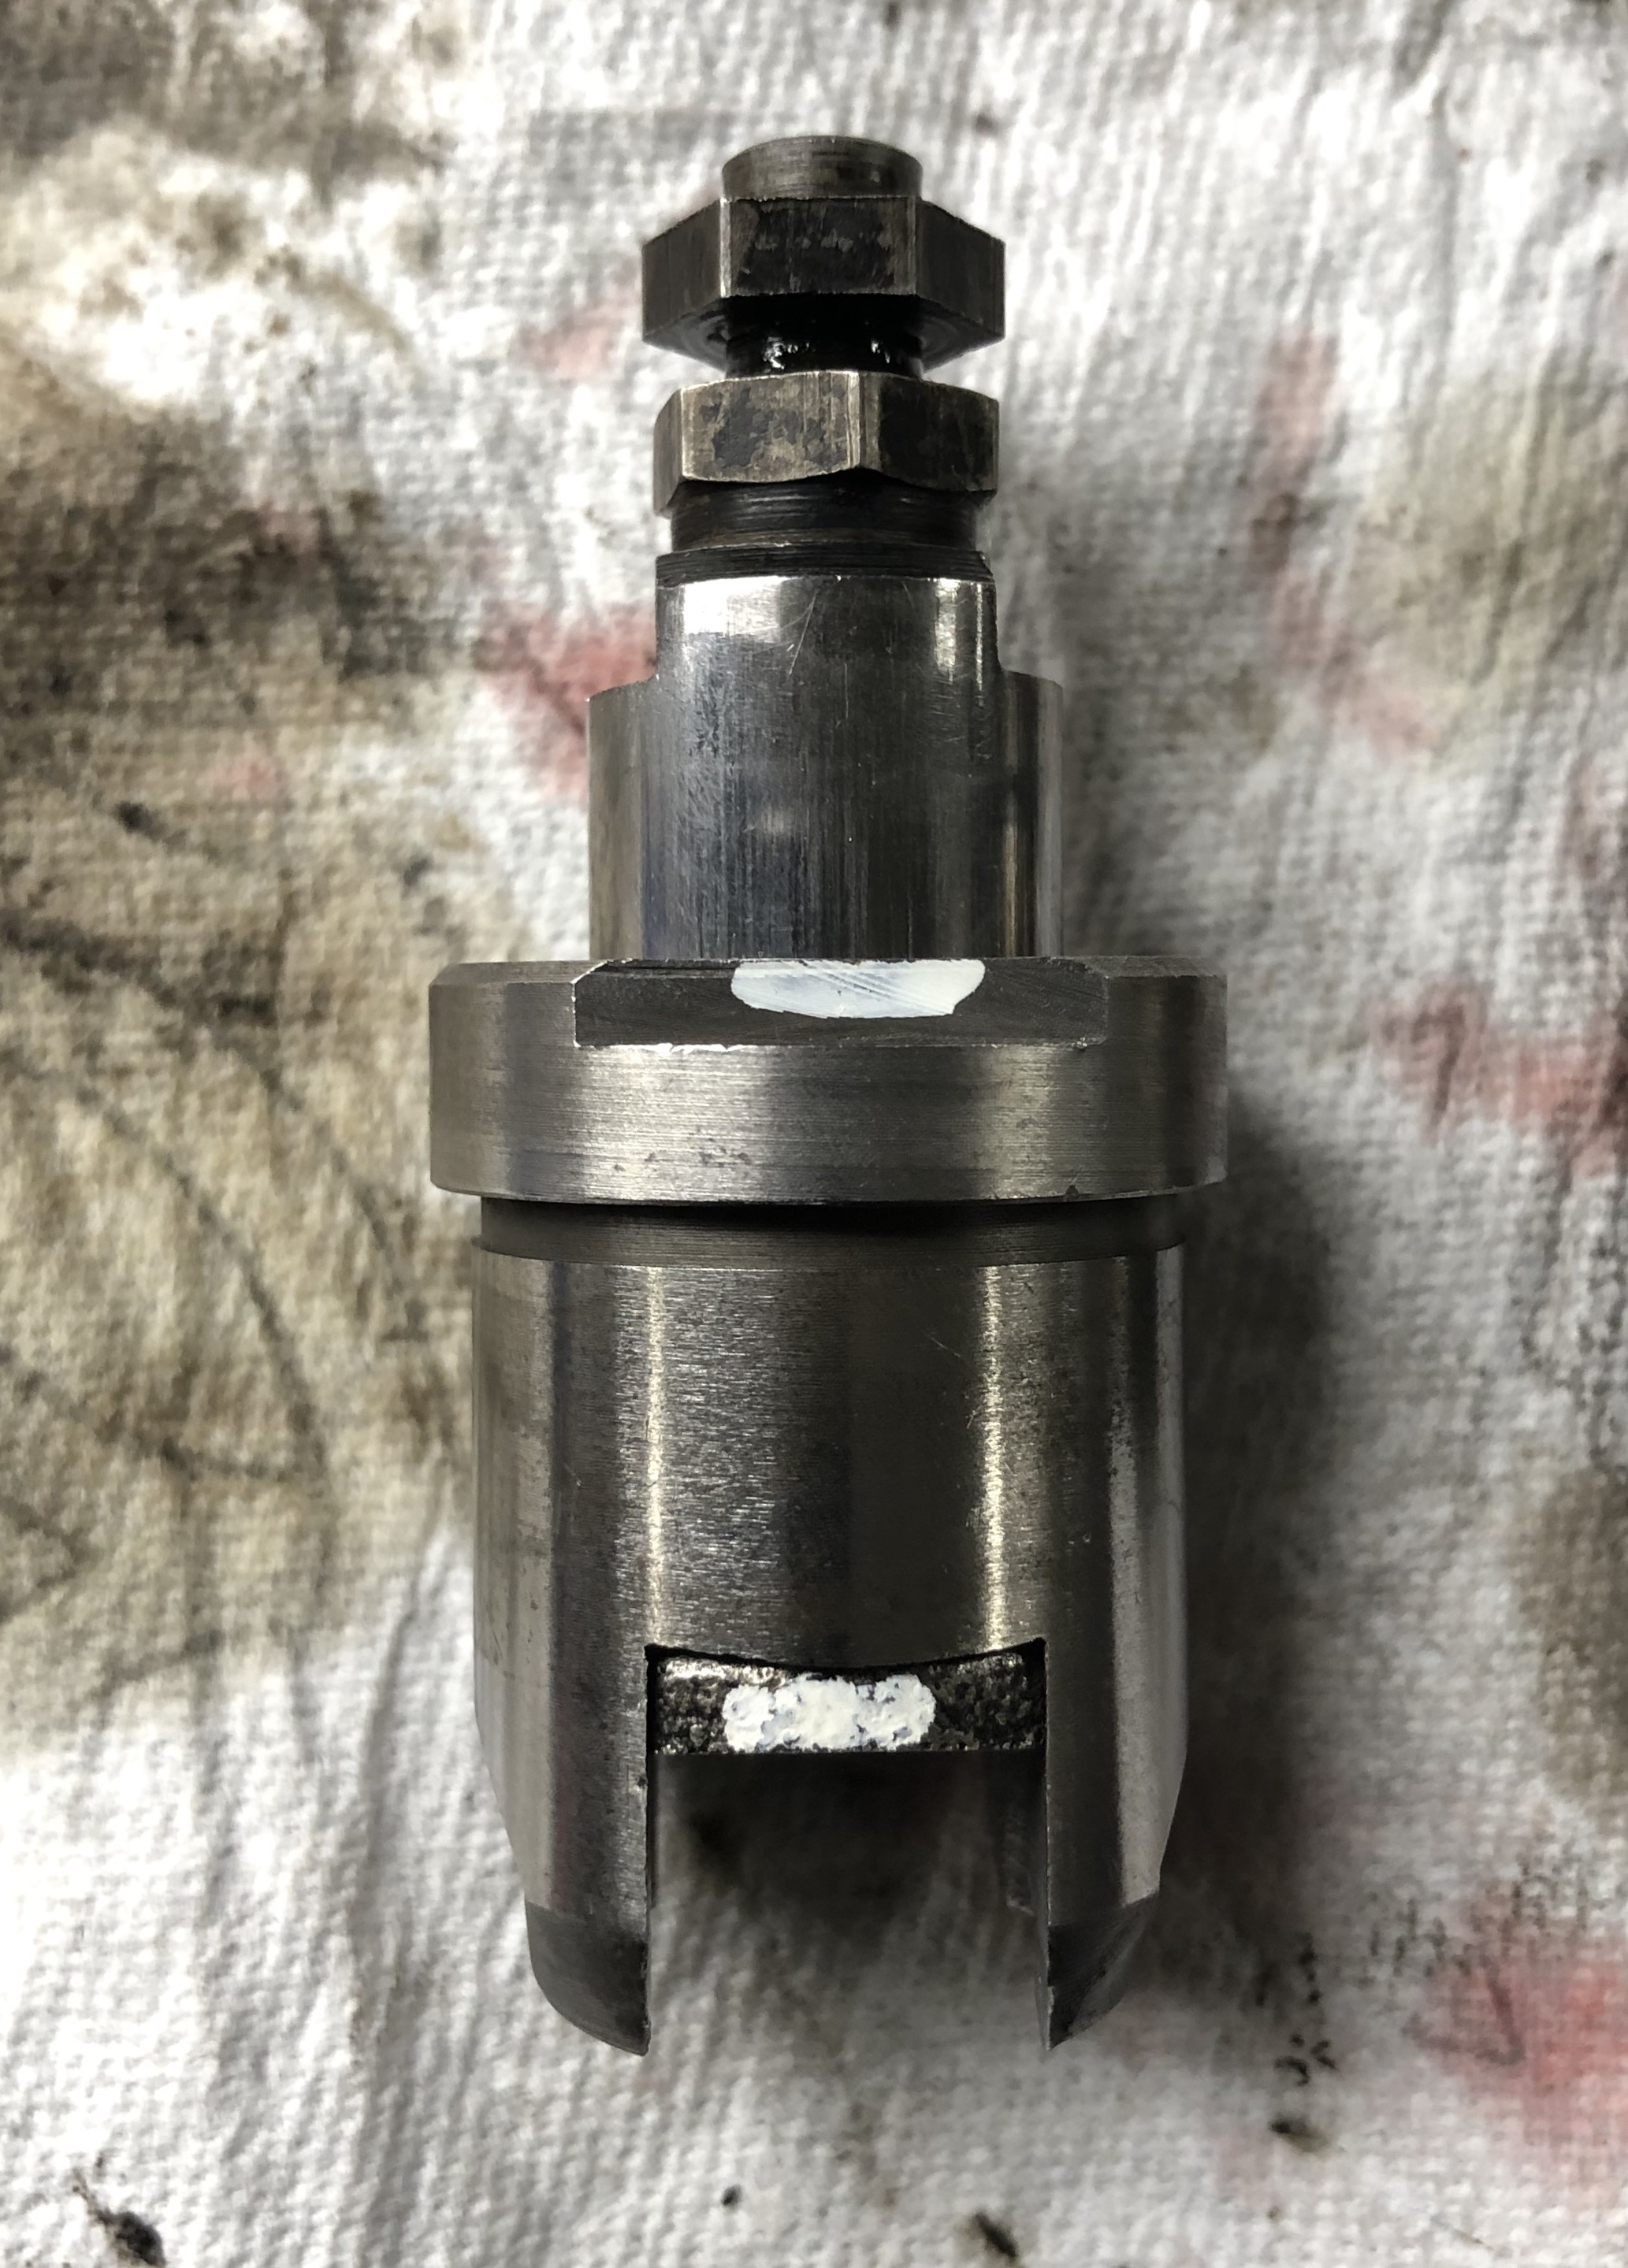
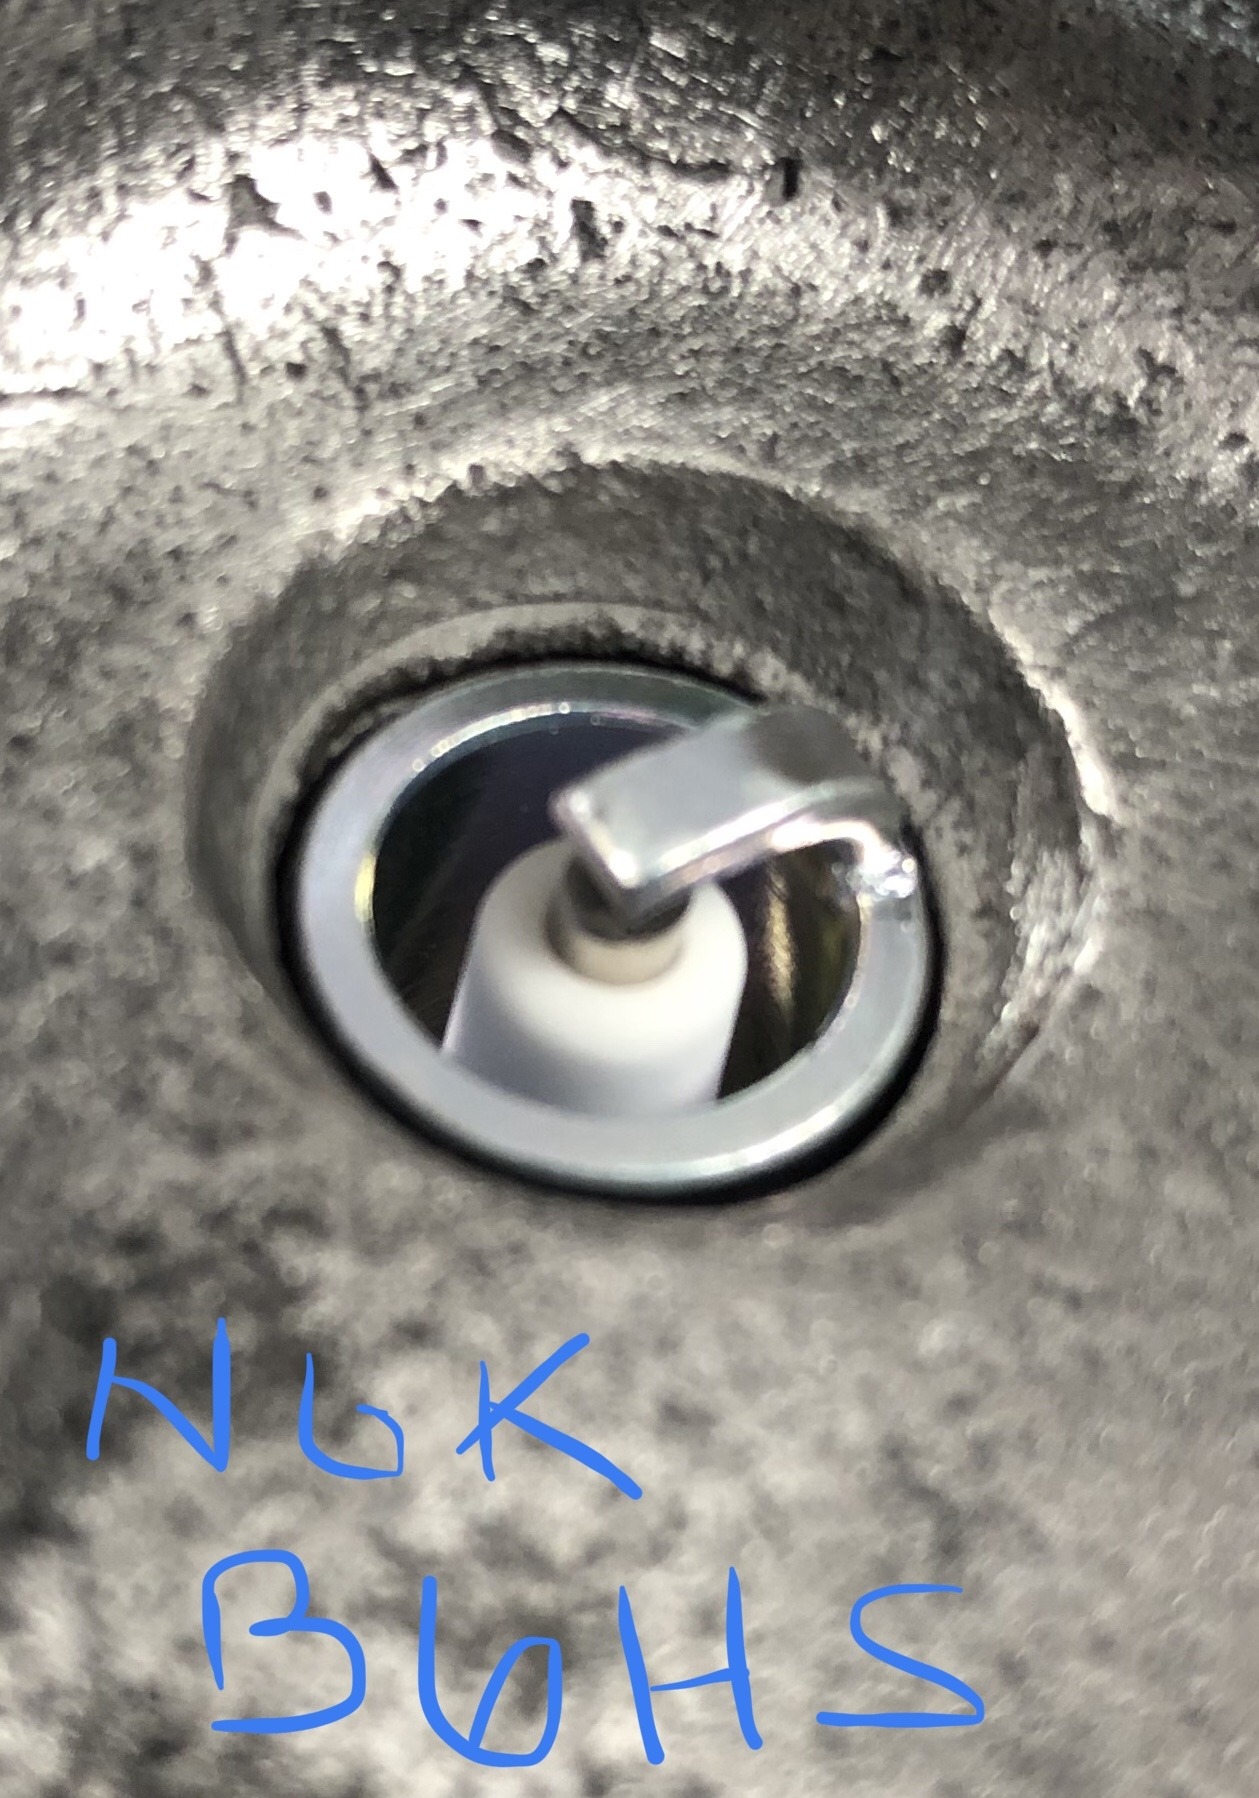
Spark Plugs.... ah yes those hidden little buggers! Until I removed the head I had no idea how recessed they were. You may recall I did a little write up on the factory 3/8 vs two NGK’s I’d found as possible upgrades. Unfortunately the one I was going to use with the protruding tip is just too long & id only have 0.023 of space between it & the valve at full open. Thus I’m going to go with the non protruding 1/2” plug which I believe is the one you are using, NGK B6HS. I’m not sure I shared this before so forgive me if I have already.... I took a 7/8” drill bit that had a pretty flat head & used it to in shroud the plug. Even though the threads of the 1/2” plug now cover up all the threads of the head (ideal situation), I still wanted to open things up some more & since I am upgrading to the 175 head I had compression to spare. Here’s a couple pictures on this:
Its hard to see it but the stock plug is actually in the hole below! Definitely not a good situation as it will slow flame propagation, one of the design problems of the long chamber Side valve engine.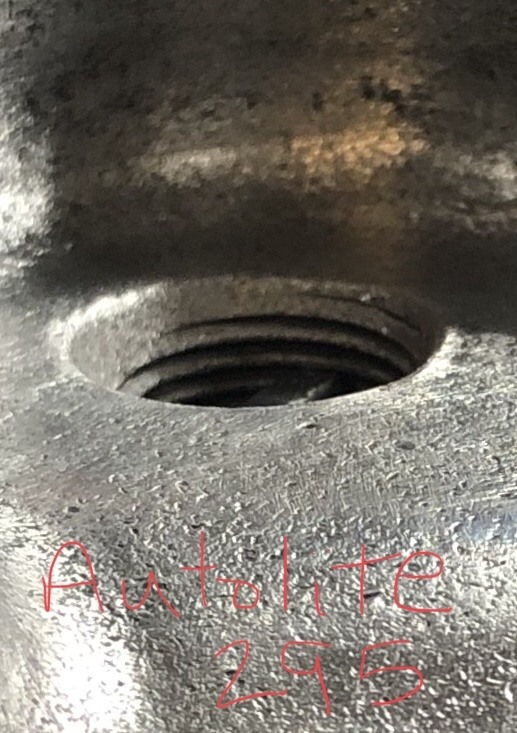
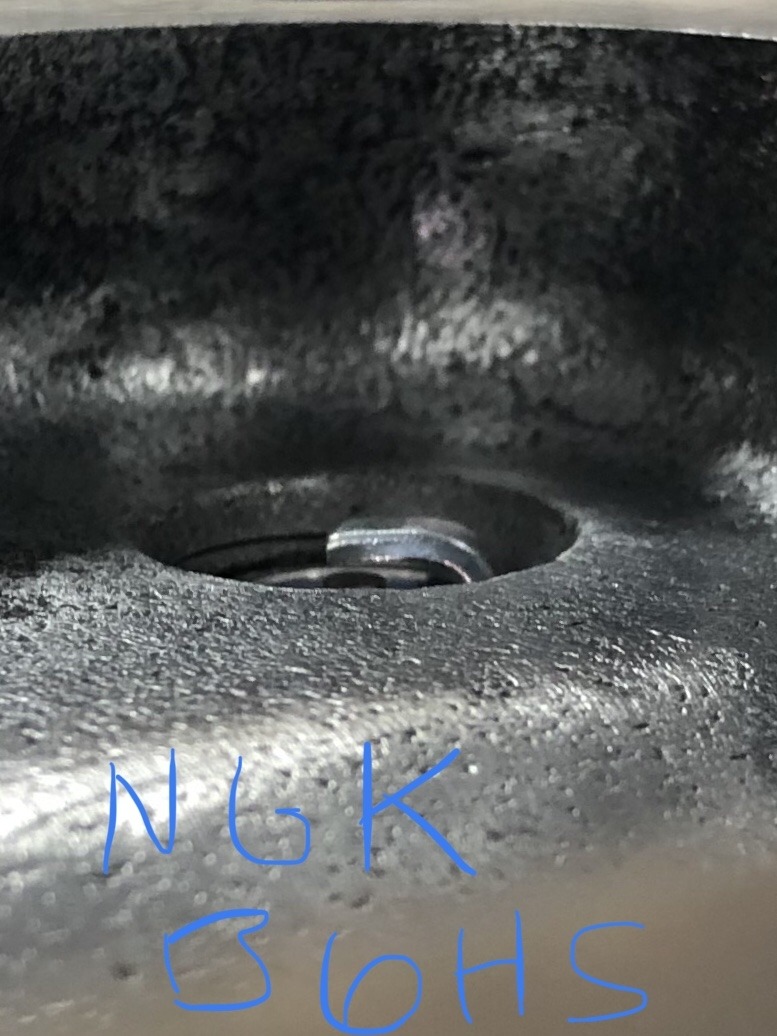
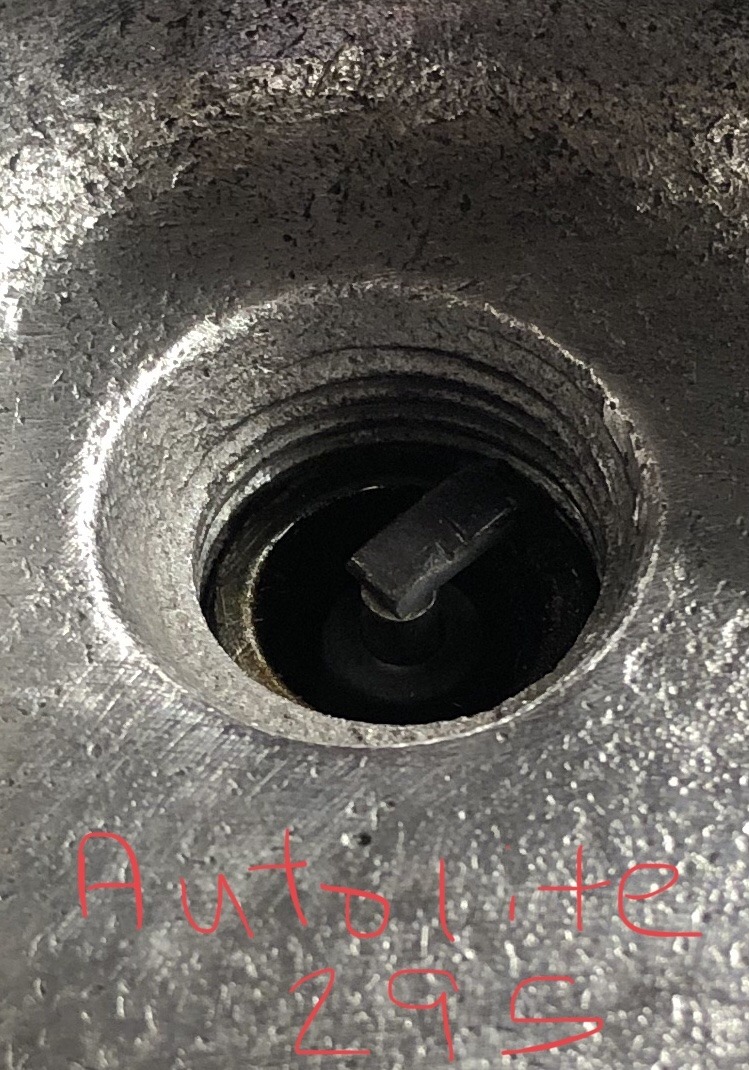
Here is the un-shrouding I did. The “original size” autolite 295 plug (3/8”) in place: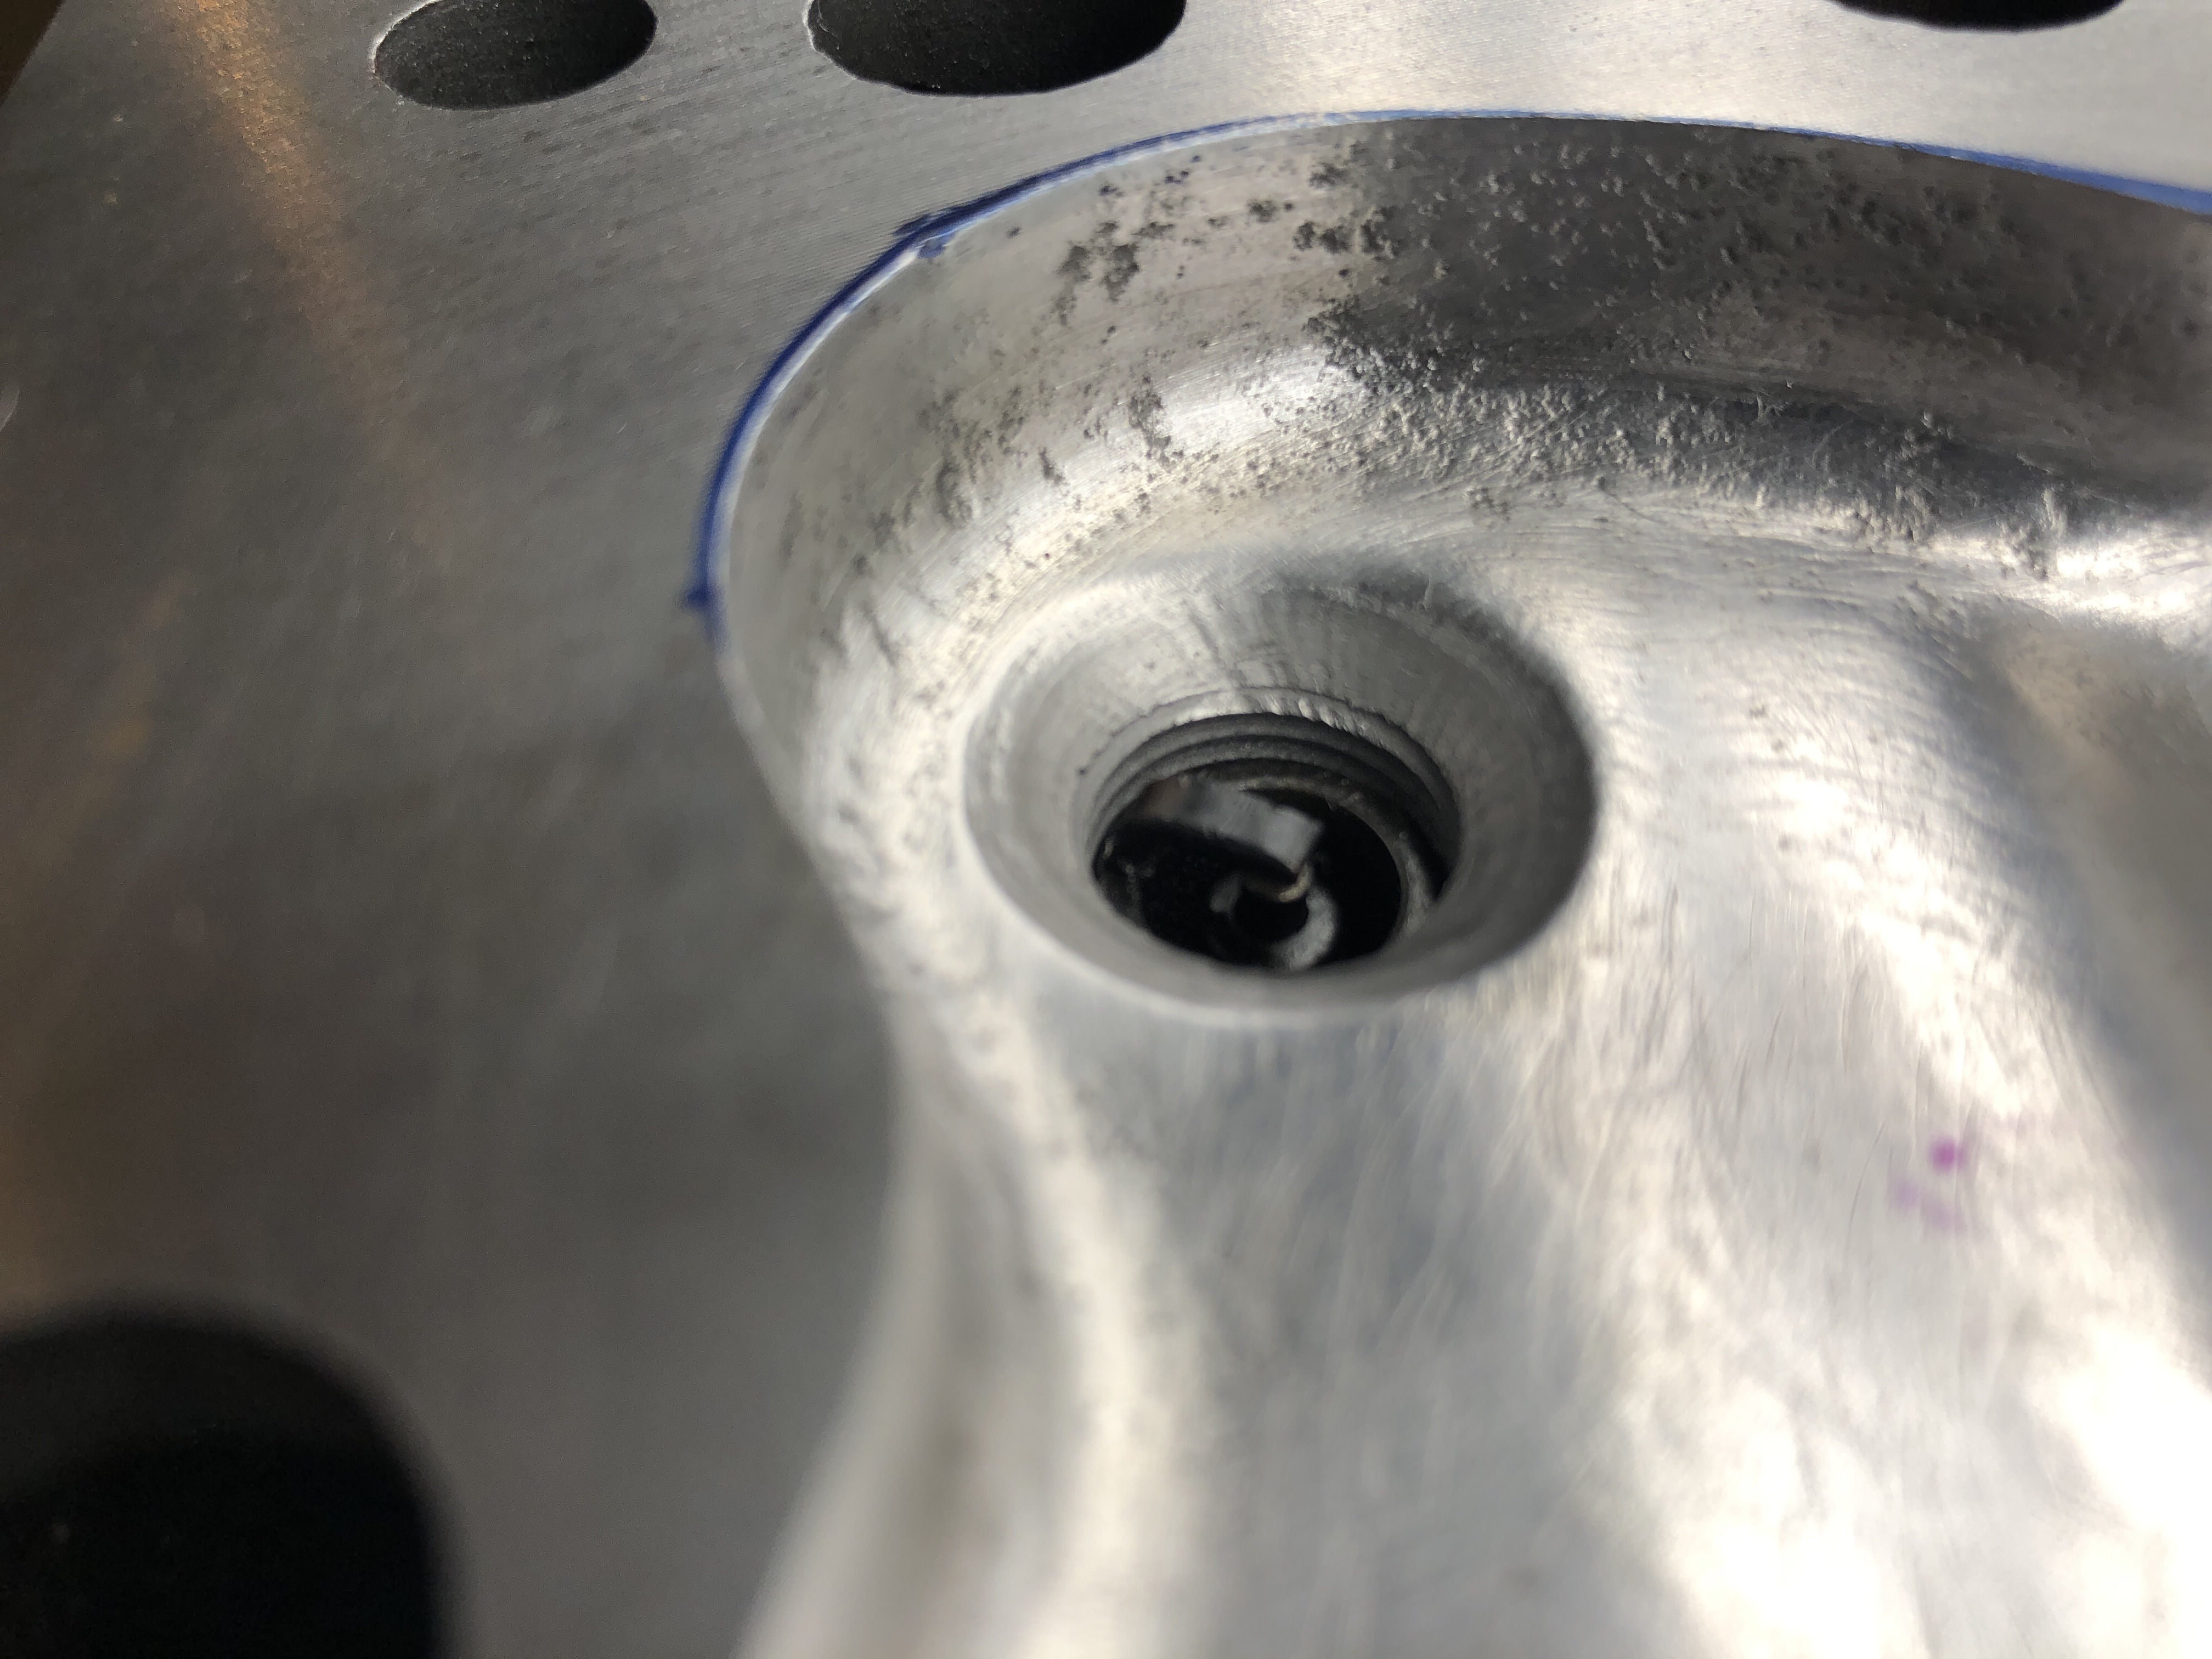
Heres with the 1/2 shank of threads, it is the perfect fit for covering up the heads threads completely. Doing the 1/2 depth moves the spark into the chamber where it should be & eliminates the risk of hot spots on the threads & subsequent pre-detonation. Shown below is the longer protruding tip plug (NGK BP6HS) that I “wont be using” with this 175 head. (That plug could be used on a stock 212 head with lots of room to spare.). However since the threaded portion (1/2” reach) will come to the same point as the one I will actually use (NGK B6HS), you at least get the visual idea. On the B6HS plug the tip just won’t protrude as this one does but be standard tip length.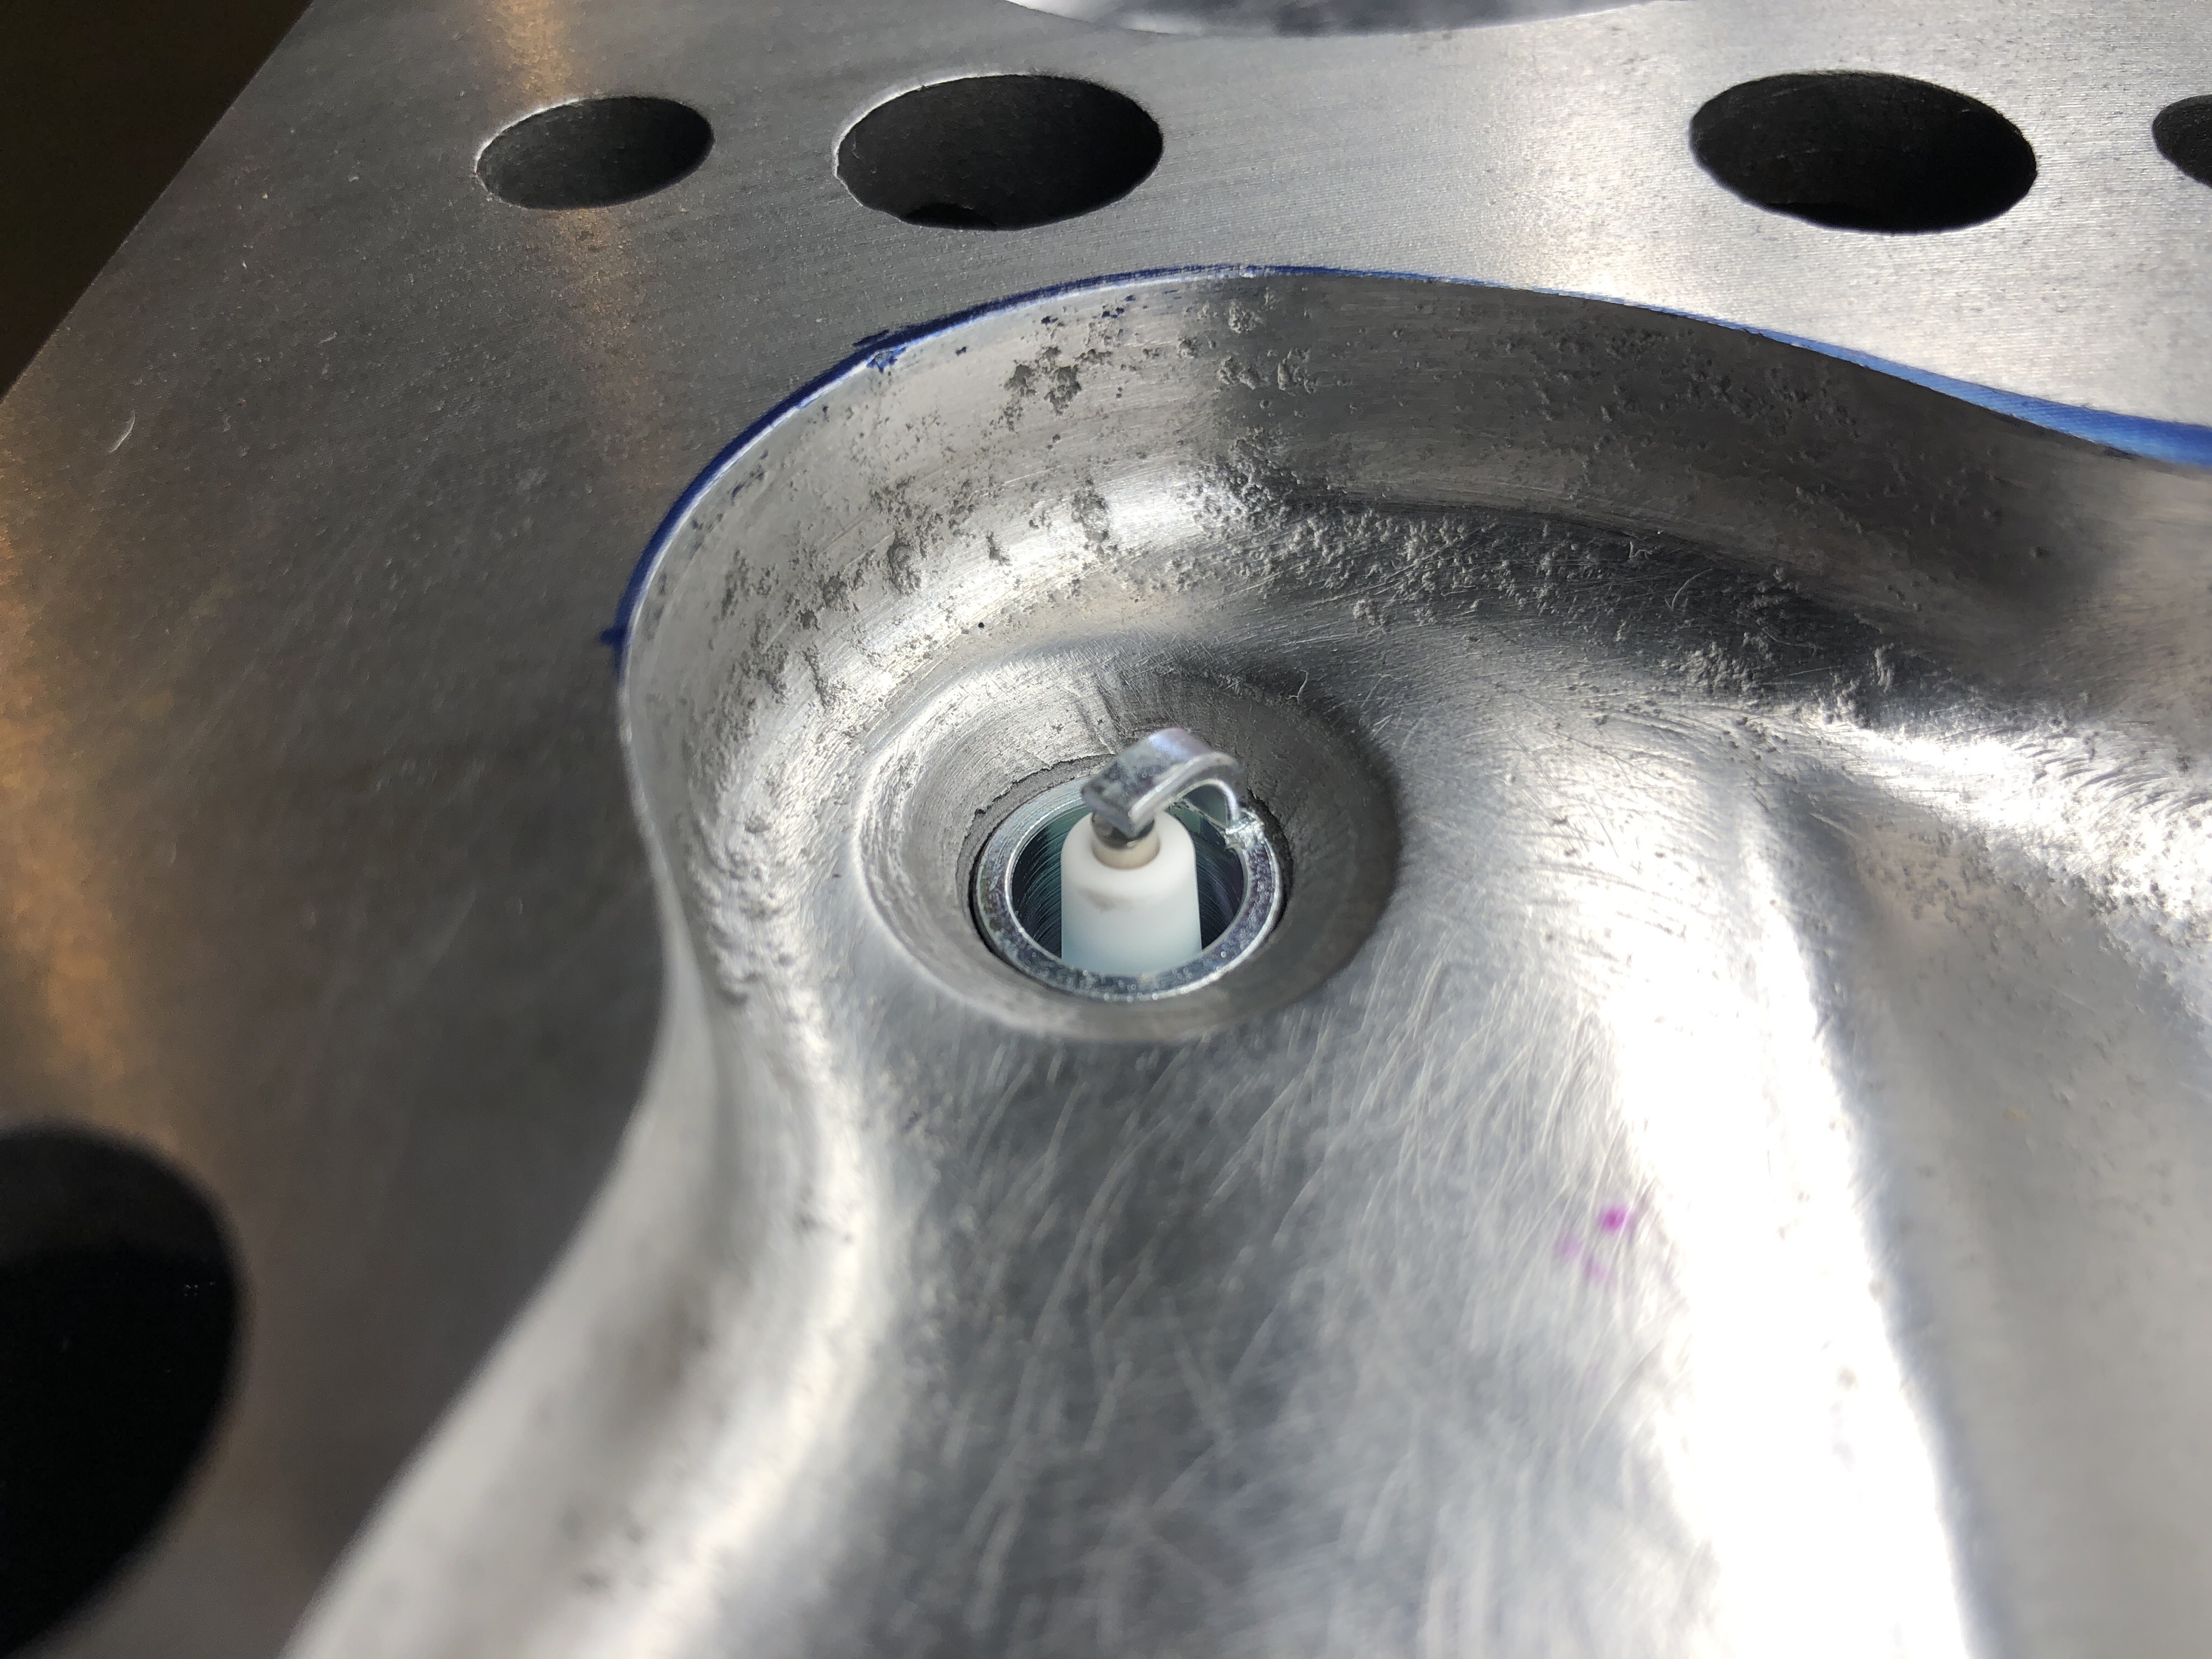
0 -
Love your images! My head was not the high compression 112 head so I don't think the B6HS was as recessed as your one (your head probably has more meat or thickness to reduce the chamber volume resulting in a more recessed plug). One more little thing you can do is index the plug so that the "open" side of the plug faces the centre of the chamber to help flame propagation by reducing the masking effect of the side electrode. This is done by using different thickness plug washers.These are all small differences but I believe will summate to a worthwhile result. Plus it's a lot of fun.0
-
The wear pattern on the lifter indicates that there is no thrust washer between the camshaft flange and the block, which means the lifters and cams are mis-aligned, as are the gears. You need to install a 1/16" bronze washer behind the camshaft flange.0
-
Thanks for recognizing that Geoff!!!
I didn’t even know there was a way to tell that was happening. I was actually still debating on if I should do the fiber gear & thrust washer over the last couple days, now I know it’s a must do. What else should I do while I’m doing those things?
again, big thanks Geoff!0 -
Here are a couple more lifter pics I had:
0 -
You need to check the cam lobes for nose wear. There is the usual slight indentation on the centre of the lifter, and they would benefit from a slight dress-off in a suitable refacer.0
-
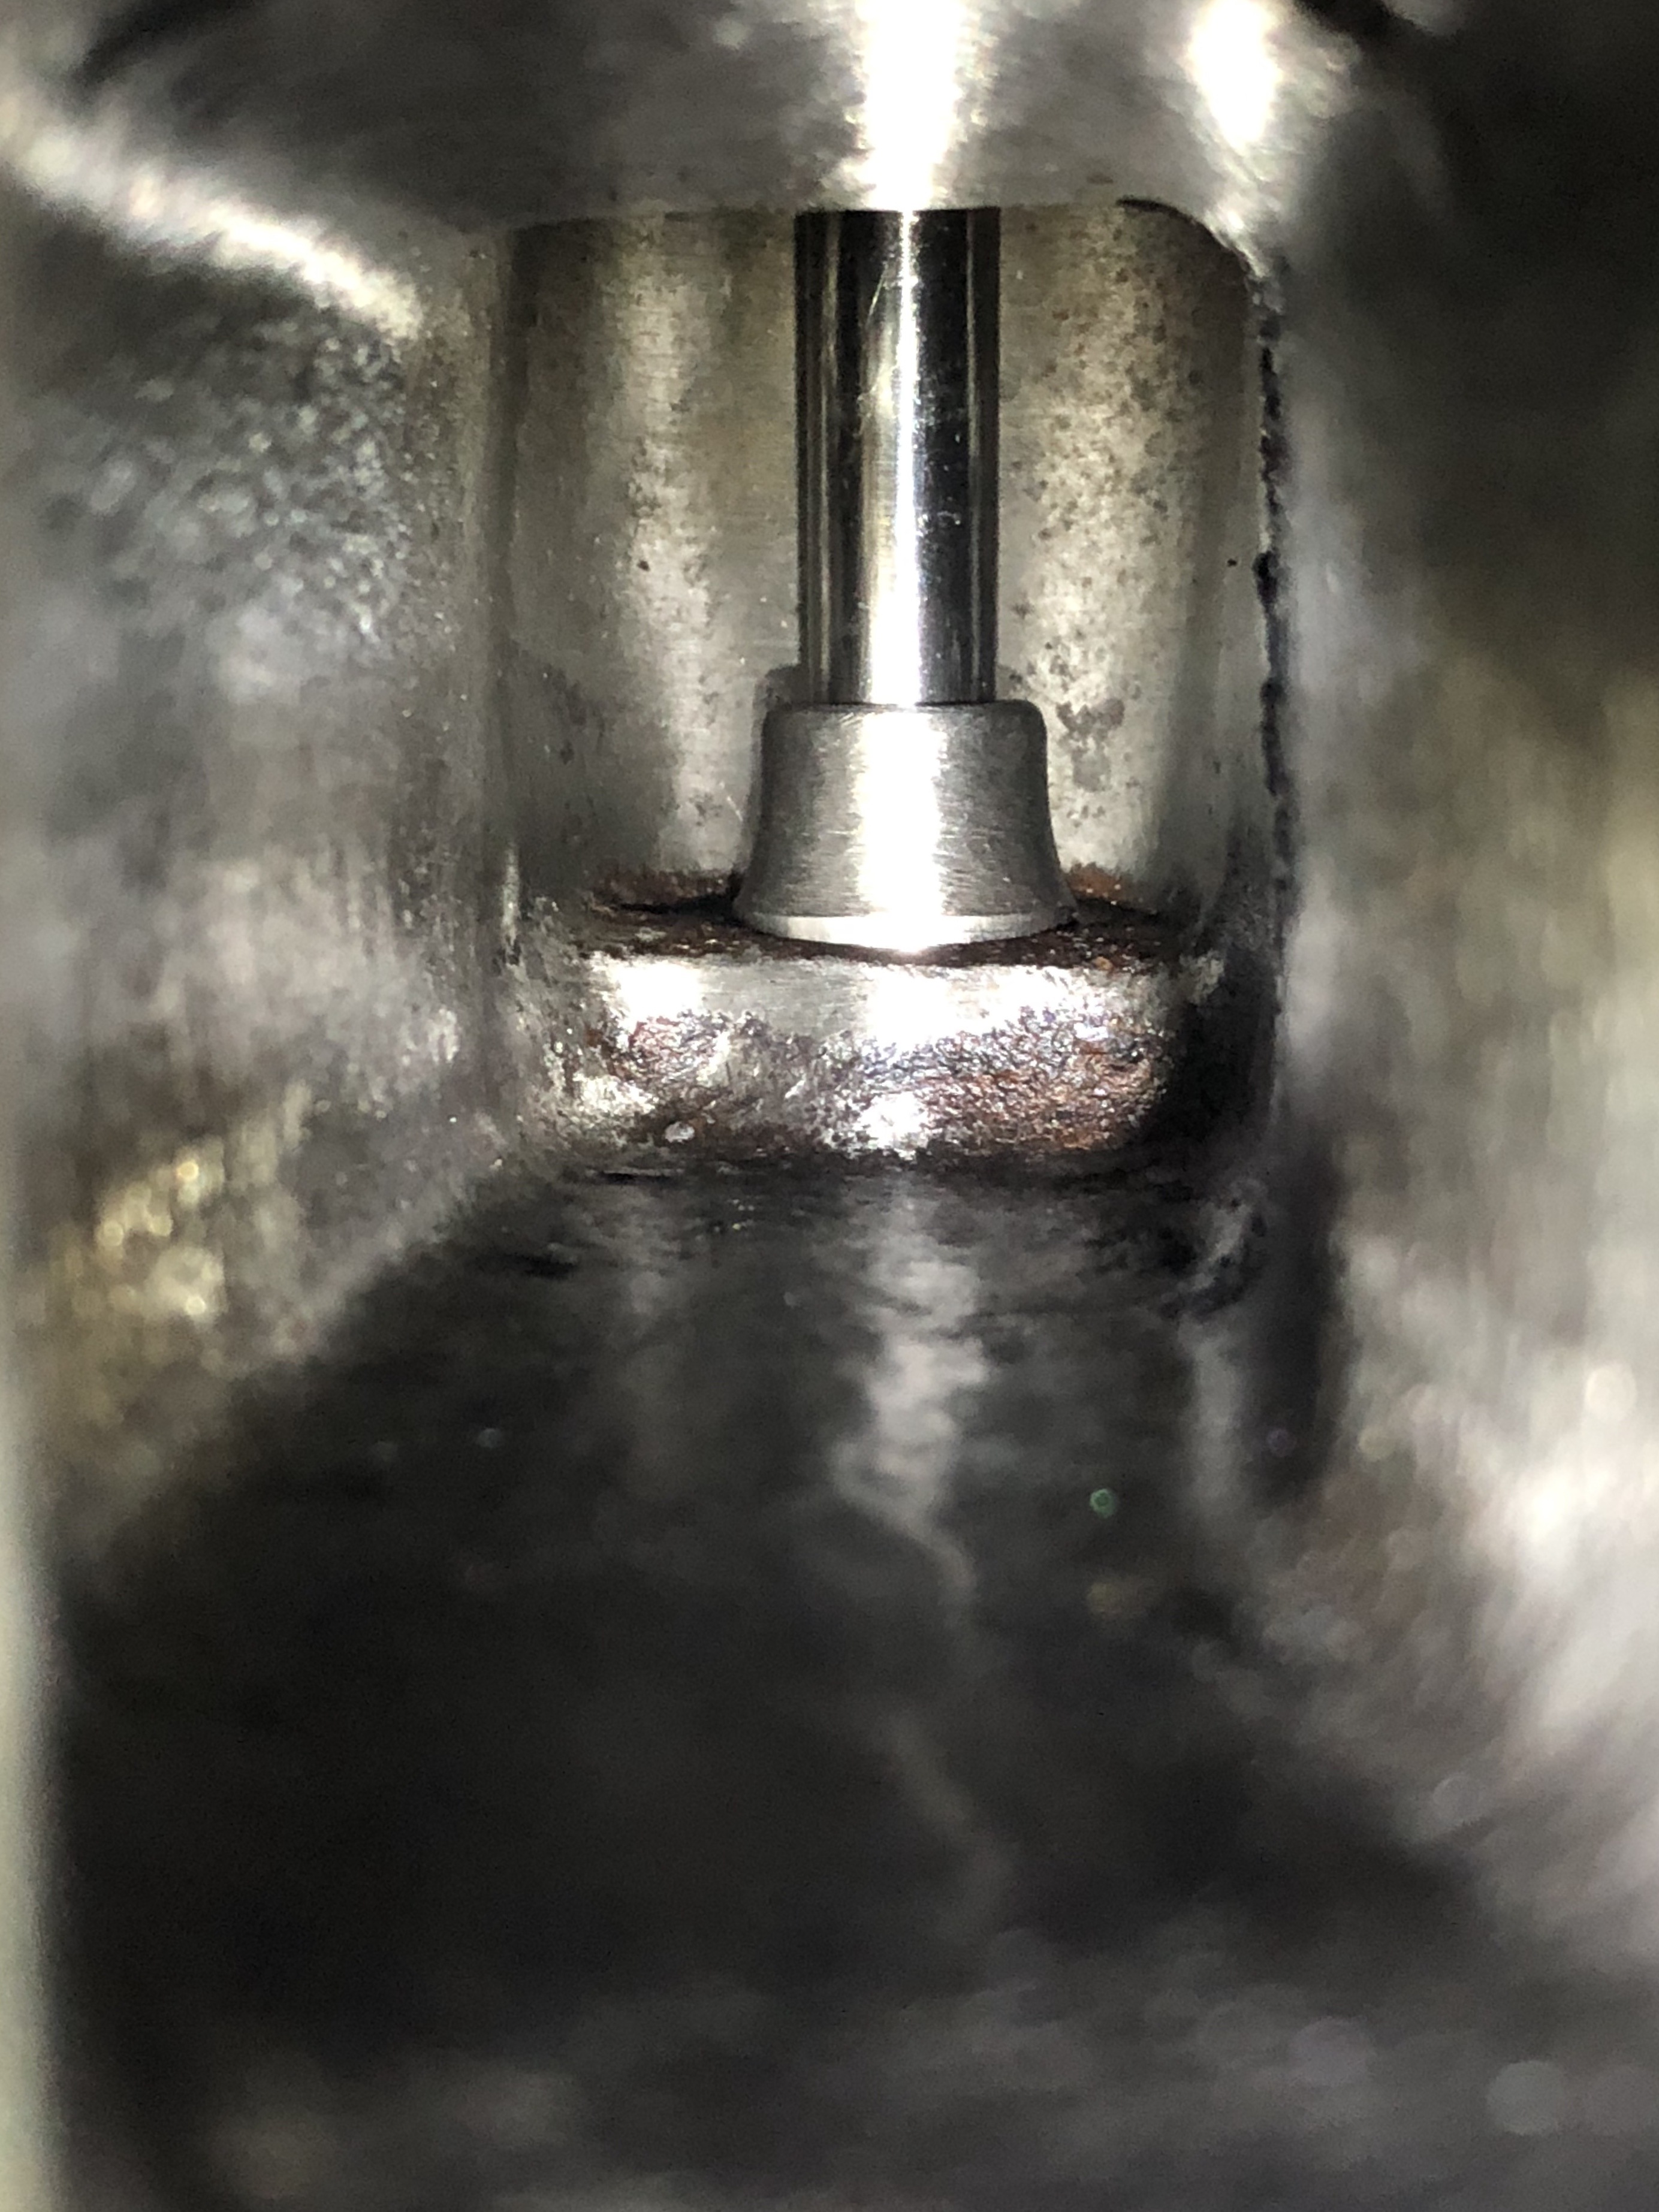
Adding a photo to this thread for future reference.As I was buttoning up a few things yesterday I decided to try to take a few photos of the valve guides with the (1938 & later) 11/32” valves in place. This is looking into the intake ports from the side of the block.One can see just a little of the original width of the guide down where the block boss meets the guide before it tapers upward. Doing so one can see the difference it made to cutback & taper the guide.
 0
0
Categories
- 37K All Categories
- 116 Hudson 1916 - 1929
- 21 Upcoming Events
- 96 Essex Super 6
- 28.6K HUDSON
- 576 "How To" - Skills, mechanical and other wise
- 995 Street Rods
- 151 American Motors
- 181 The Flathead Forum
- 49 Manuals, etc,.
- 78 Hudson 8
- 44 FORUM - Instructions and Tips on using the forum
- 2.8K CLASSIFIEDS
- 609 Vehicles
- 2.2K Parts & Pieces
- 78 Literature & Memorabilia
- Hudson 1916 - 1929 Yahoo Groups Archived Photos
