Remove Vibration Dampener?

Ok, so I got things torn apart on the front of the engine & found a bolt to replace the crank bolt. However my 3 jaw puller won’t fit around the dampener as it hits the timing cover and the radiator frame support gets in the way. Is there a method or available puller I need to use? Please don’t tell me I need to pull this dam engine.... I’m so tired of fighting this thing!
One more thing... why does it look like the Original manuals photo isn’t putting pressure on the center of the crank bolt? It looks like it’s pushing off of the edge of where the fan belt groove.

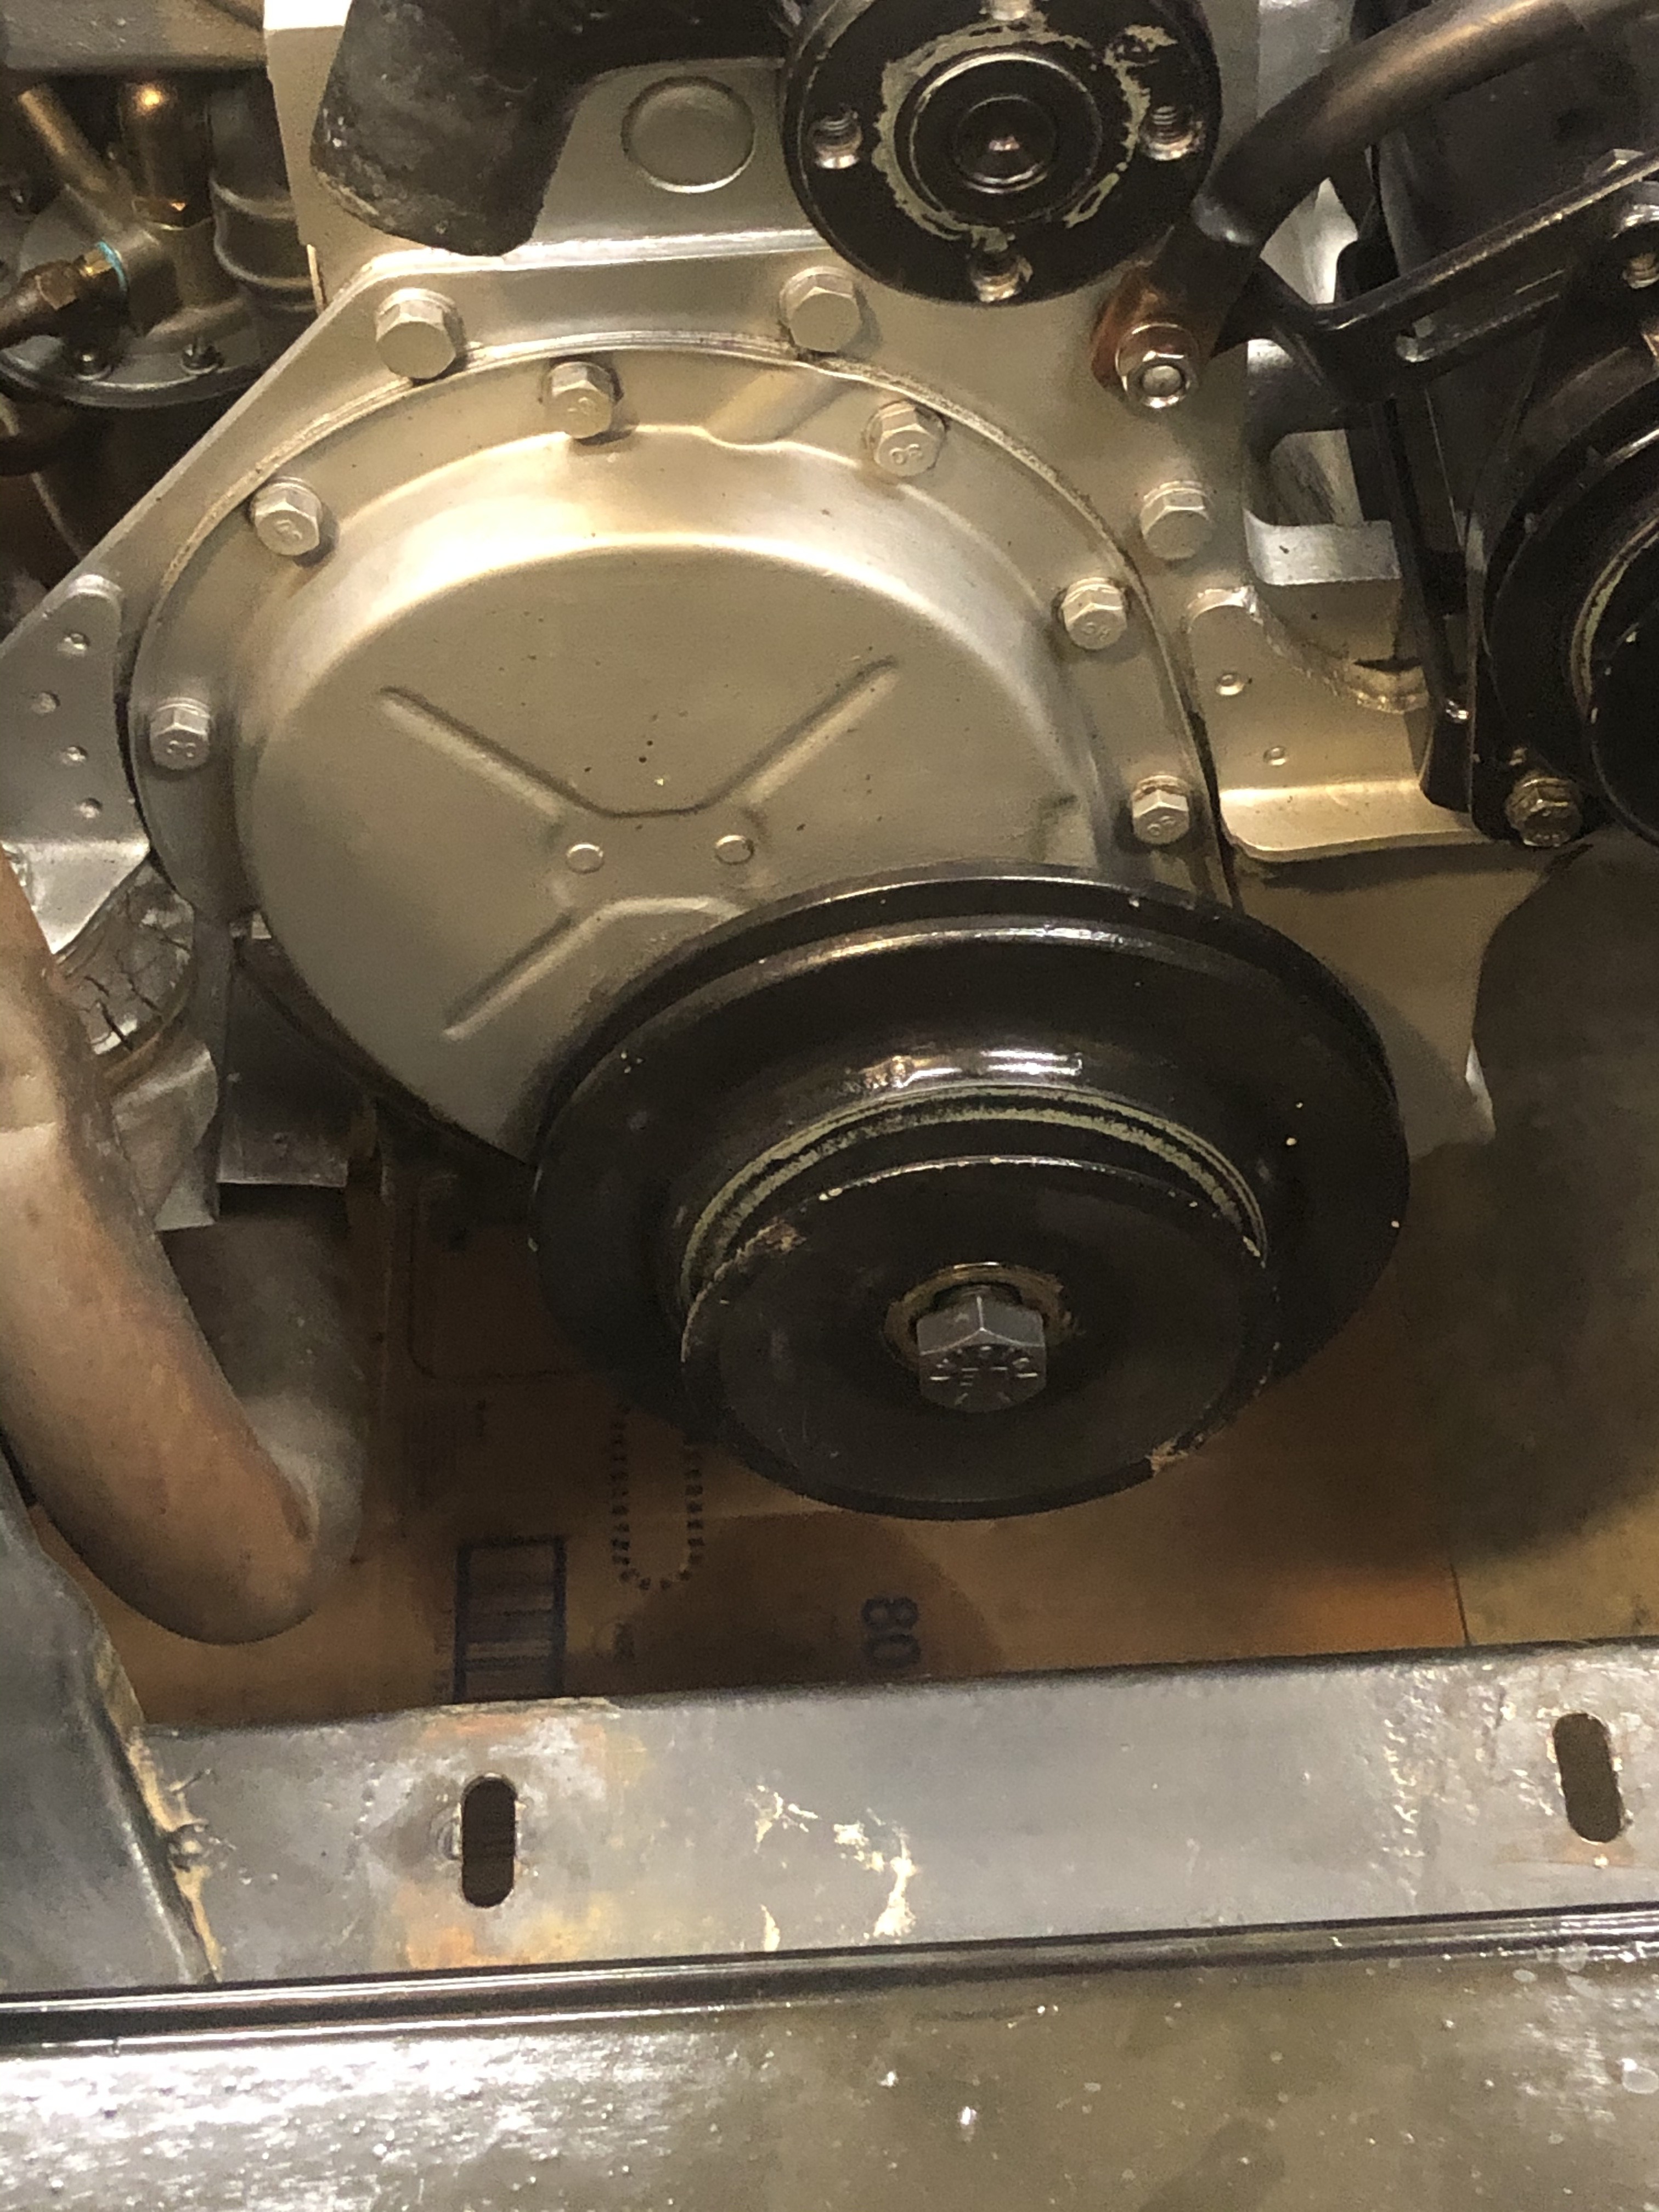
One more thing... why does it look like the Original manuals photo isn’t putting pressure on the center of the crank bolt? It looks like it’s pushing off of the edge of where the fan belt groove.
0
Comments
-
Okay, I know the workshop says not to knock on the dampener with a hammer, but that is exactly what I do. I get a pinch bar against the edge of the timing case and the edge of the dampener, and after removing the bolt, I use a 2lb hammer and gently tap the bottom of the rear edge of the dampener, whilst keeping pressure forwards on the pinch bar, and I have never failed to get one off using this method, nor broken anything. However, Something does not seem right about the appearance of your dampener, it seems lighter section than the factory one. Good luck,
Geoff
0 -
The attached picture is complements of a previous Hudson owner response to the same question... not my puller, but it seems to be focused on doing the job. Good Luck.

 0
0 -
You often have to make simple tools to work on our cars. Consider finding the correct damper pulley. Once the seal is broken it will slide a lot easier.0
-
I've pulled many off with wood wedges between the hub and timing case and hammer blows to the edges. Just enough tension on the wedges , you can tell when you're about to hit it to hard. Same with the hammer on the back edges of the damper , solid blows , but not excessive . A few blows on damper , a little more pressure on wedges, repeat.
I found it easier then using a pry bar and hammer , but that works also.
A puller is great , but not always needed.0 -
I was able to get mine off with a two jaw puller I picked up on amazon. Someone recommended I put a socket in the dampener to protect the threads, which I did, and that worked well.
The puller was around 50 bucks, so a bit pricey, but it is adjustable and I have used it for other things since getting it.
But if you've got the scrap laying around, the photo above Ken posted looks straight forward to make. Wish I did something like that.0 -
I spent the morning running around town trying to find some kinda 2 arm puller that would work and came up empty.I did grab some 1/2” by 1.75” bar stock & then went to the wrong place for nuts & bolts as they had nothing I needed. There are a few things left out of that description such as the bolts he is using have all been cut for threads further down the neck towards the head. It also looks like whatever he used for the center bolt, threads were also cut in some smaller block of steel. Unfortunately I only go up to 1/2 on my tap & die set & don’t have a mill/lathe to make such a tool plus I don’t just have huge bolts & nuts laying around.I’ve been looking around on line as well for a two jaw puller with an 8” spread & found one but it’s for drums and rotors.
Since failure seemed to be the flavor of the day, I tried hitting the dampener with a 3lb hammer against a 2x4, which quickly broke the 2x4.0 -
The one I purchased was for drums, gears, and rotors, but the main thing is it was capable of opening wide enough to fit around the dampener and that the grips were thin enough to fit behind the dampener.
The one that I ended up using looks something like this one:
0 -
Have you tried the hammer and levers method? I think on my 212 I used a big tyre iron and a heavy rubber mallet from opposite sides and that sucker popped loose just fine.0
-
Hahaha, pretty much everything is one helluva job with this Hudson!I can’t begin to tell you how often the “gas can & lighter” have looked very appealing to me. Once again I wasted the entire day (yesterday) trying to find something to work to remove this dampener but nothing would fit.... and to think my wife wonders why I’ve been working for so many years on this Hudson & it’s still not driving.As much as I may like to have the unique & unusual car with it’s odd ball engine, it’s become very clear why the vast majority of people yank the engines out of “all makes” & put in a small block Chevy! I sure as hell pray that once the engine is fixed it will finally work properly. Either way I never could have gotten this far along without everyone’s help. So even though I am struggling currently, I do want to say “thank you” to everyone for all your help!0
-
It's just as much work to remove a damper from a small block Chevy.
I repaired cars for 47 years , the early cars were easier than the Northstar Cadillac engines I worked on.
Take a day off , or two. It will come off easier.0 -
Now you know why people build street rods.BigSky said:Hahaha, pretty much everything is one helluva job with this Hudson!I can’t begin to tell you how often the “gas can & lighter” have looked very appealing to me. Once again I wasted the entire day (yesterday) trying to find something to work to remove this dampener but nothing would fit.... and to think my wife wonders why I’ve been working for so many years on this Hudson & it’s still not driving.As much as I may like to have the unique & unusual car with it’s odd ball engine, it’s become very clear why the vast majority of people yank the engines out of “all makes” & put in a small block Chevy! I sure as hell pray that once the engine is fixed it will finally work properly. Either way I never could have gotten this far along without everyone’s help. So even though I am struggling currently, I do want to say “thank you” to everyone for all your help!0 -
The more I work on my truck, the more I realize what I most enjoy is the process that comes along with working on a Hudson. Everything from learning, communicating, searching, and executing is what keeps me going on it. Not to mention, Hudsons are some of the best looking vehicles out there, bar none, in my opinion.0
-
I built a puller like was pictured earlier in this thread.
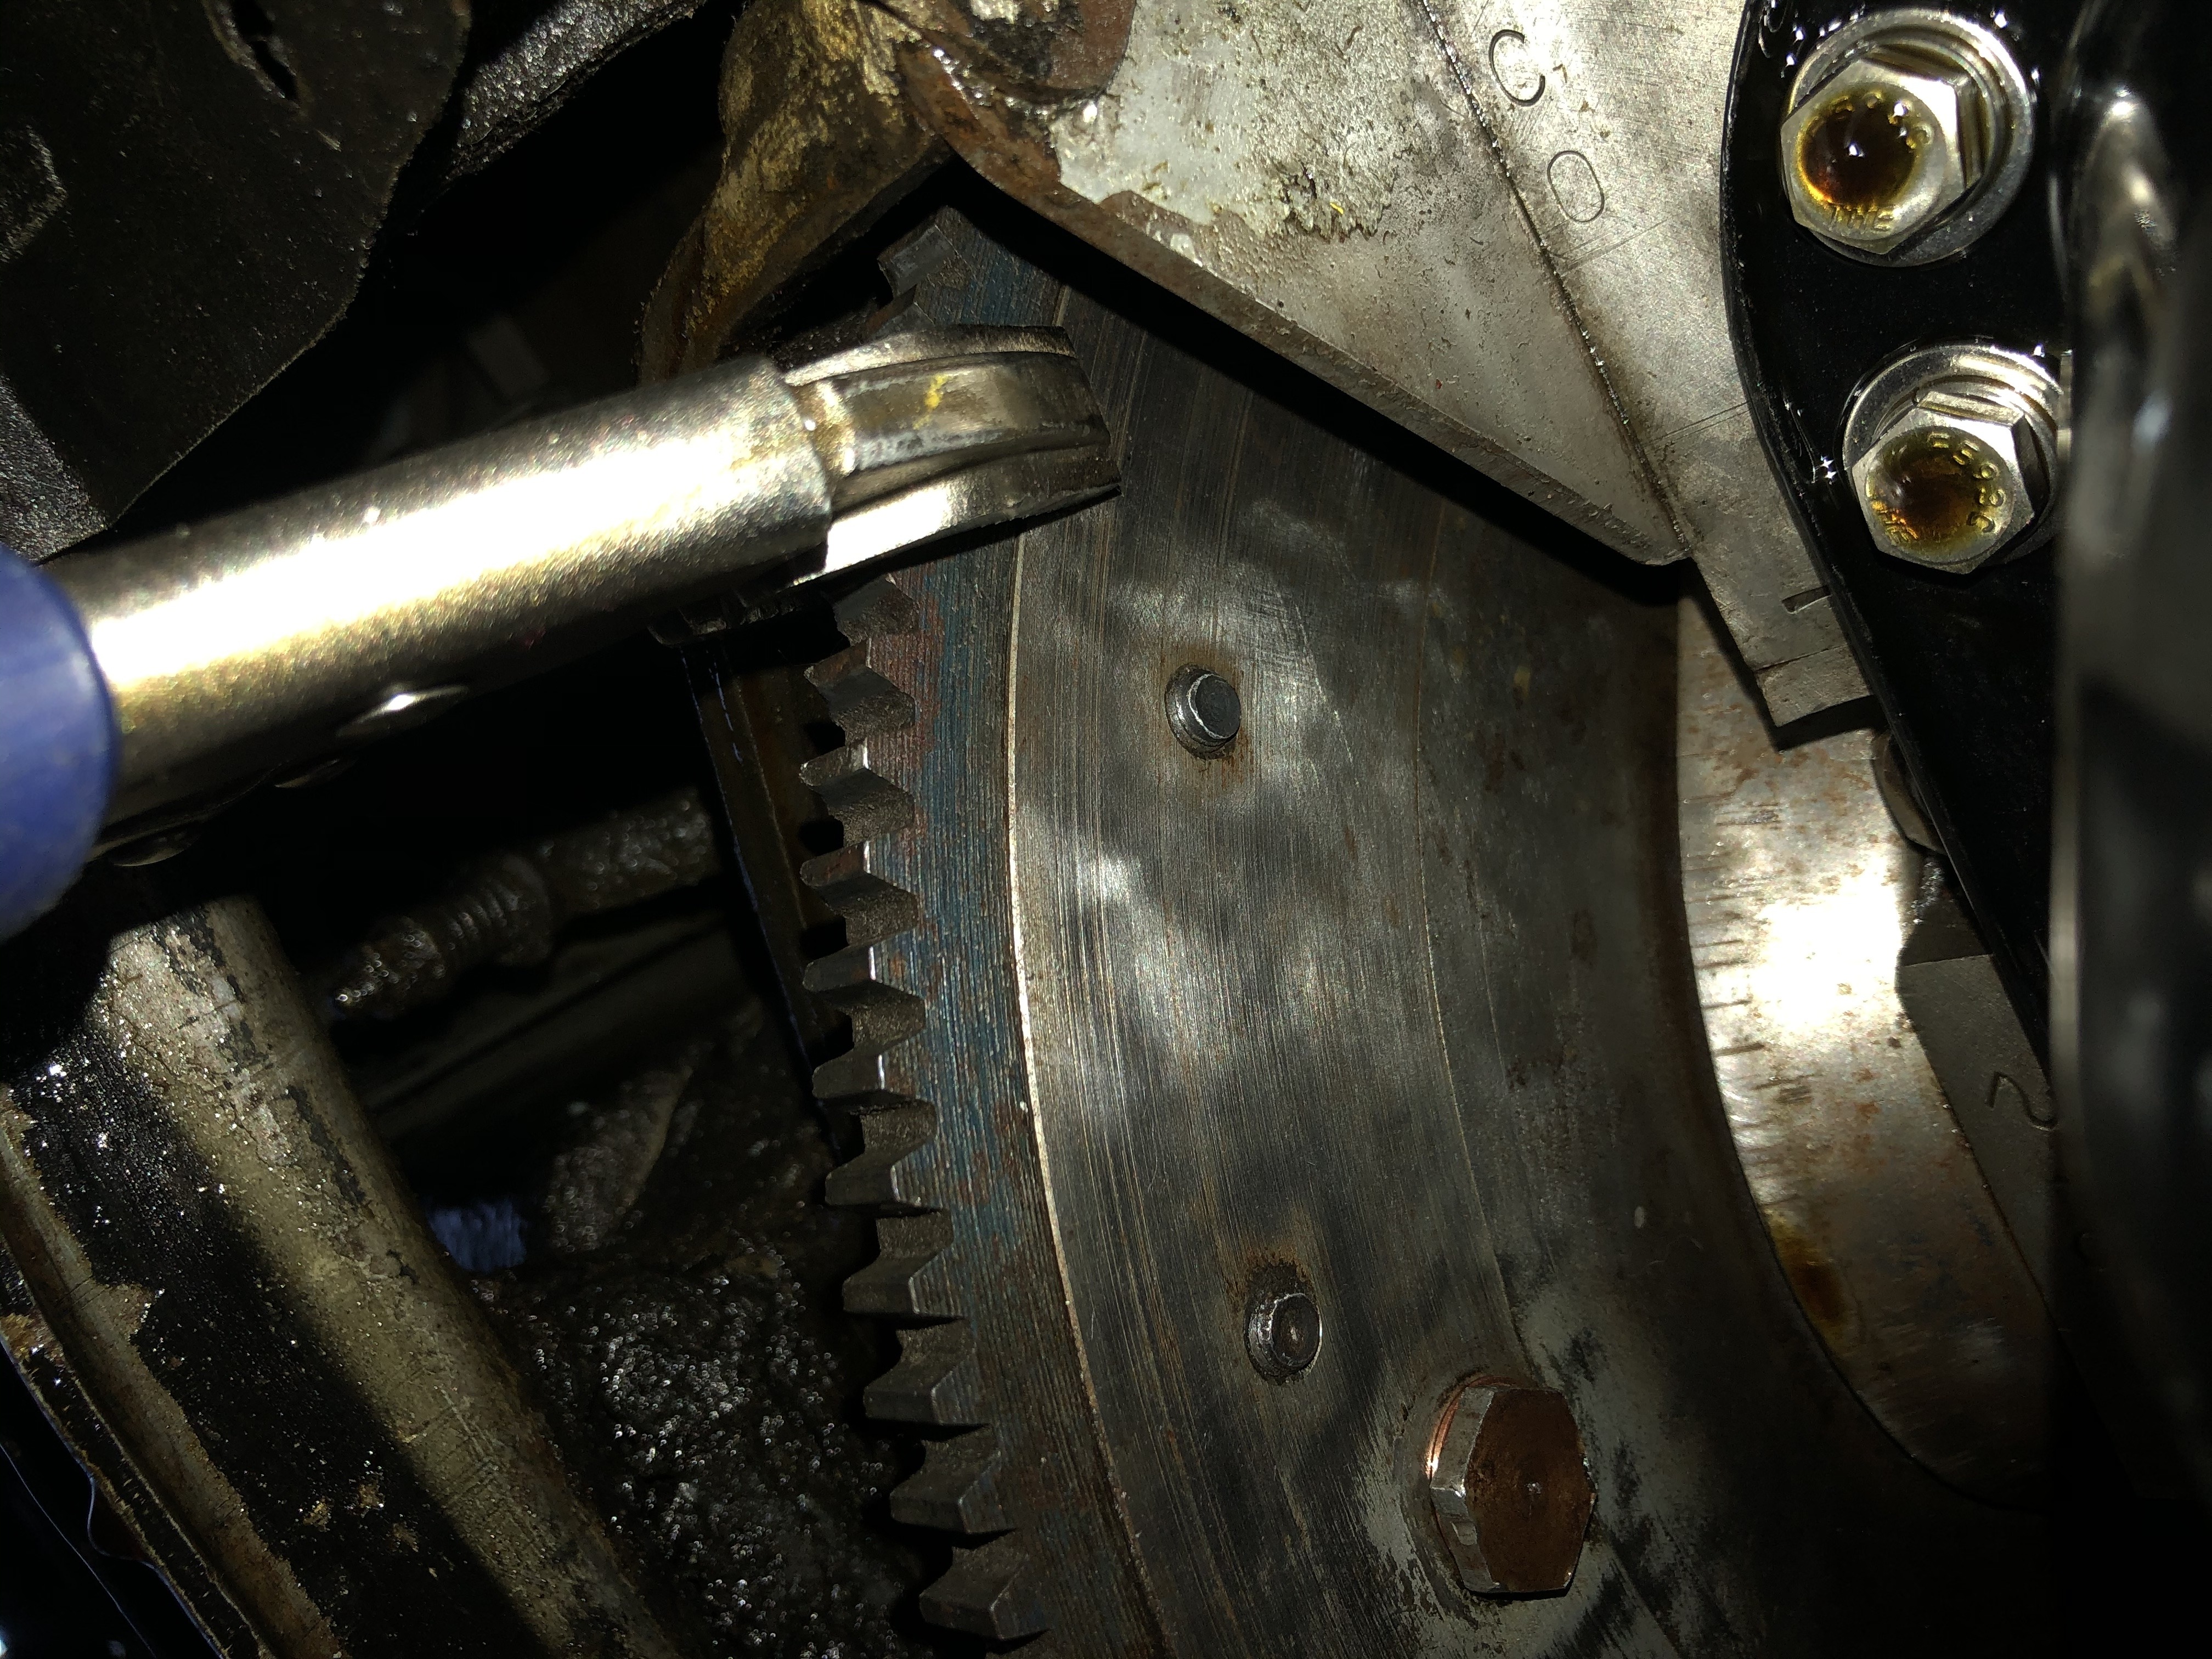
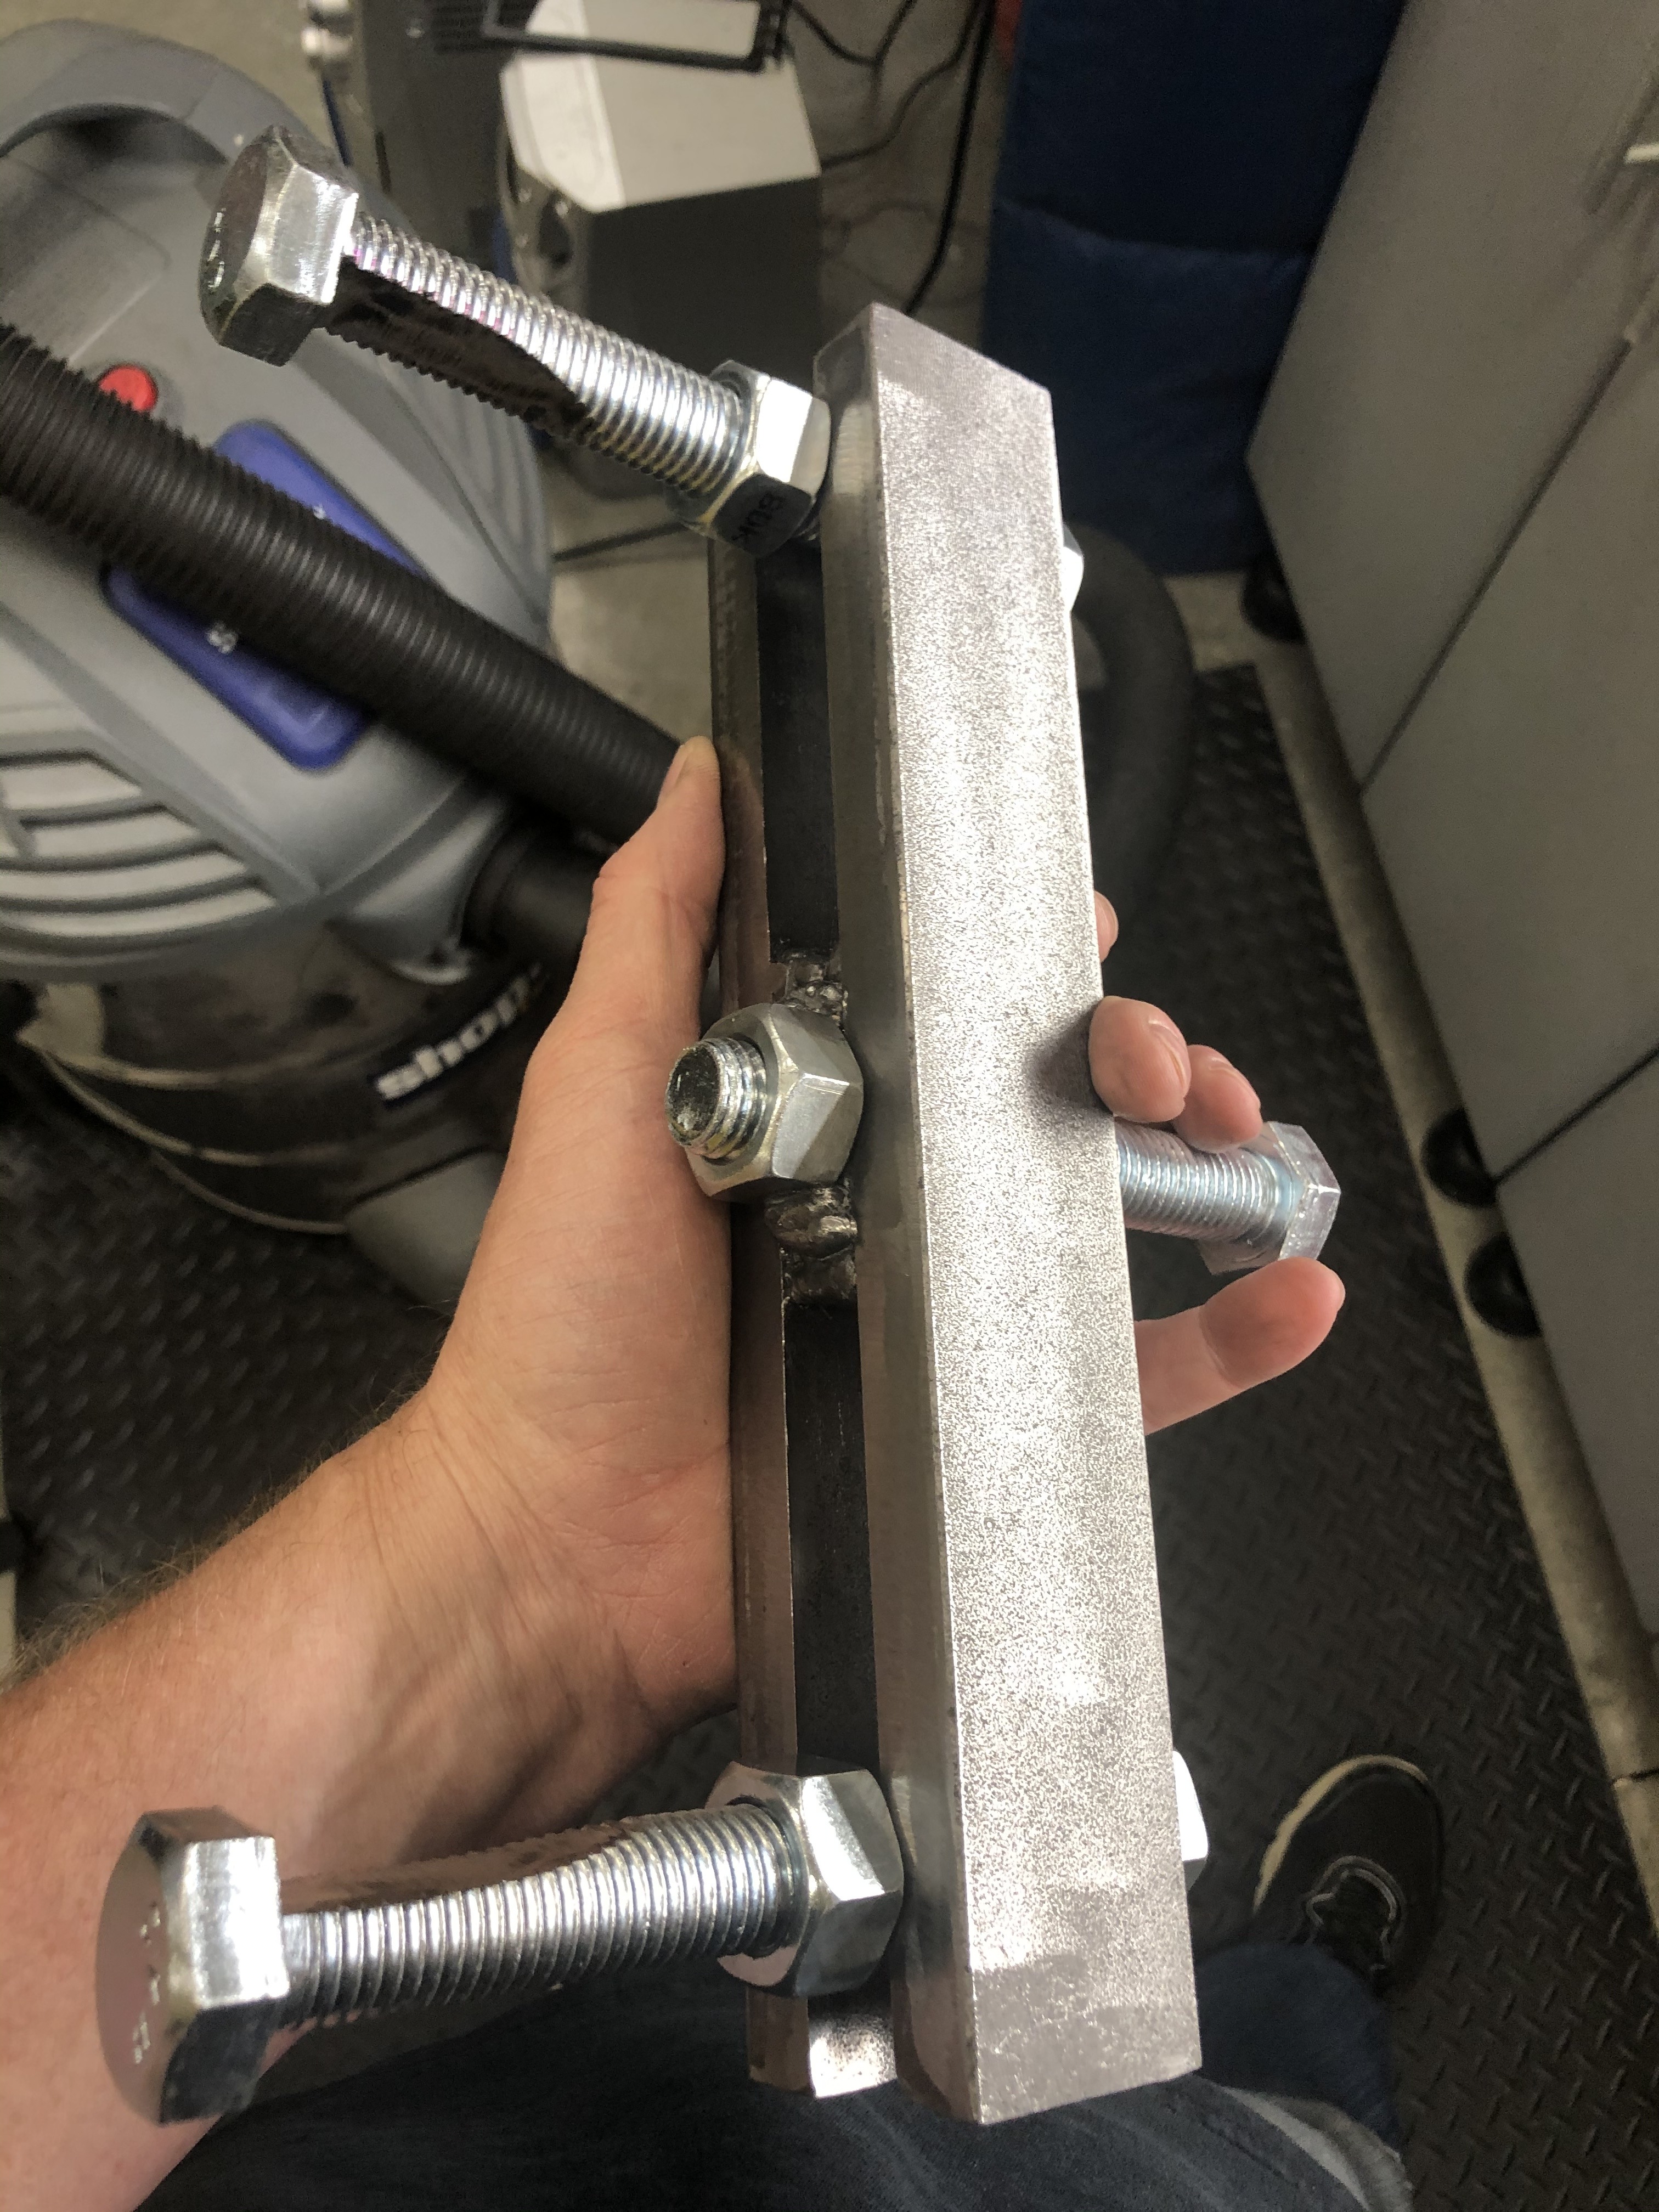 Unfortunately it’s not working as expected. It hooks up ok & I put a 7/8” socket between the center bolt & the crank & tightened her down.Here lies the problem. When I tighten the center bolt to pull the balancer towards the front (off), the engine crank turns. It’s in gear but can only get second due to electric hand not going into 1st gear and I have no hand brake as the rear cables are missing.When it turns the heads of the outside bolts run into the timing cover. Not wanting to break the timing cover, I am not pushing the bolt heads against the timing cover.Okay so I need to find a way to brace the tool from spinning so I can actually tighten the center bolt & pull off the balancer. I’m not coming up with any good ideas so maybe someone has an idea.
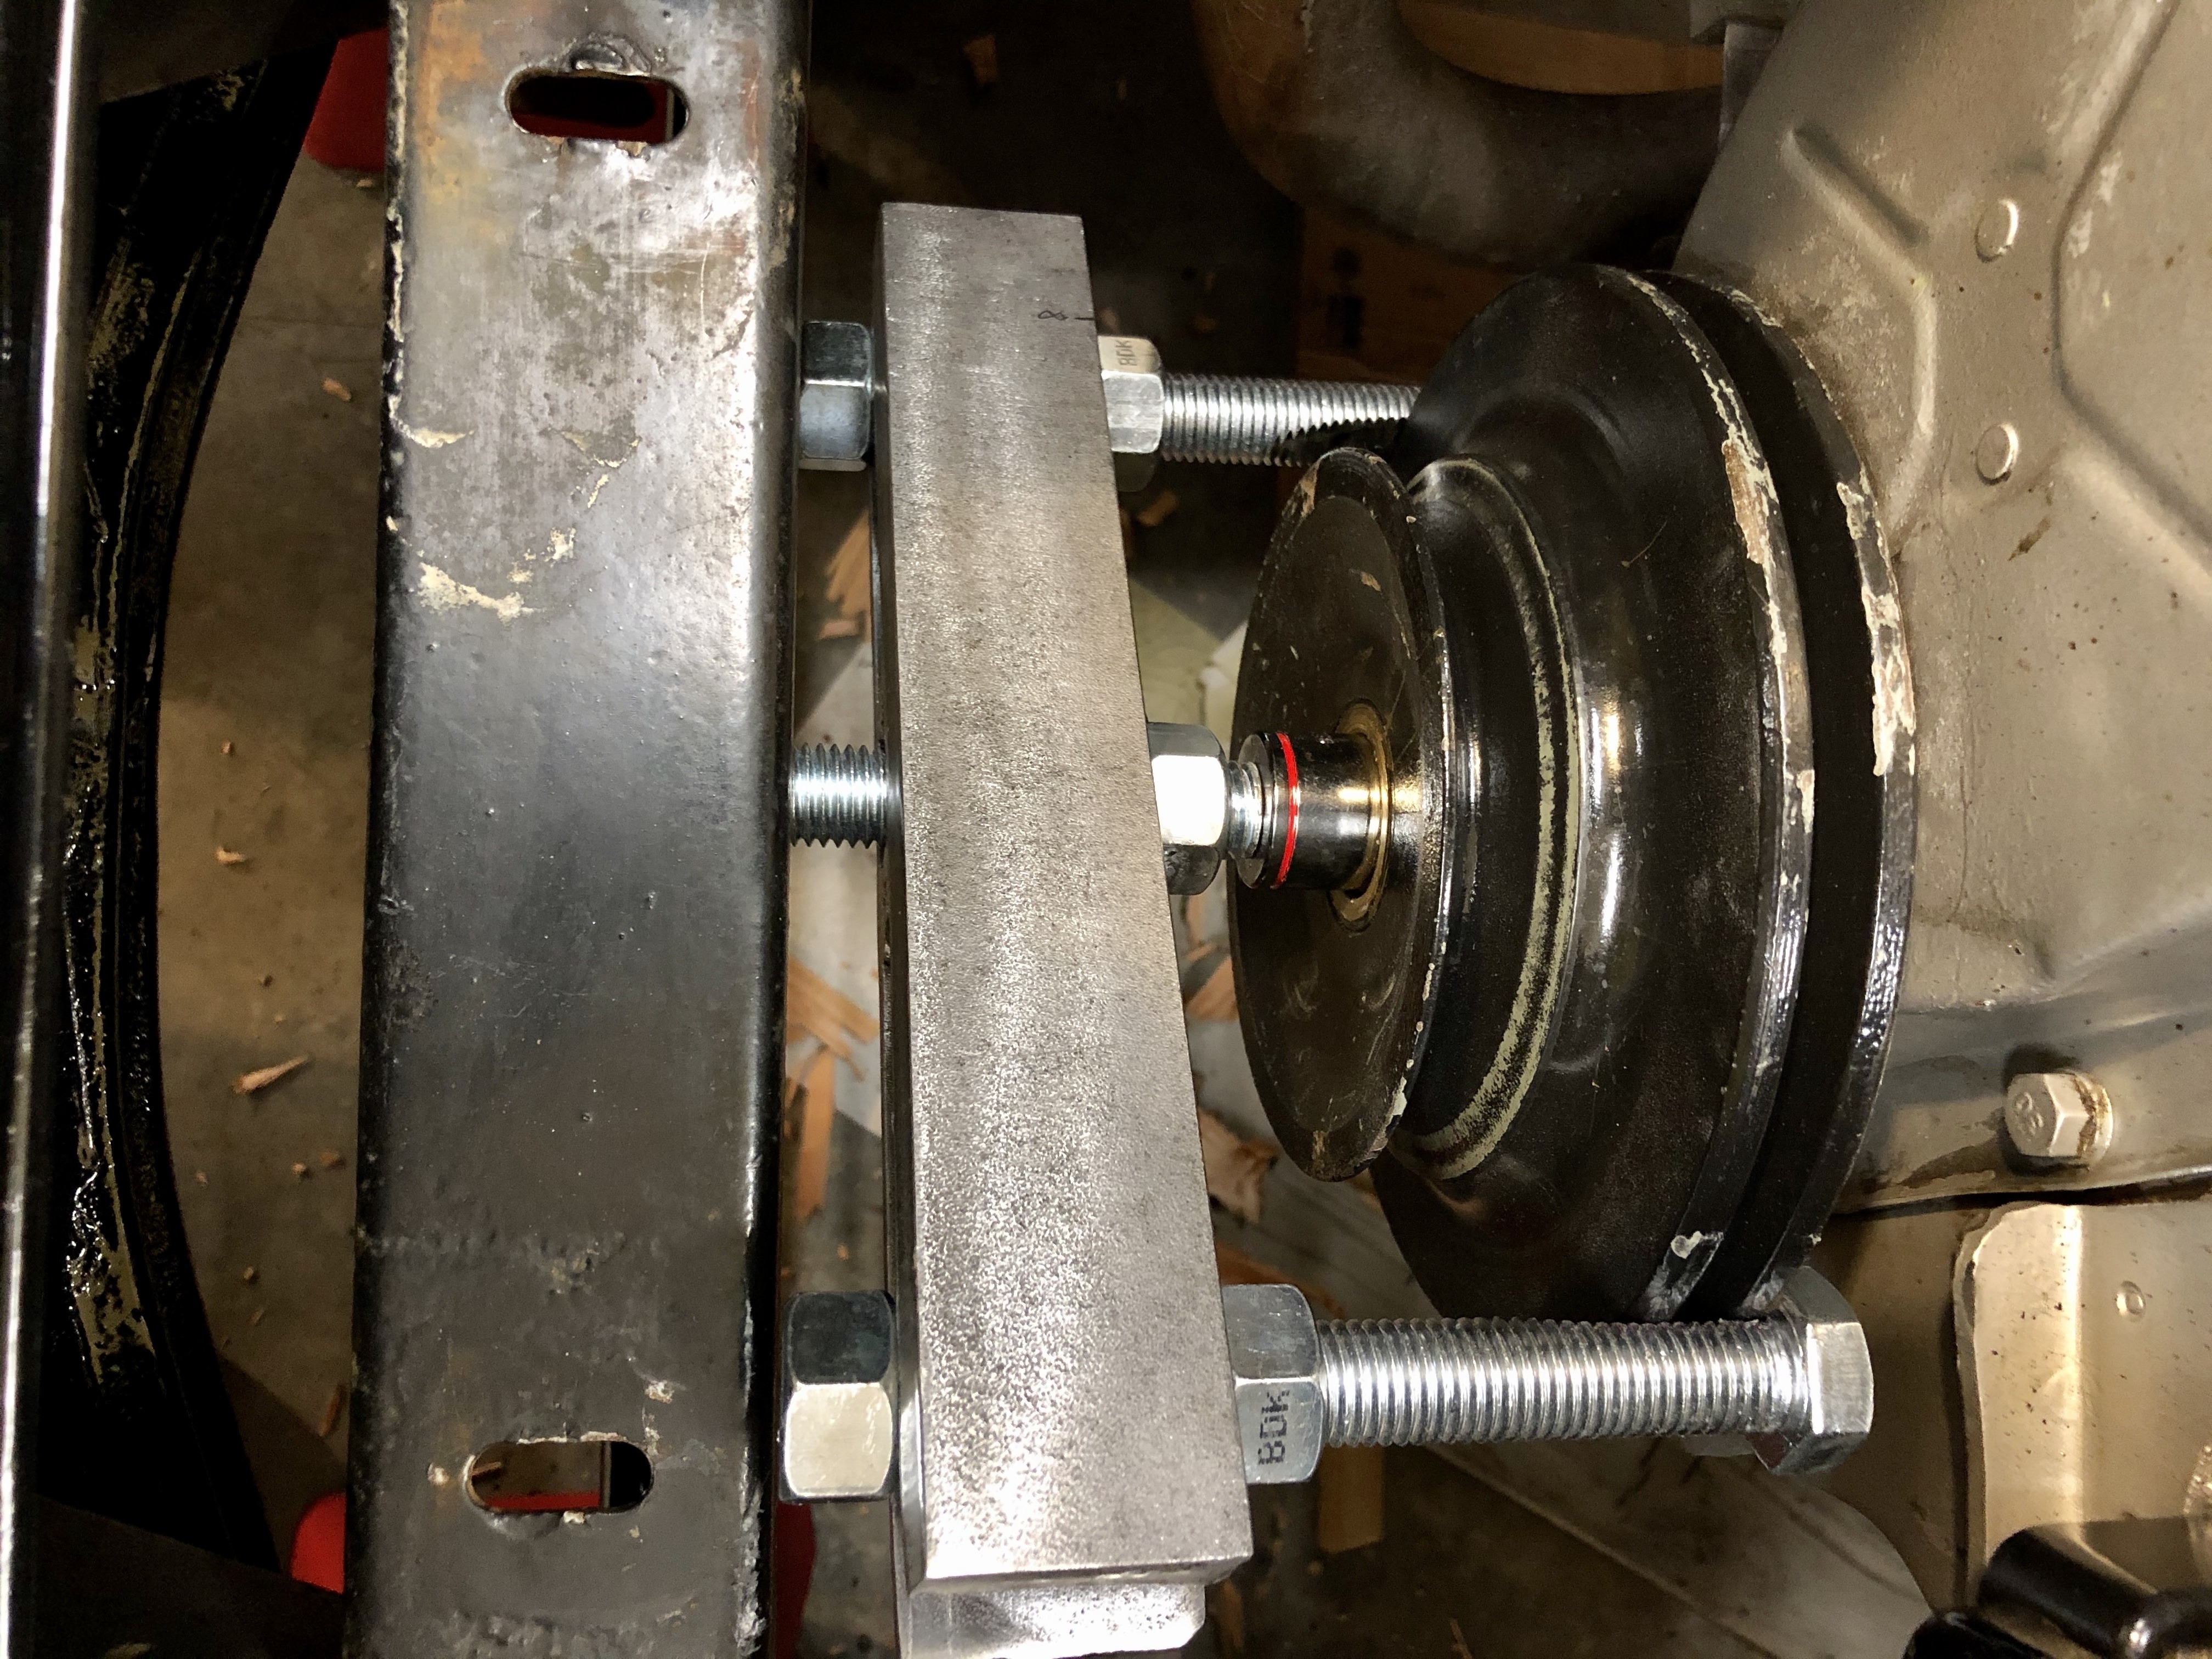 0
0 -
You will need an assistant to hold a pinch bar in the flywheel teeth.
0 -
A large crescent / adjustable wrench on the end of your puller might work. Brace it against the frame. ?
A wood wedge between the flywheel and bell housing should work.
some guys remove a spark plug and put a small rope between piston and head..
Looks like you have room to put a piece of 2x2 wood between the puller and the floor?0 -
Are you using a wrench or air/electric impact? I used my impact and zipped it right off. Just took mine off a couple of weeks ago to install a new timing chain.
0 -
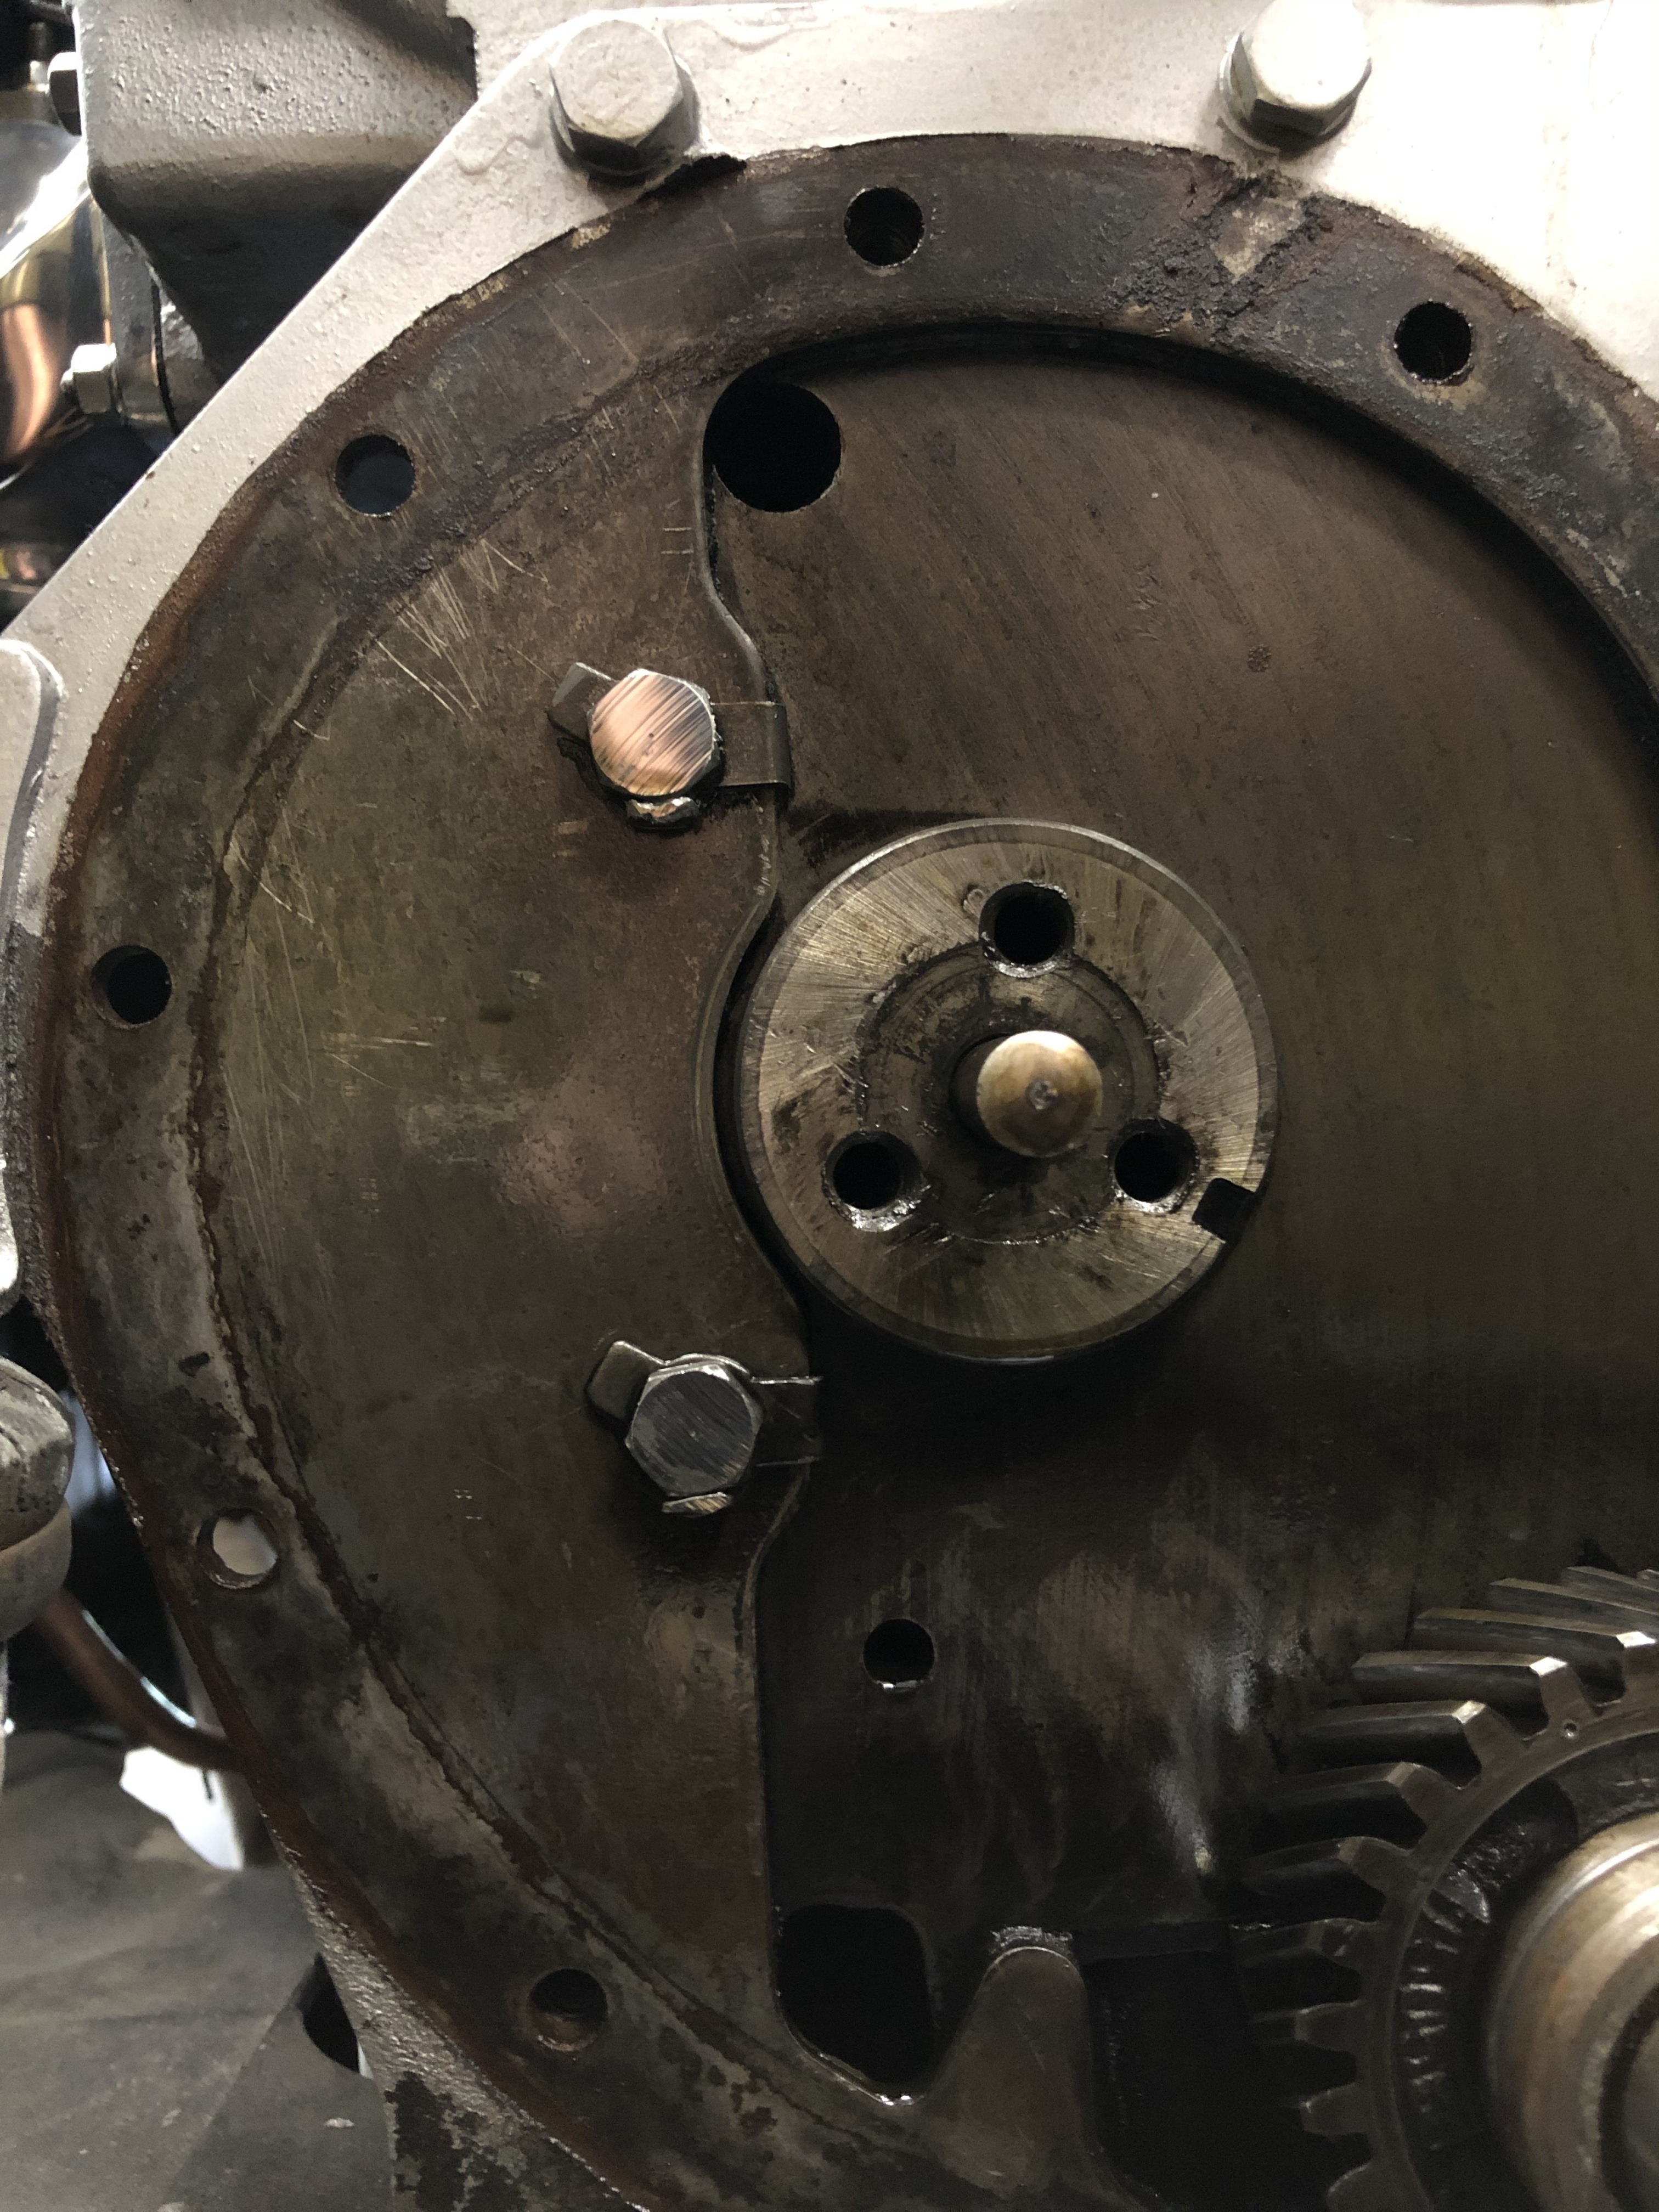
Well this has been an interesting morning working on the engine. Late last night I had the same idea Geoff recommenced on bracing the flywheel, so I put my “vice grip“ on the flywheel & braced against the bell housing. Within 20 minutes in total the harmonic balancer was off the engine!
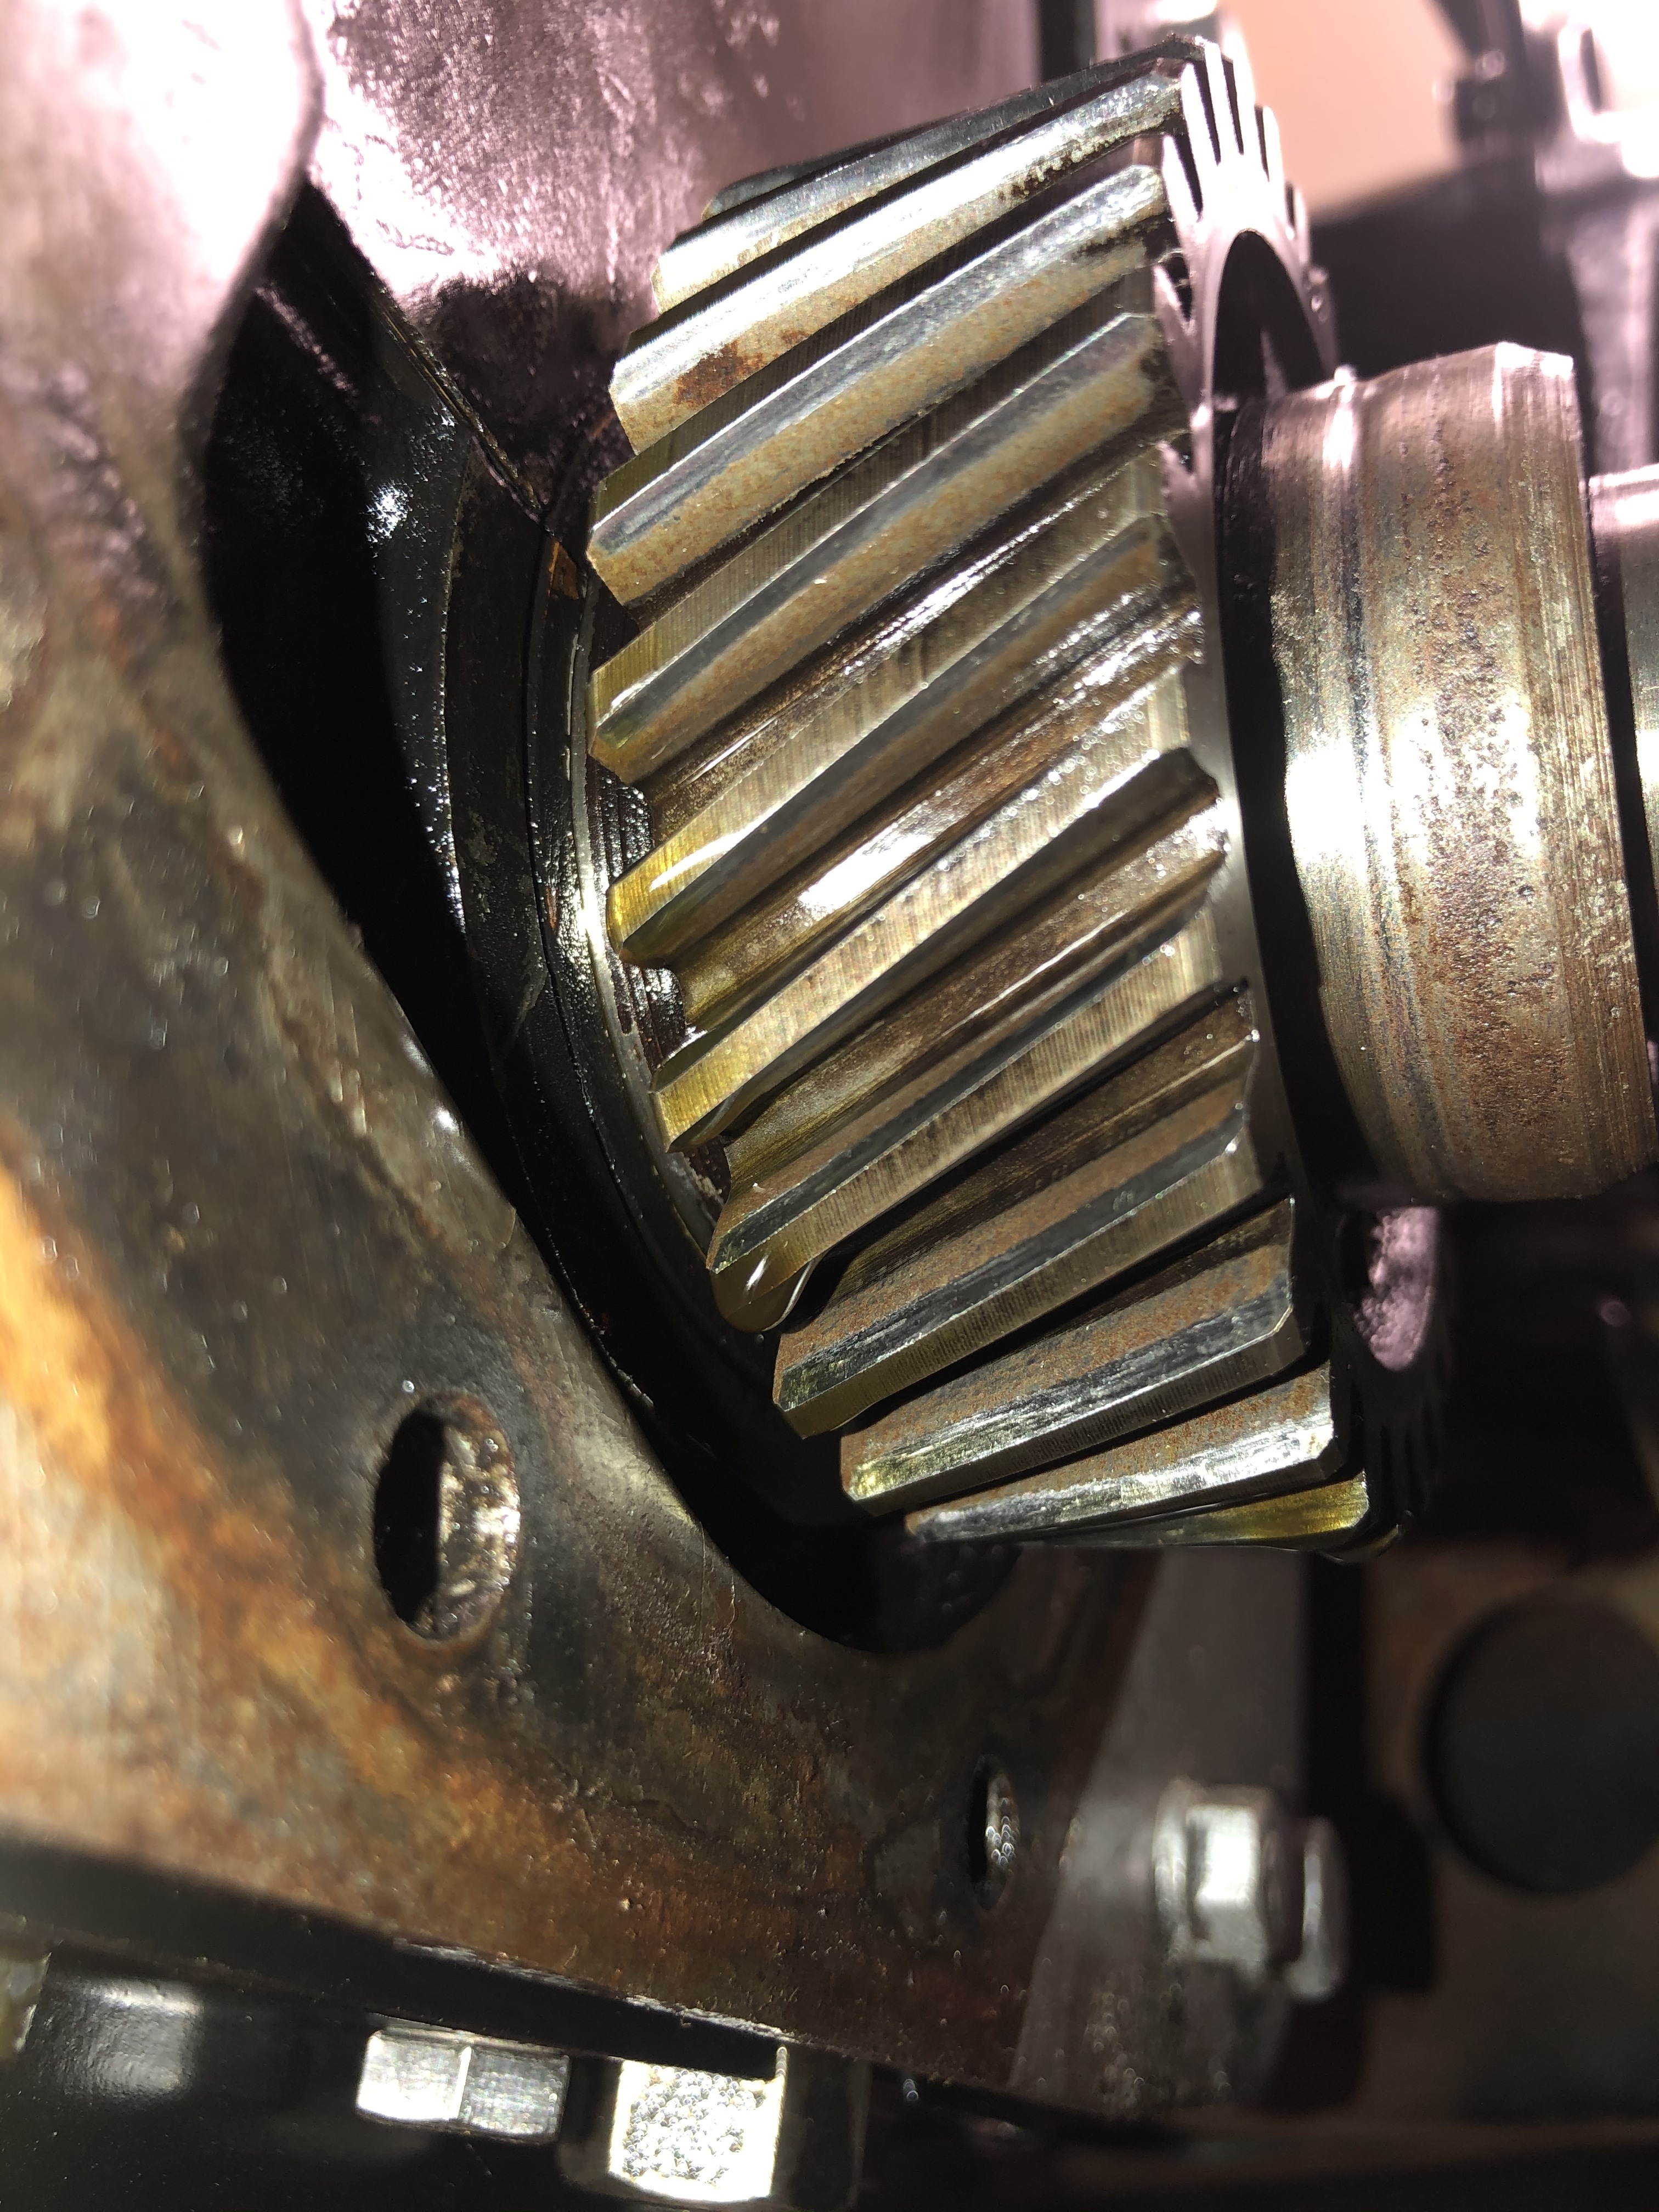
 Removed the timing cover was easy enough and once off that’s when I found the most interesting things.....
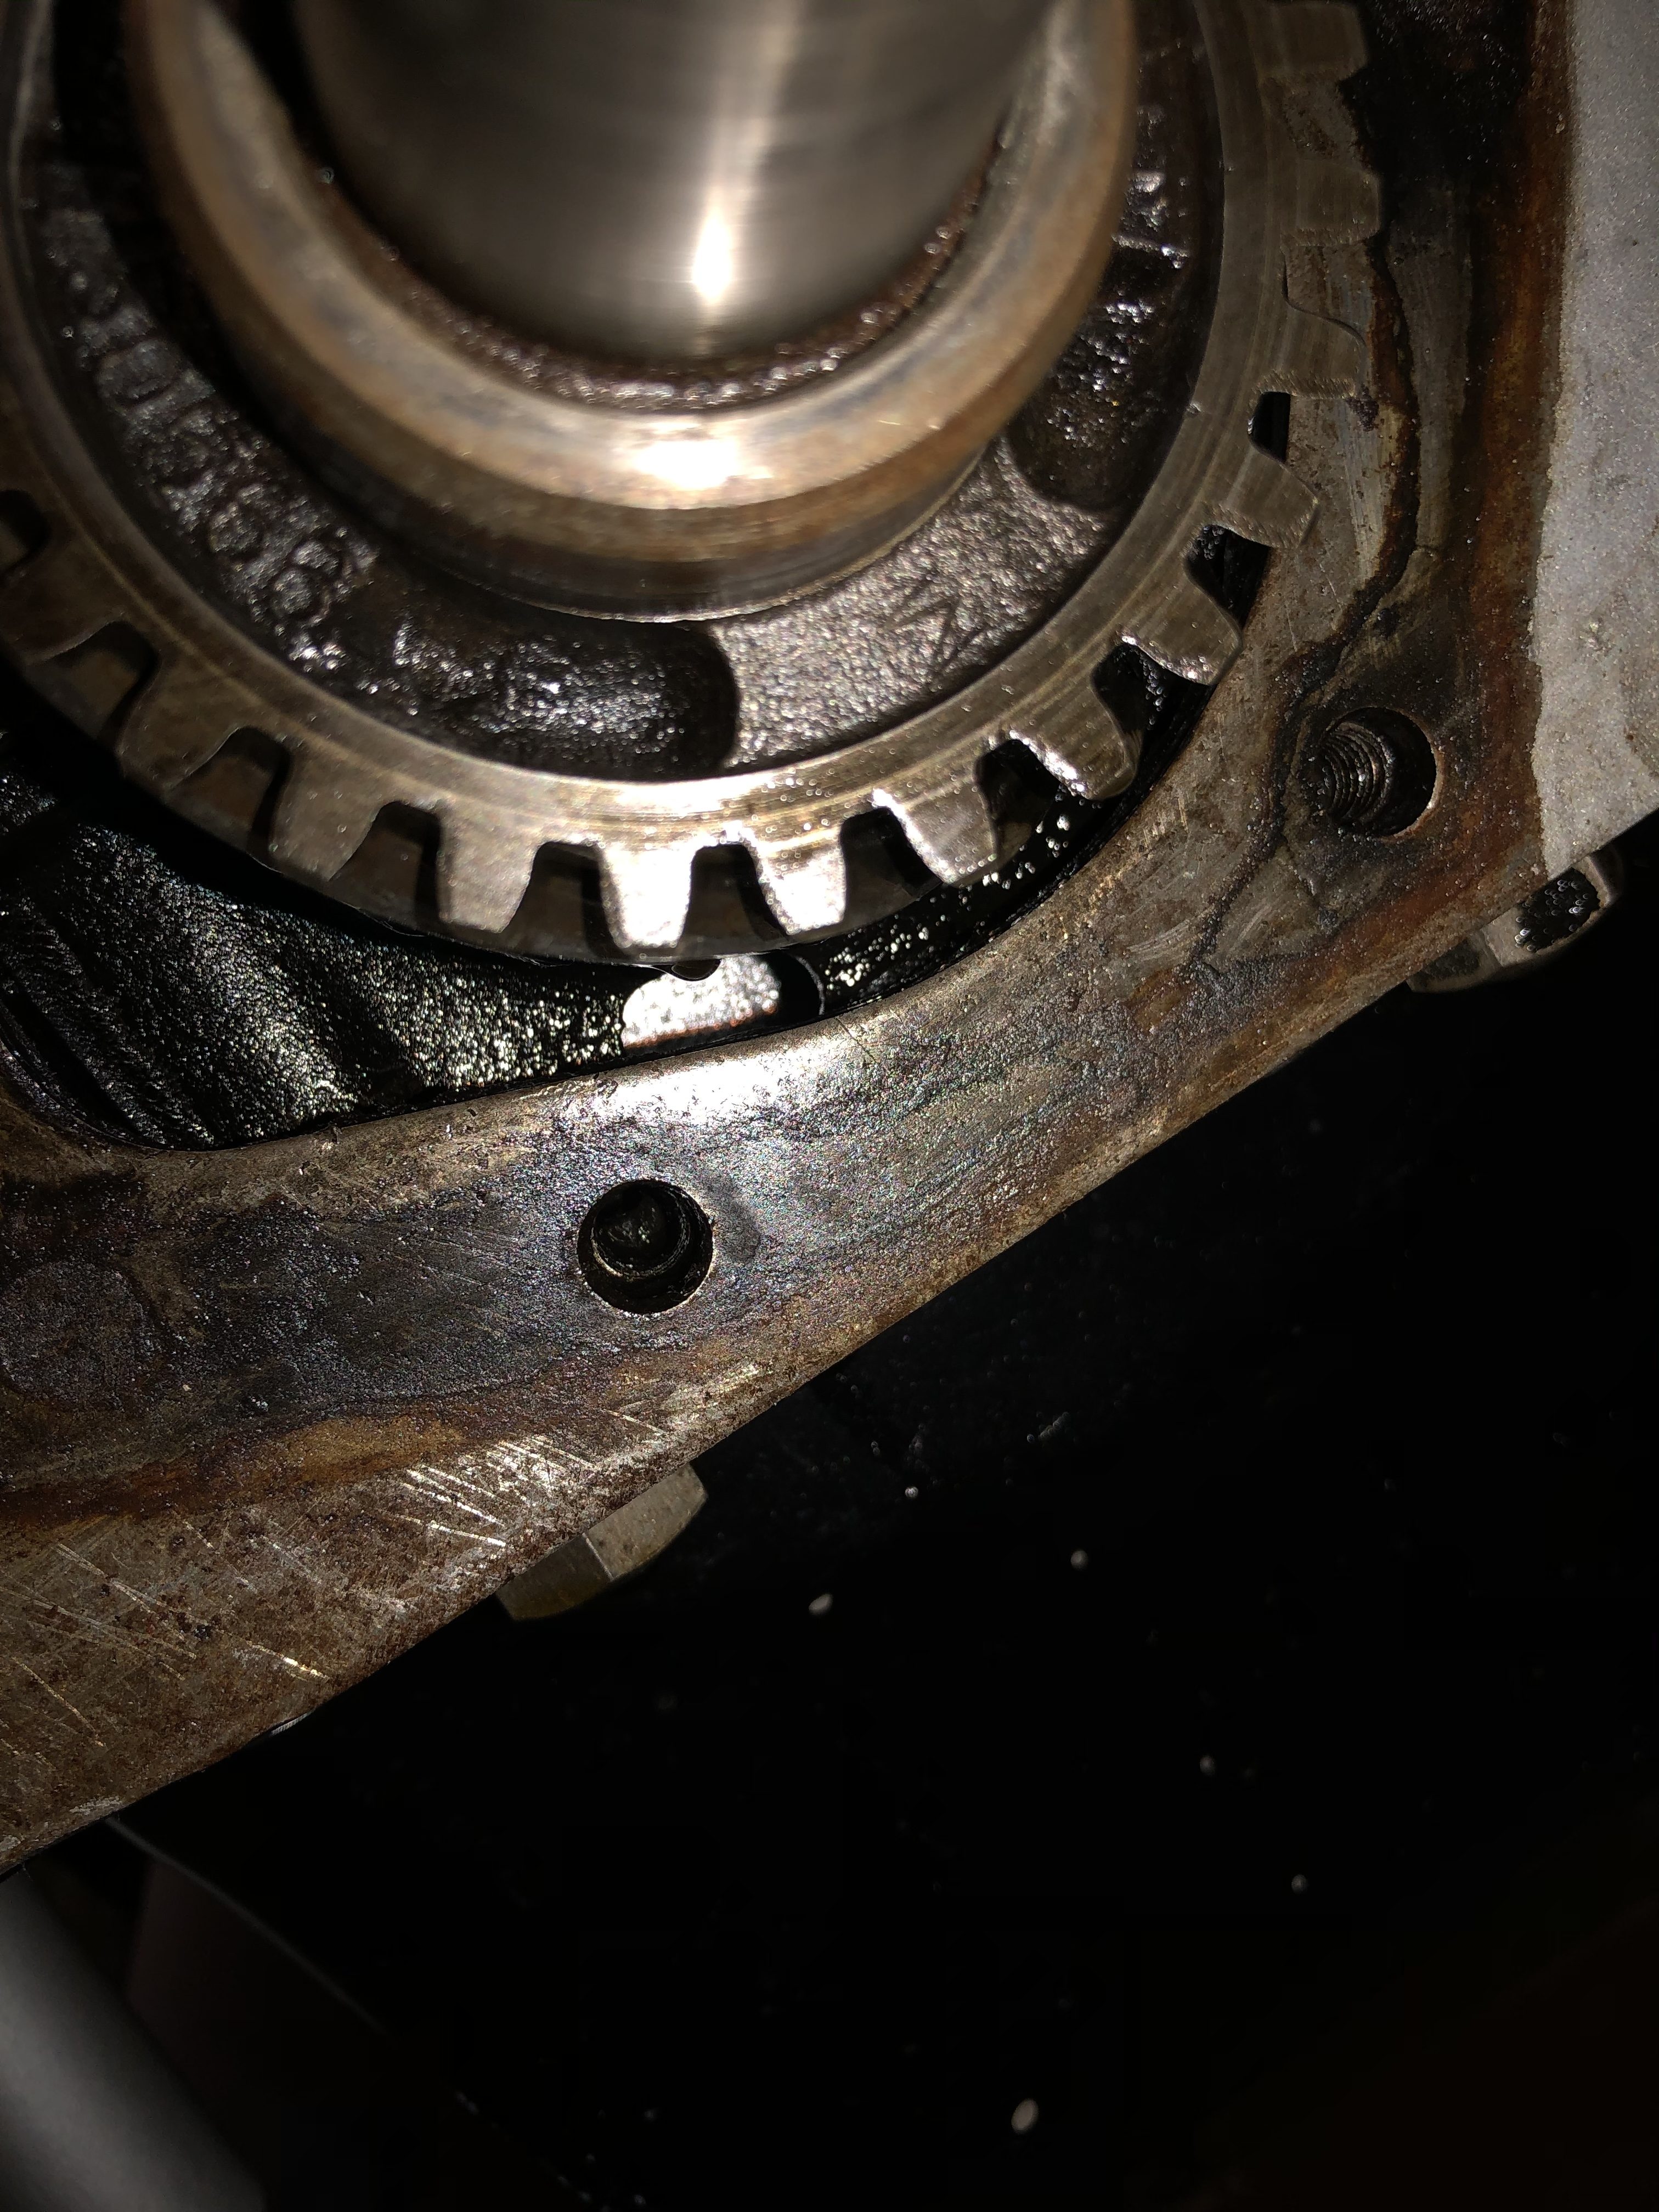
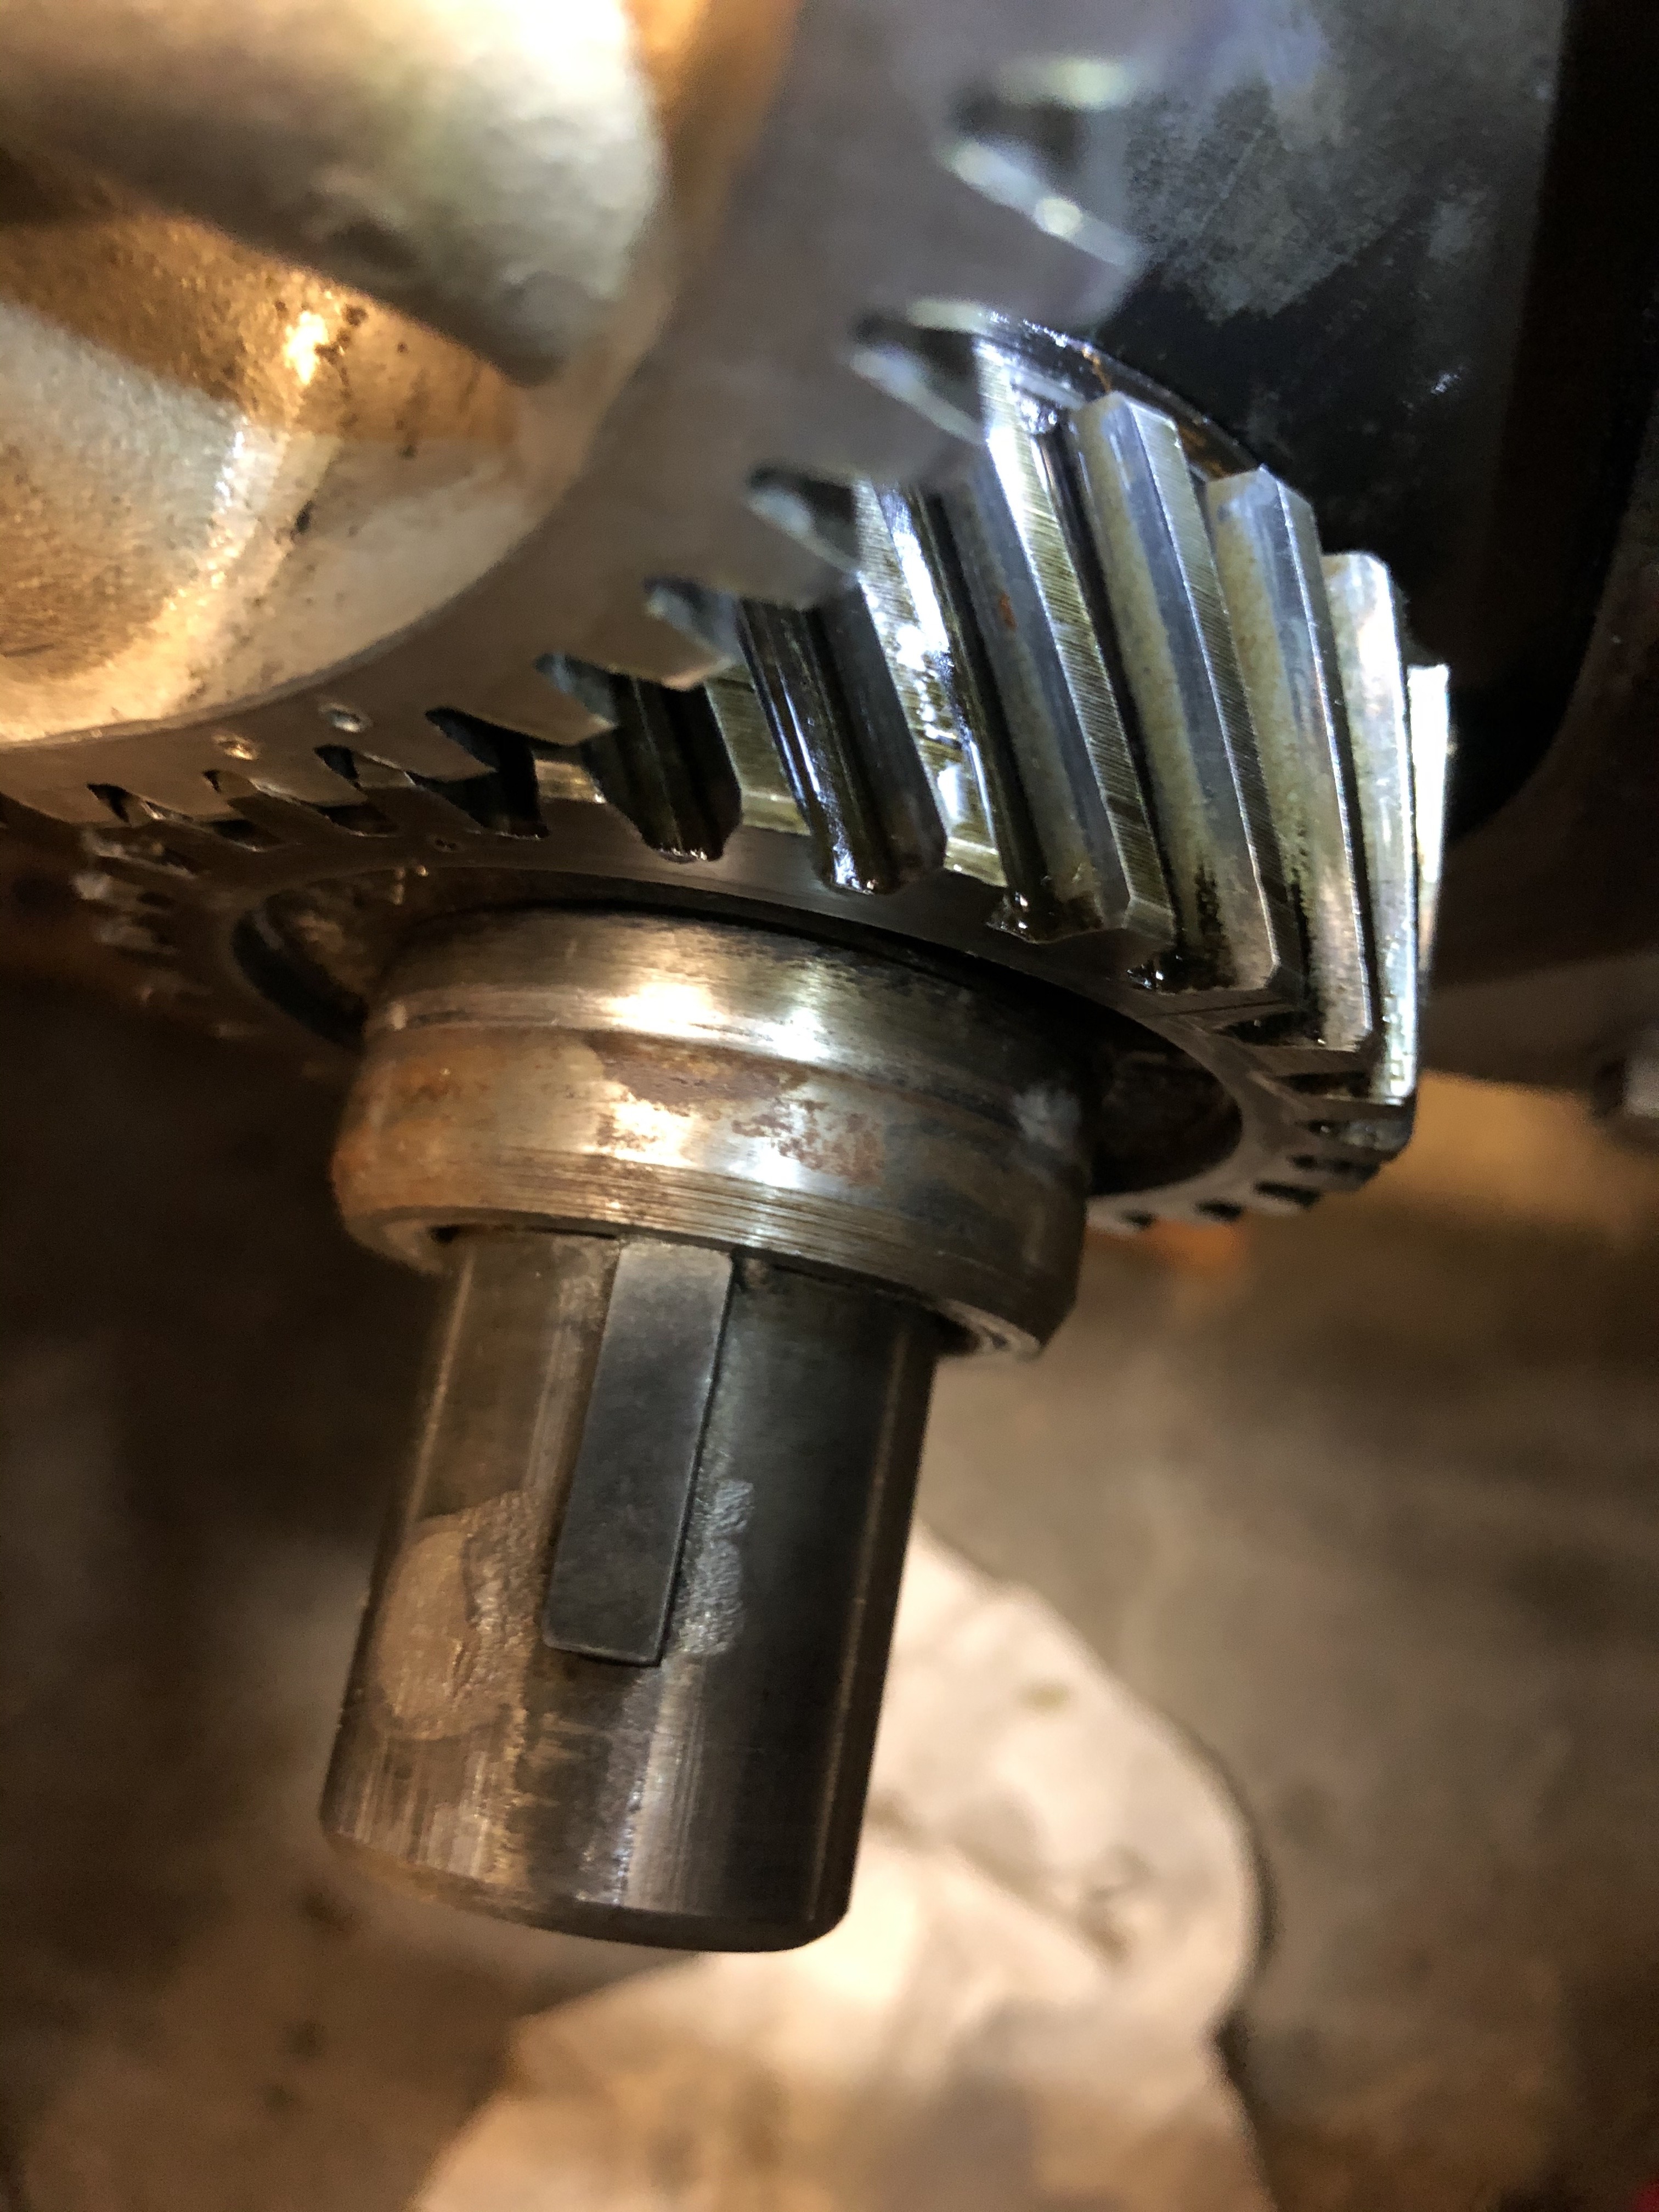
1) Staring me in the hairy eyeball was an aluminum cam gear!?!
2) As I stood there looking at the aluminum gear, wondering where the heck all the engine noise has been coming from, I realized there was no “cam spring” pushing against the timing cover when I removed it!?!3) Upon examination the crank gear to see if it was changed to a 20 degree gear to match the aluminum cam gear, I found part of the cam thrust washer wedged behind the crank gear! Unfortunately When I had the engine apart last winter, I had found a small piece of what I now know to be from the cam thrust washer in an oil trough inside the engine but my local Hudson guy didn’t recognize it as anything at that time.
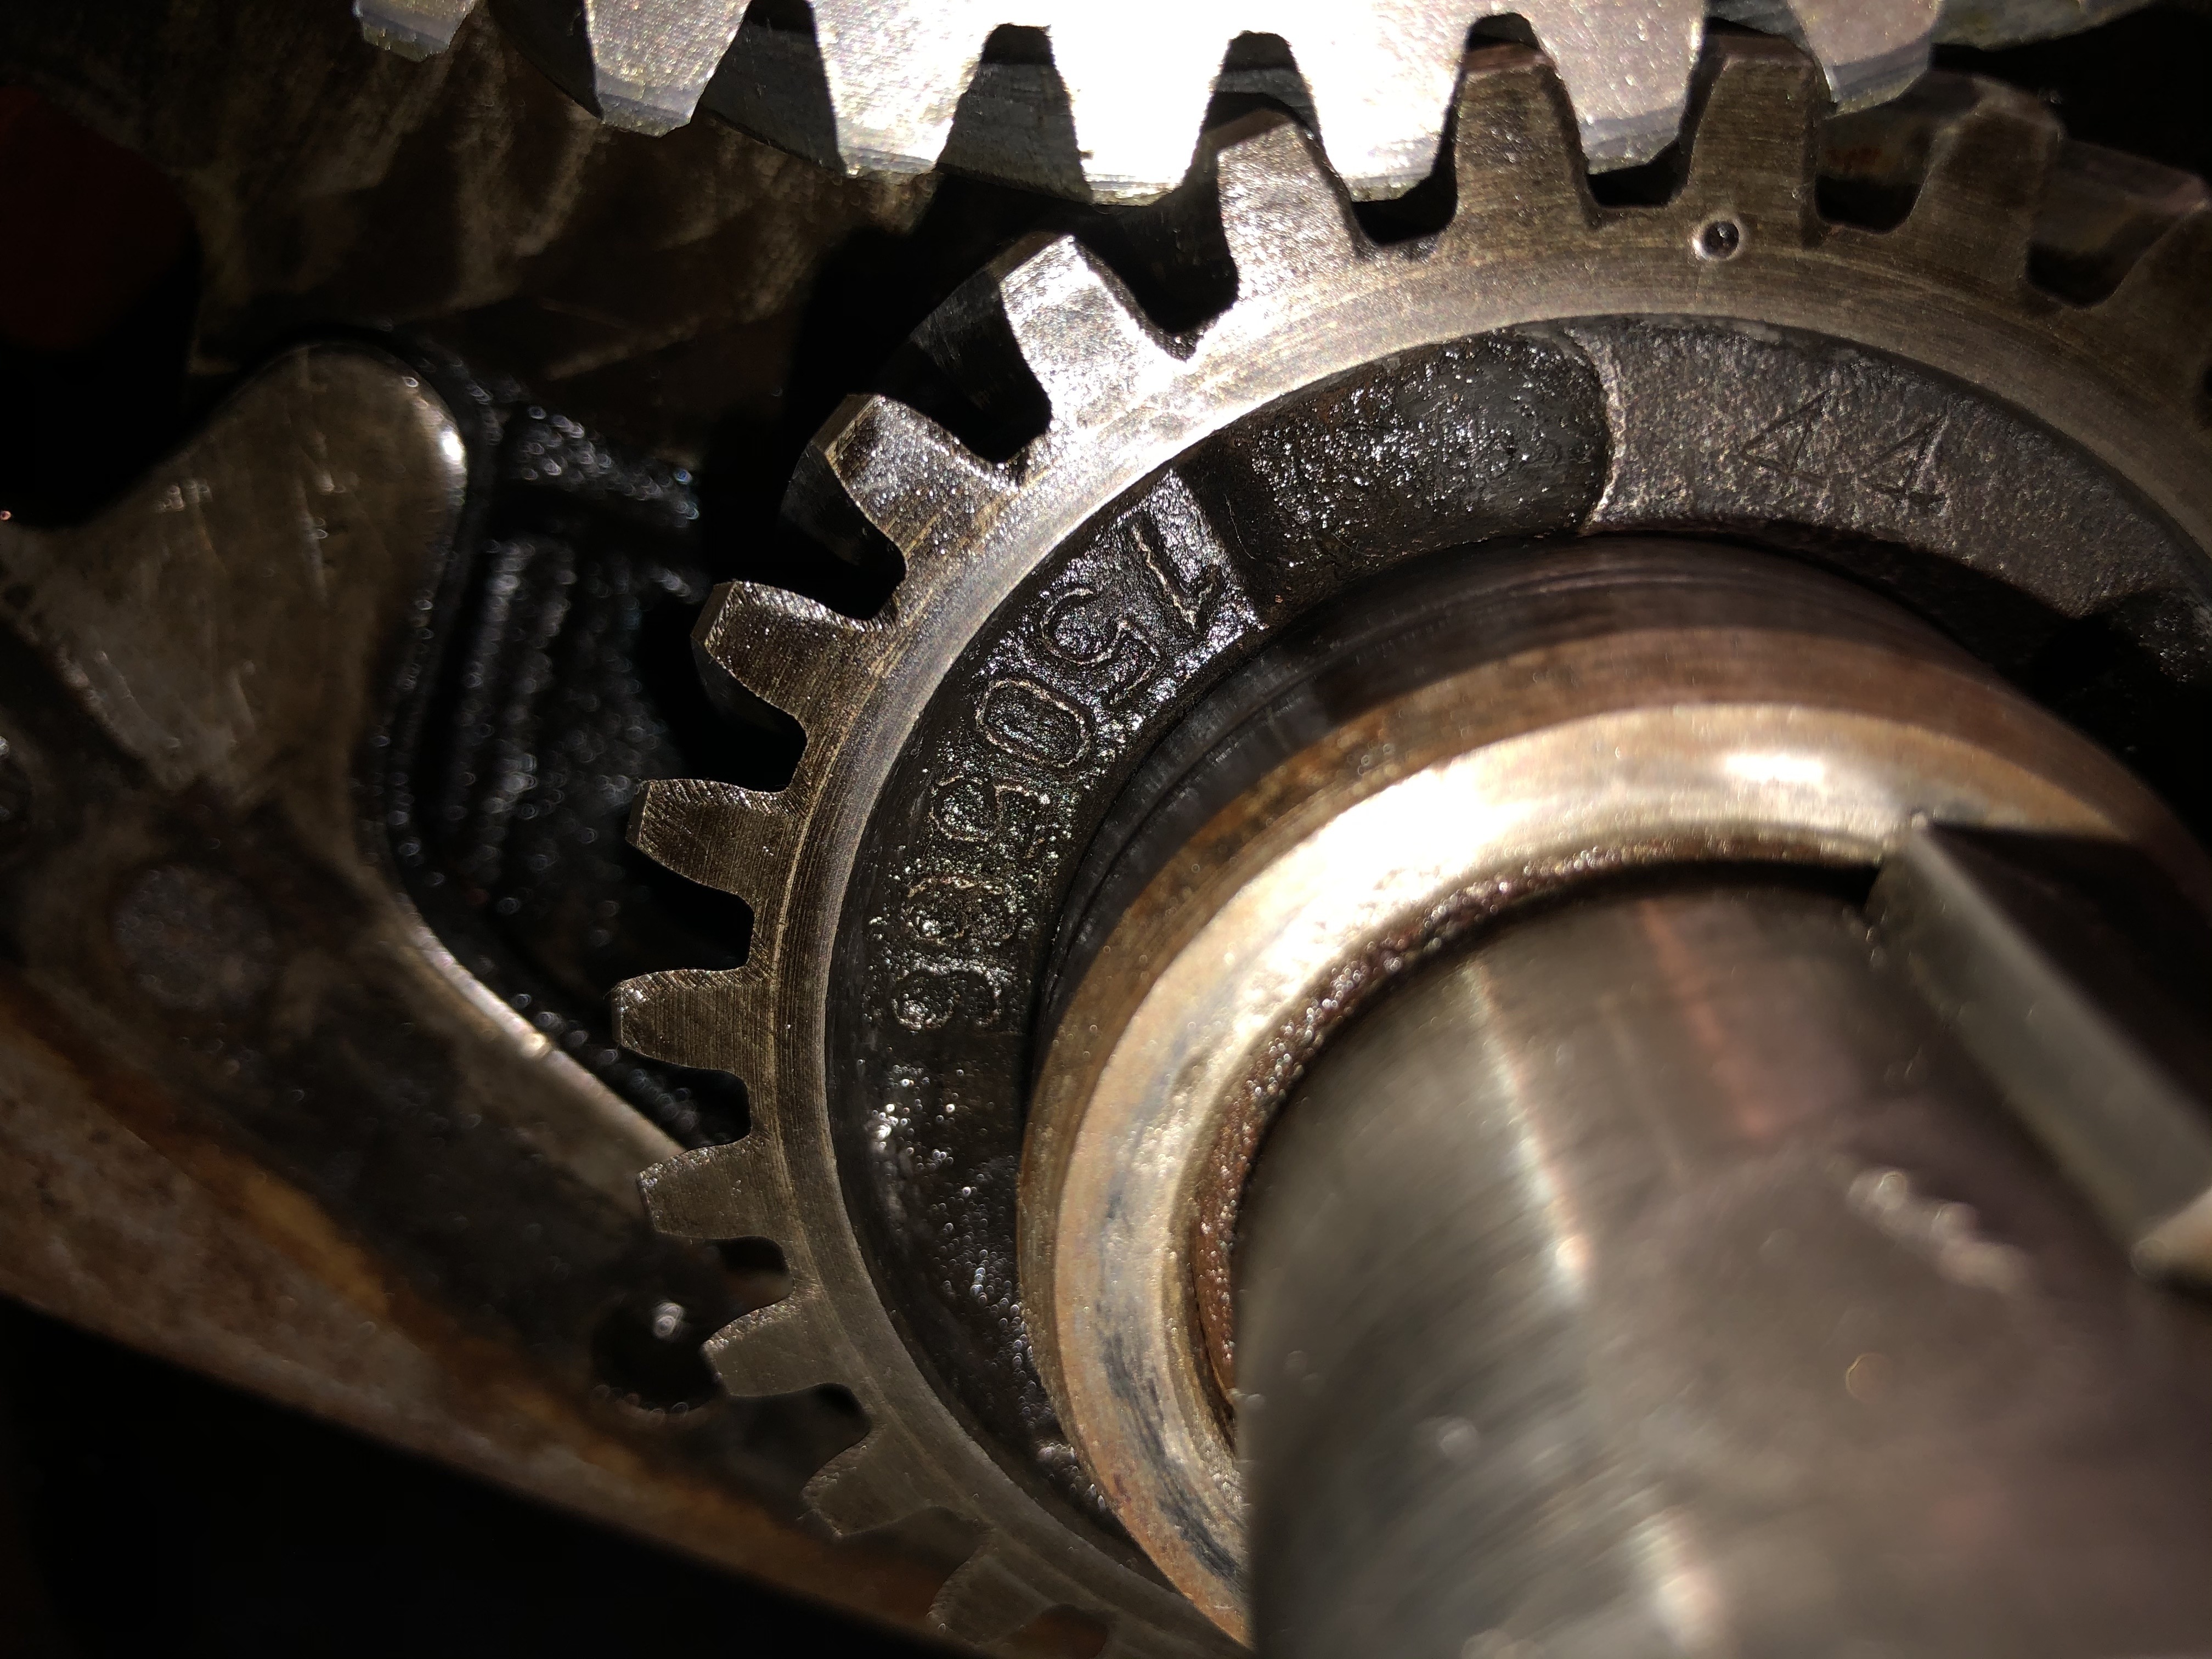
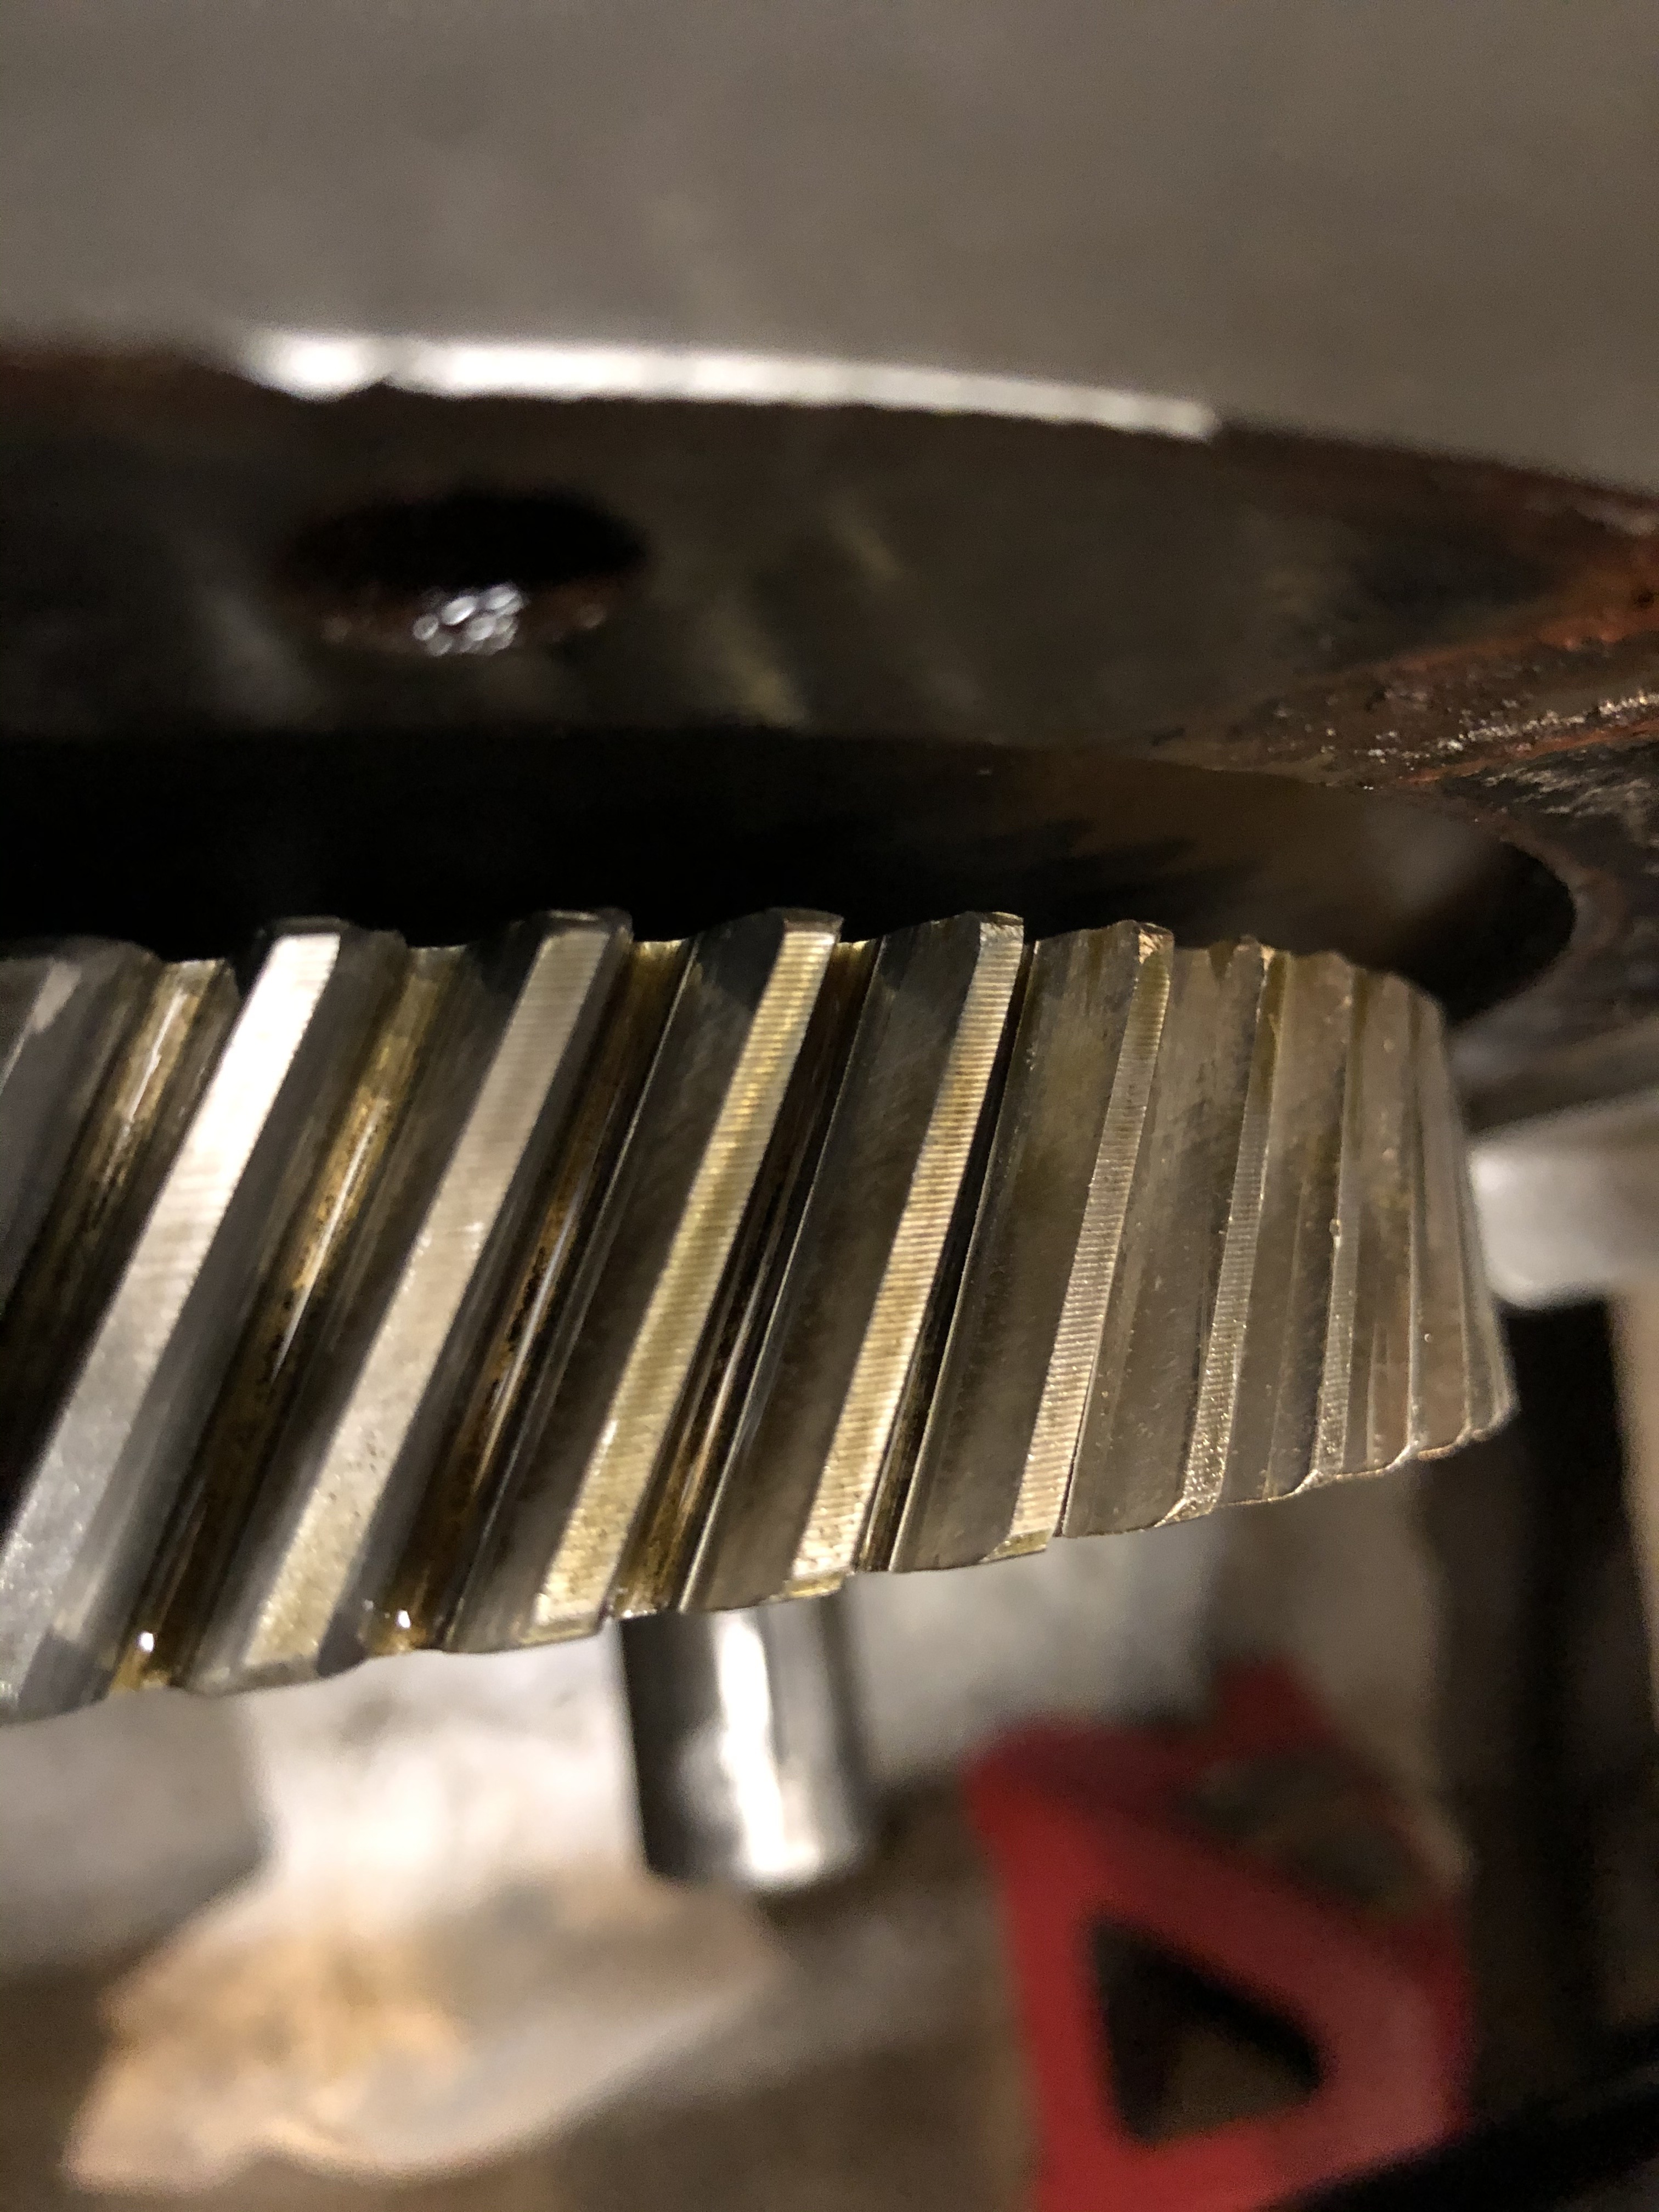
4) looking over the crank gear I found it did NOT have the “20” on it as it should to designate the 20 degree gear angle, so it has to be the stock gear!5) Finally, examining the gears it looks like there is some wear on the gears, but I’m no expert on the level of wear present.
My time in the garage most likely is done for the day but I will be interested to see if the bolts are hitting the back of the cam gear or what’s actually going on there. So Geoff, what do you suggest is my course of action, what has to be done from what may be a check & see?

 0
0 -
Okay, if the thrust washer is missing, then you need to remove the cam gear and check that the engine plate bolts are either counter-sunk, or machined thinner. The noise you hear will be the spokes of the gear hitting a bolt had most likely. Whatever, you will have to replace the thrust washer, which will most likely cure everything. Also you need the peg and spring of course. In fact the angle of the gears thrusts the cam gear rearwards, so there is little danger of the cam gear coming forward, but you still should have the thrust peg and spring in there. the crank gear is the correct part number for the later 20 deg. gear. Have fun !0
-
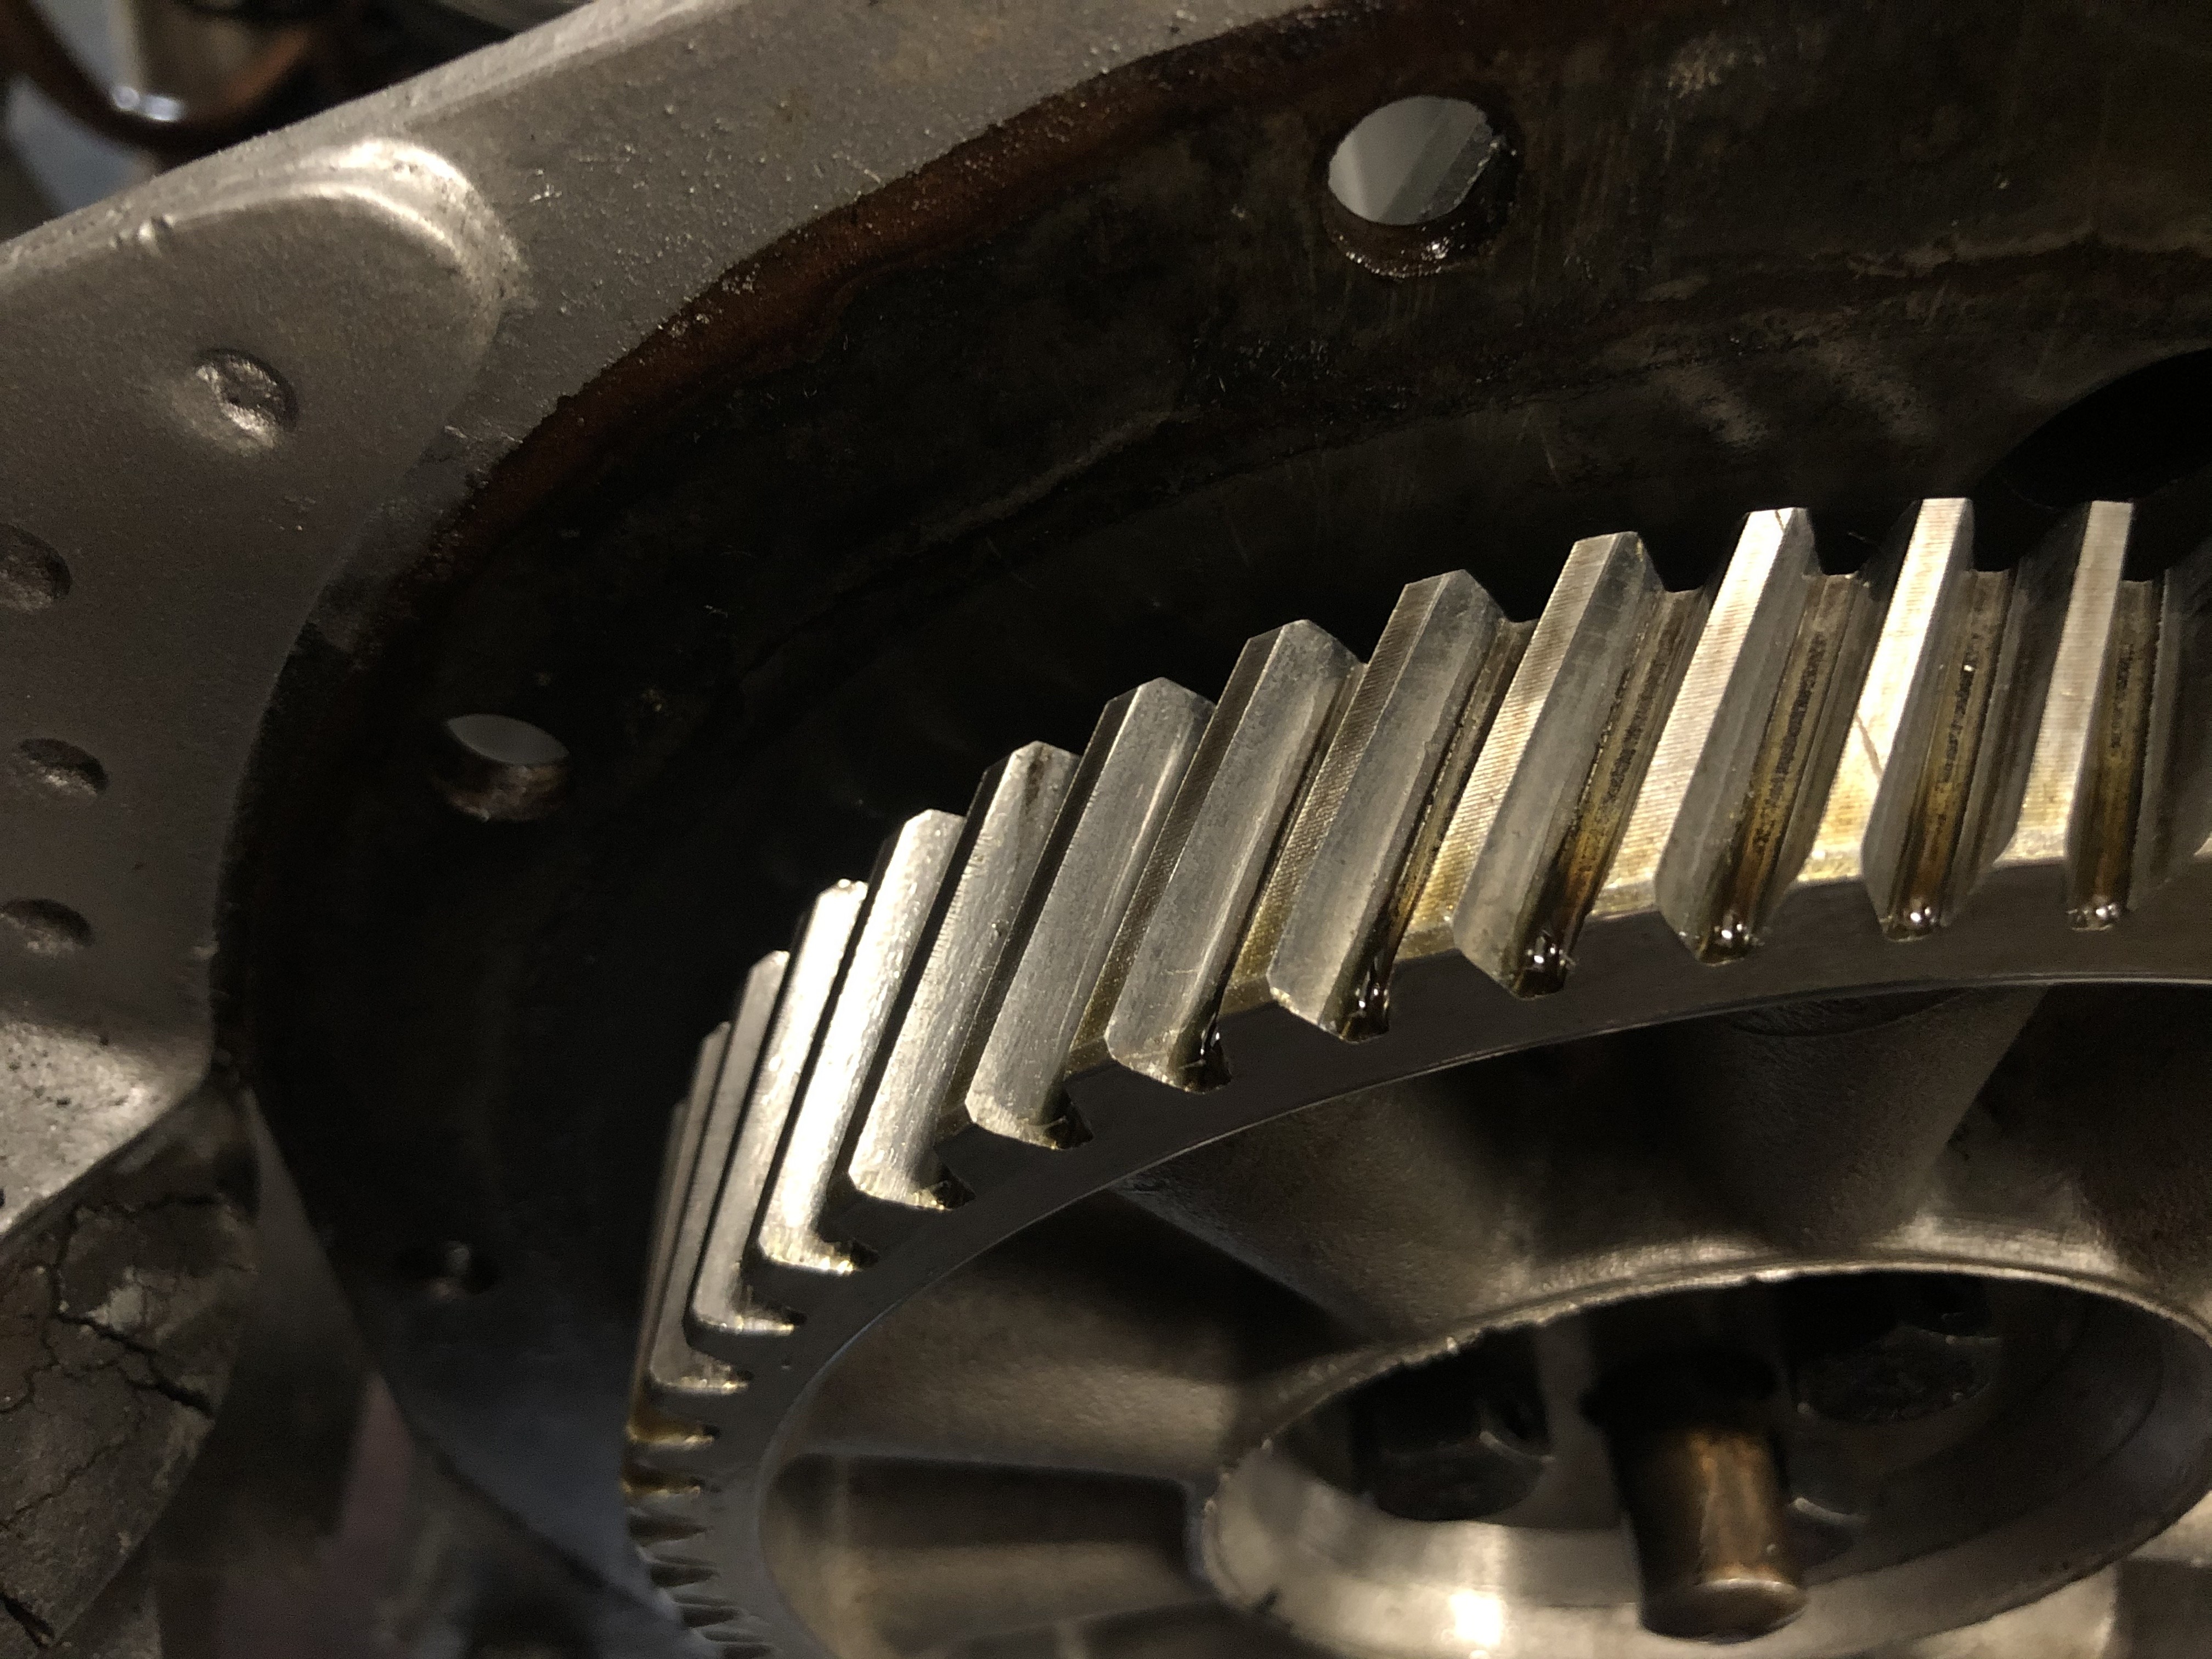
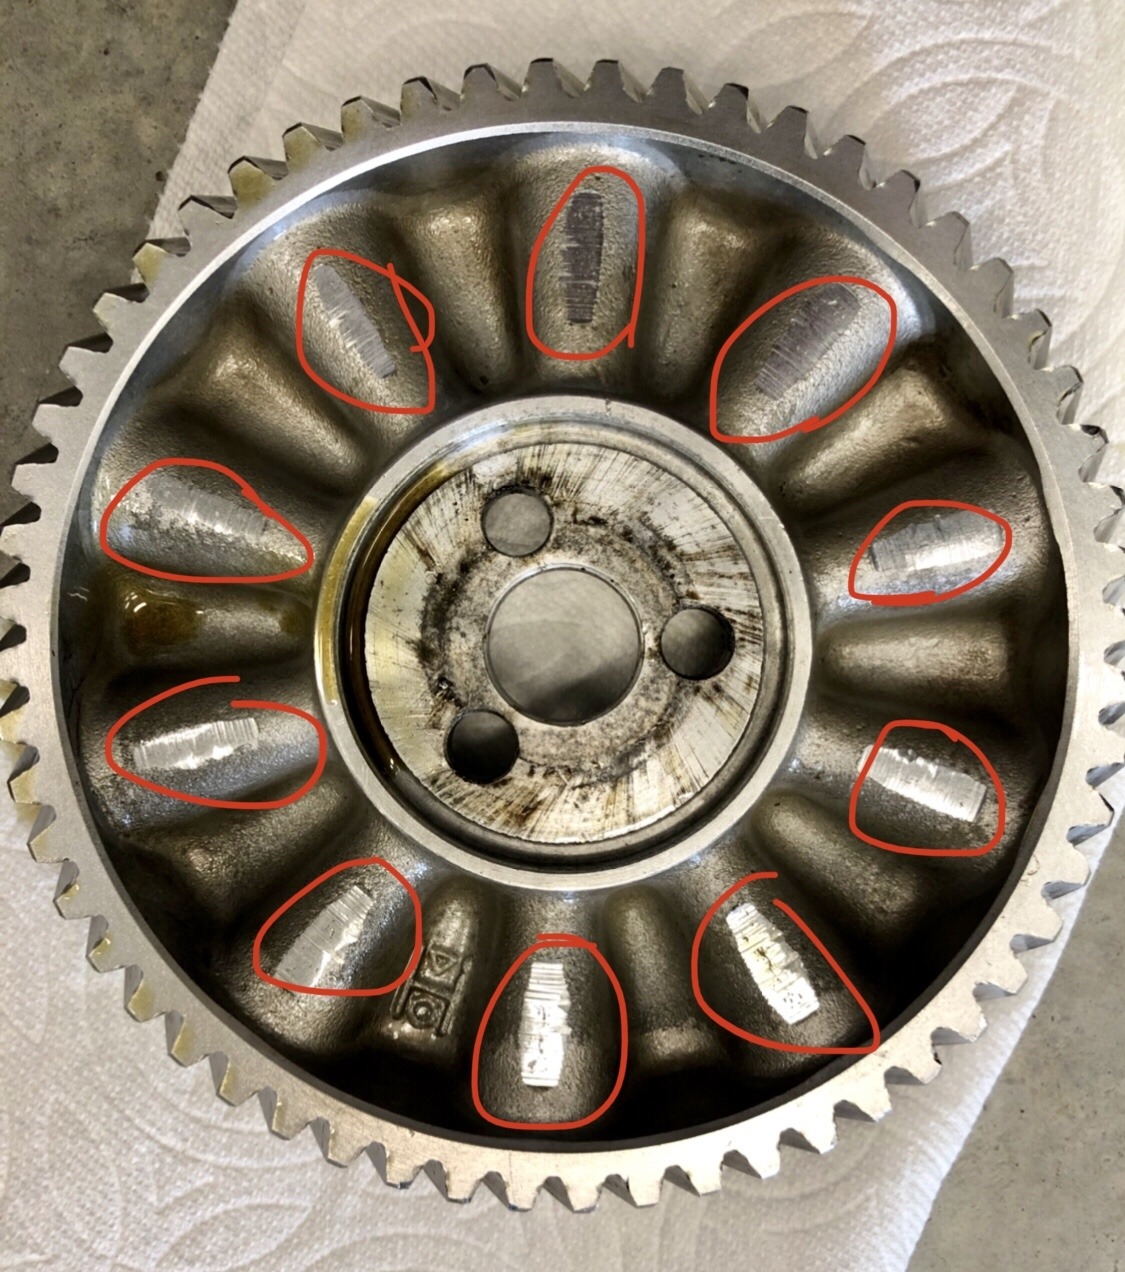
Took the cam gear off & you nailed it, the spokes on the backside of the cam gear were hitting the bolts heads! It’s hard to believe that the missing 1/16” cam thrust washer was effecting everything so dramatically, the timing, the engine sputtering when driving, etc.
 I’m guessing they were machined flatter but just to be sure, what is the maximum thickness the bolts can be?
what did you think of the wear on the gears, is there concern?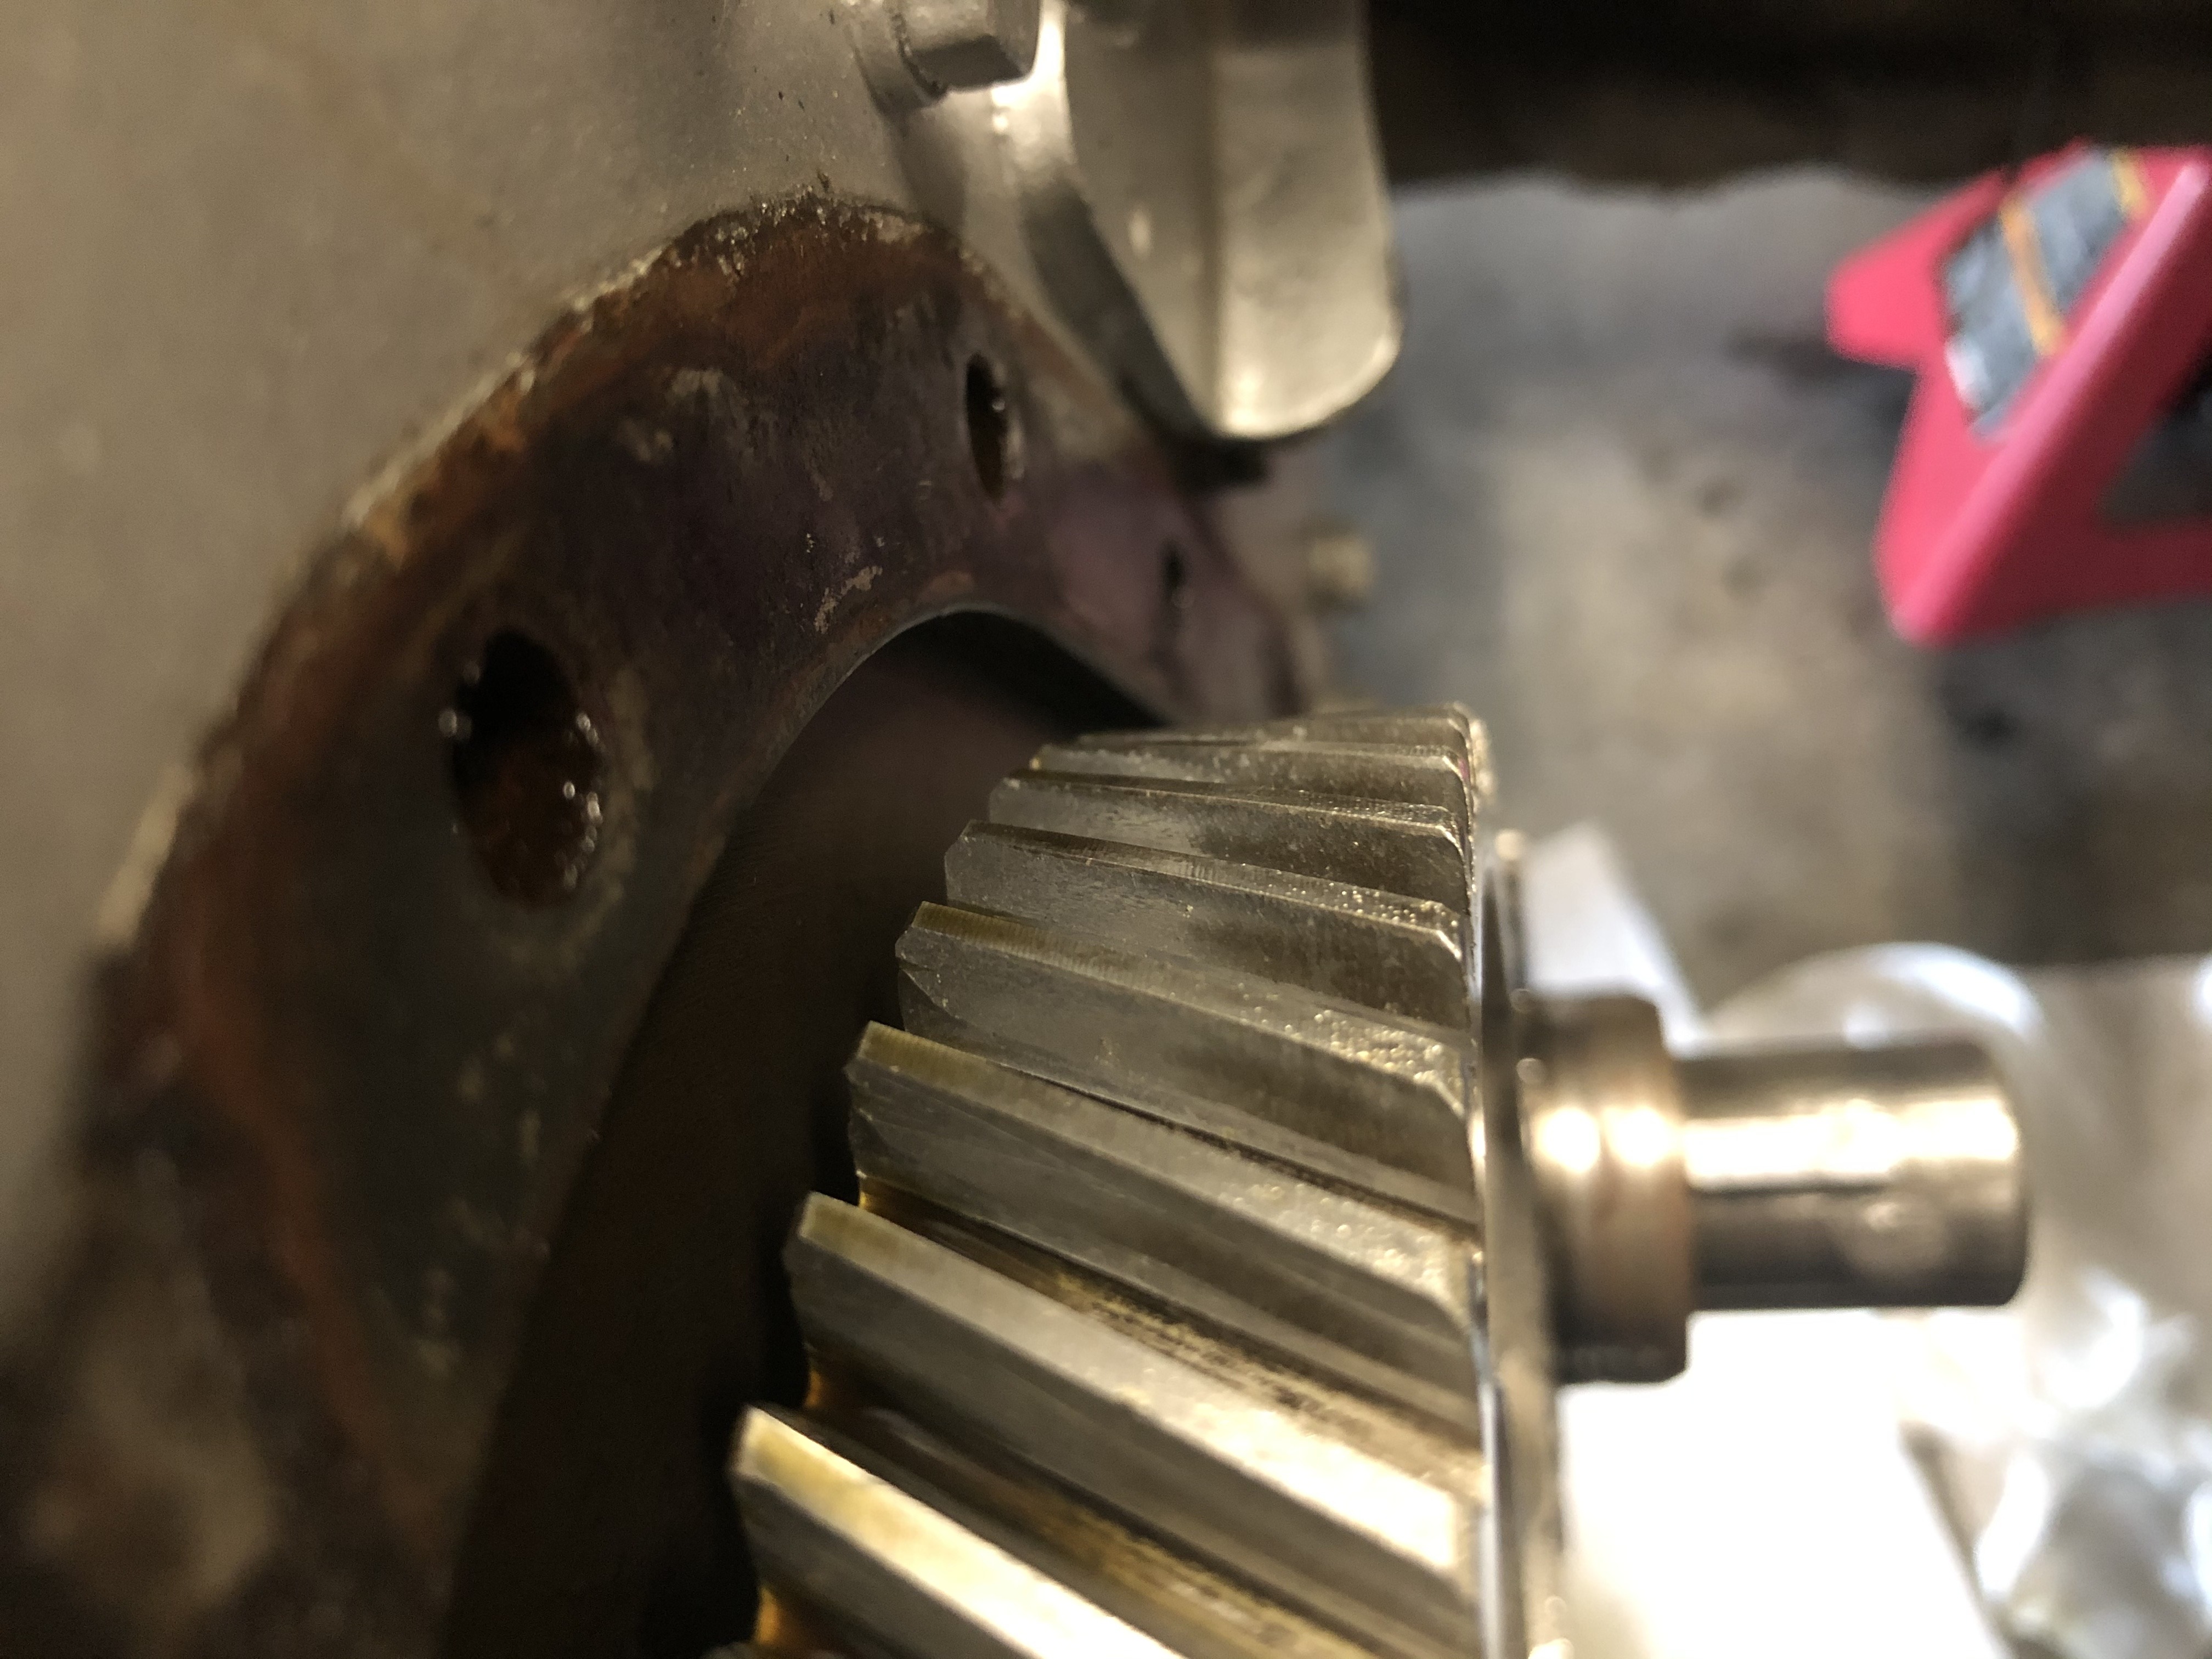
 Just for reference here are the videos showing the effect it had on the engine. 1st video was of the engine sputtering when on an appropriate 30-45 minute drive: https://youtu.be/ea0Z8leqZ7UThis later when I put the timing light on the engine & one can actually hear the rattling noise (cam gear hitting the bolts behind it) and timing all crazy: https://youtu.be/cA6wP8Kw3Sg0
 -
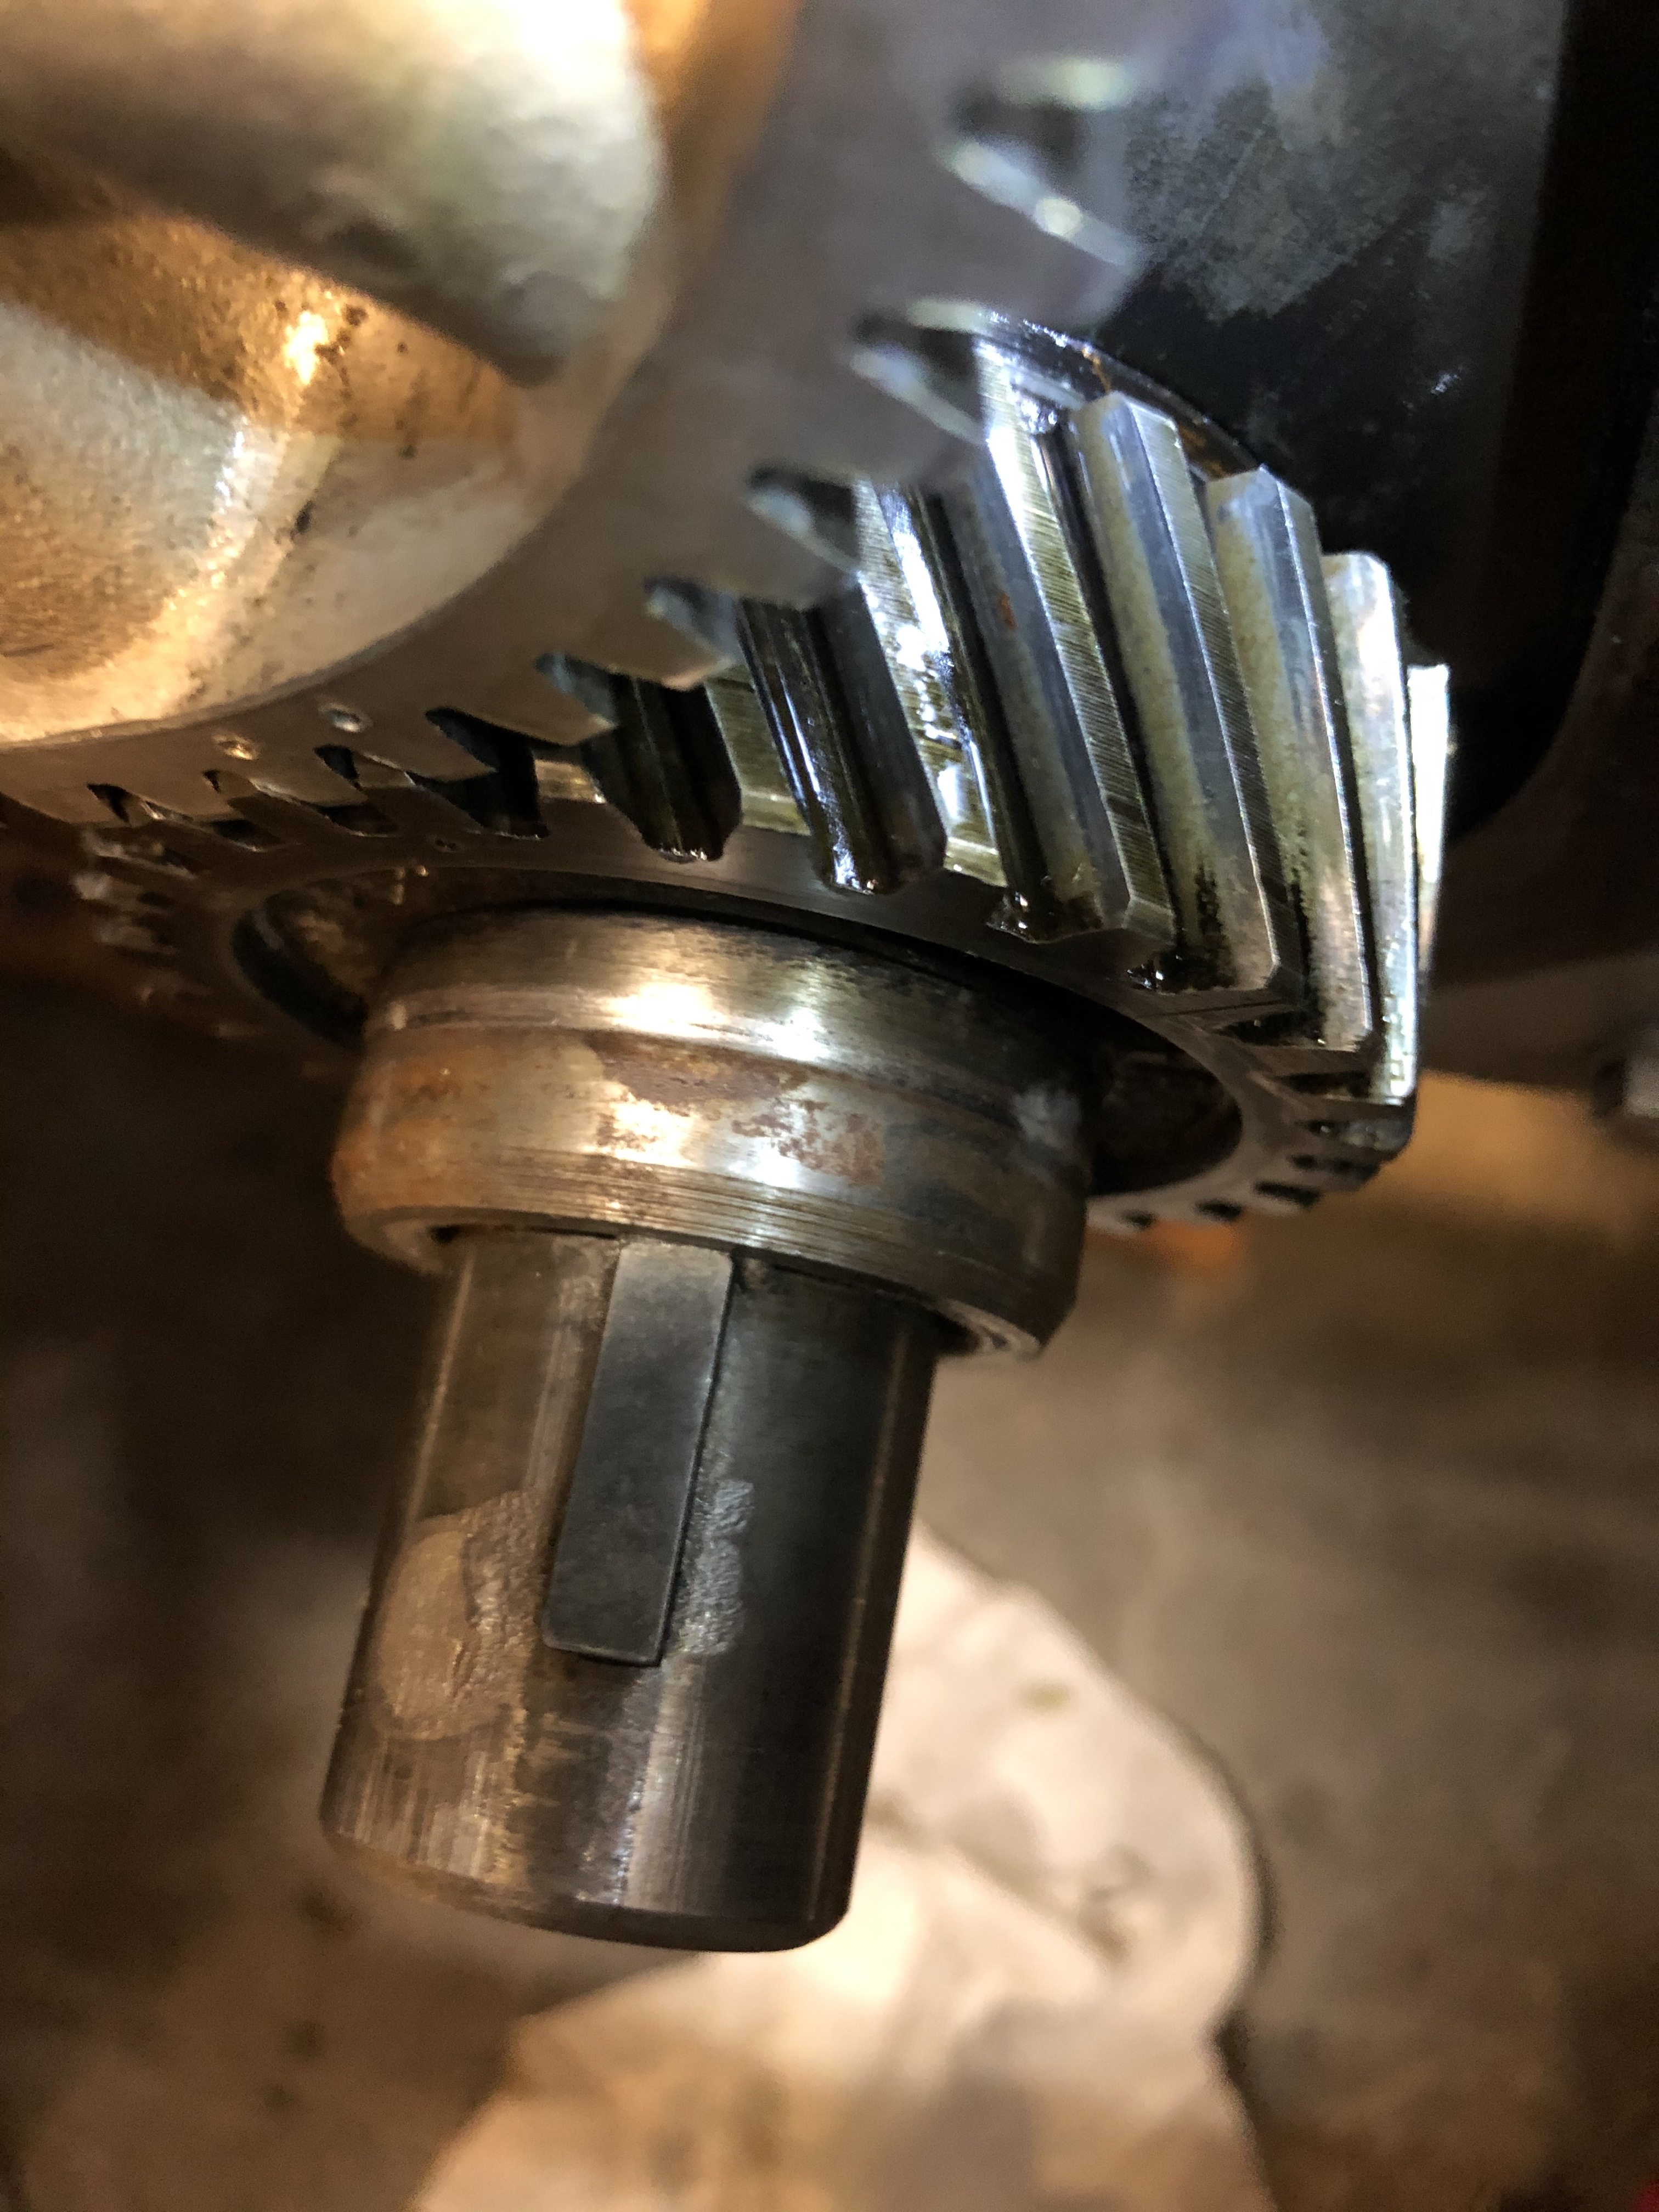
Photo of back of gear where it was hitting?0
-
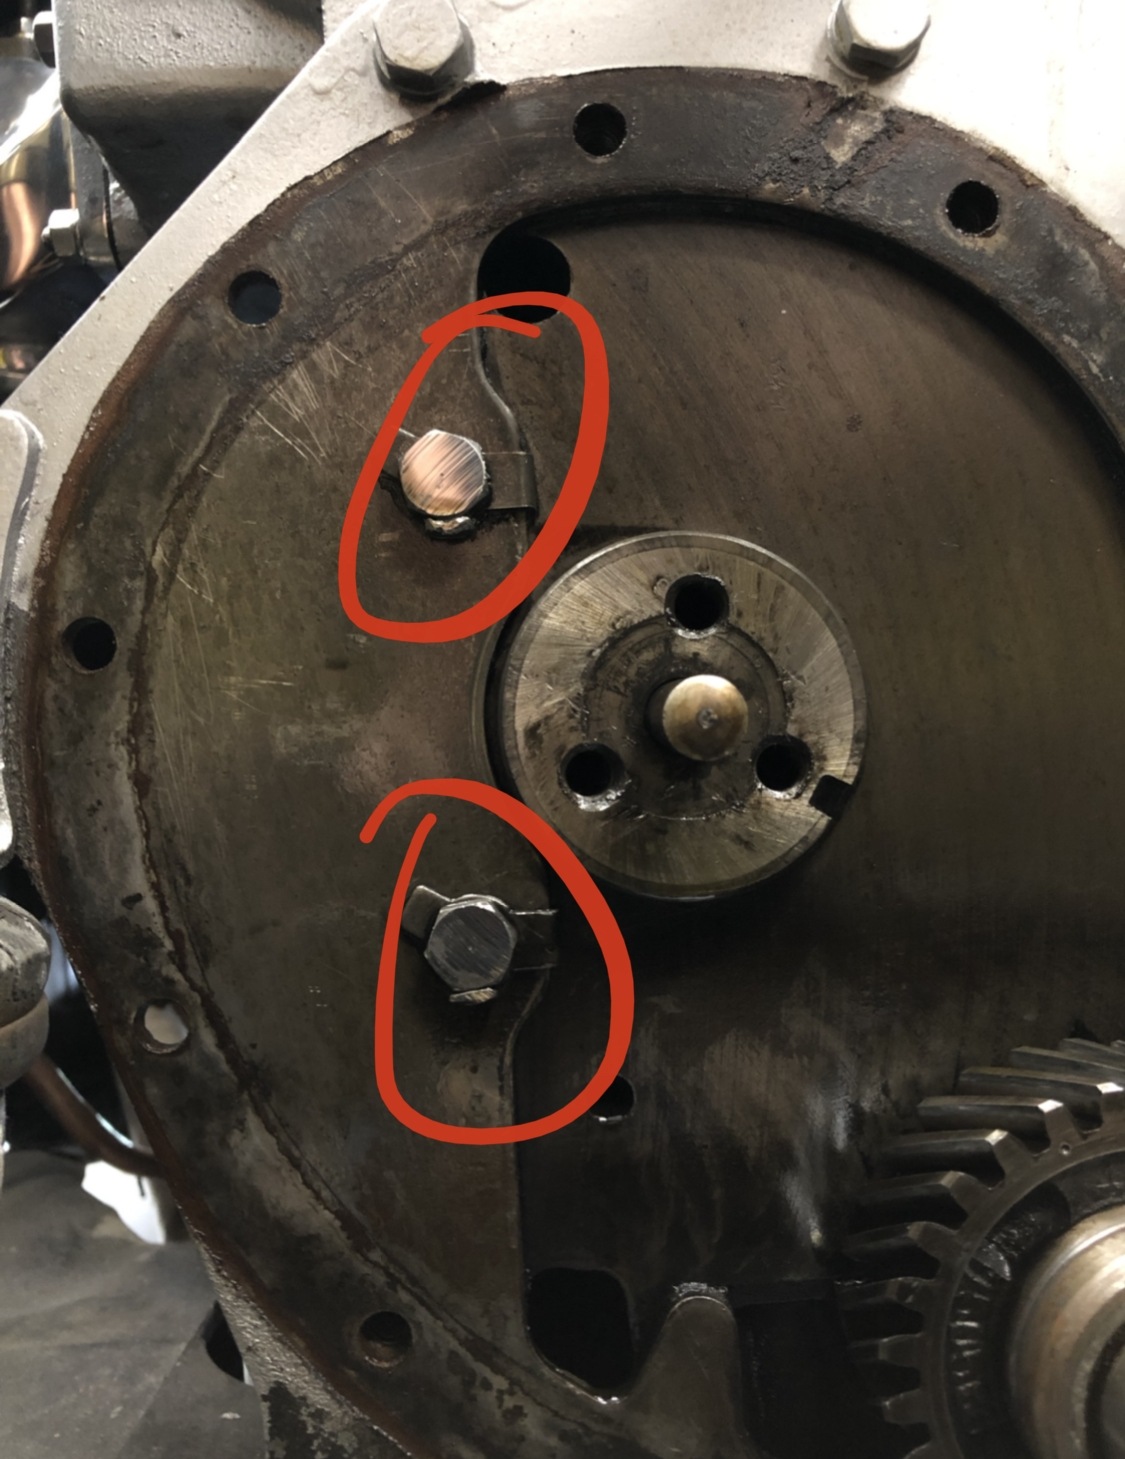
Yes indeed, the two vertical bolts to the left (in picture) of the cam we’re hitting the “spokes” of the cam gear.
 I am guessing here but I may have only 4-6 Hours of run time on the engine since it was apart and put back together this year. I’m not sure how much damage could have occurred in that time, if any. However, I will be dropping the oil pan & checking the cam lobes from down below just to be safe.0
 -
Re bolt head height, if you leave out the tab washers and use loctite on the bolt threads instead, you will find you have enough clearance.
0 -
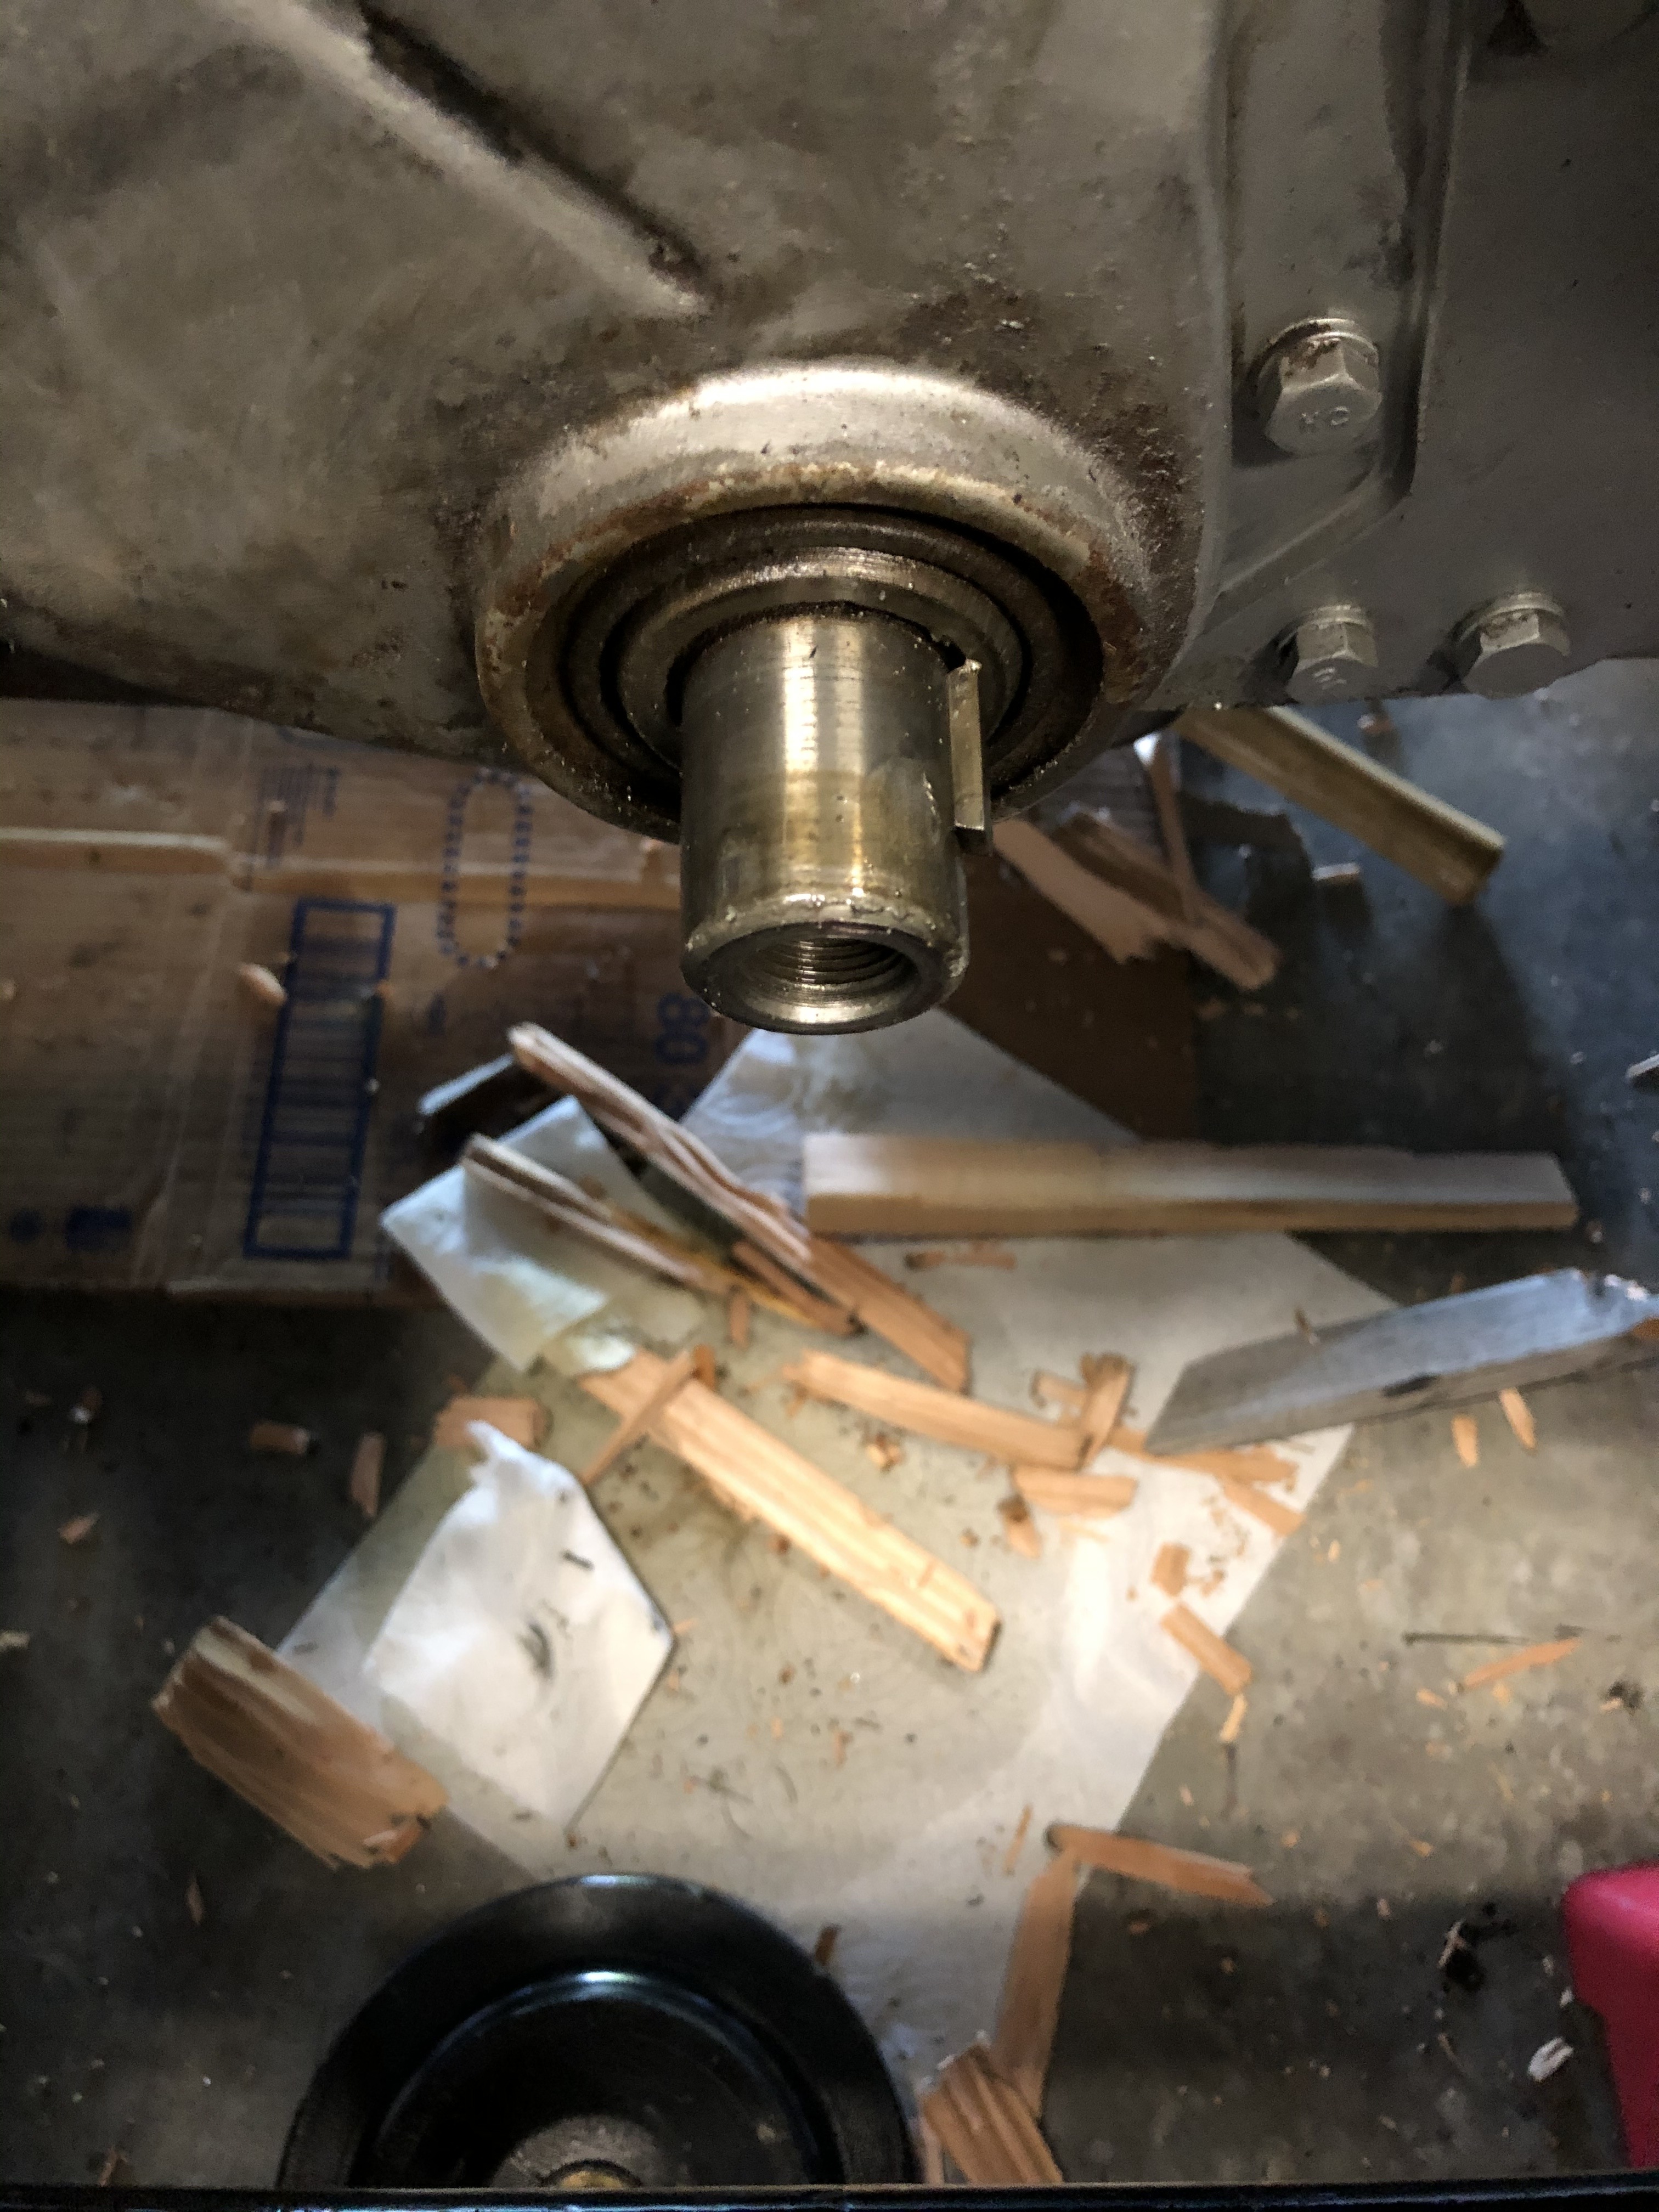
Clean the threads before using loctite. Consider replacing the bush on the crankshaft and use a new oil seal.0
-
A couple people mentioned the bushing had a groove worn in it from the timing cover seal. After pulling the key & then bushing I am wondering if I can just replace it along with the new seal?
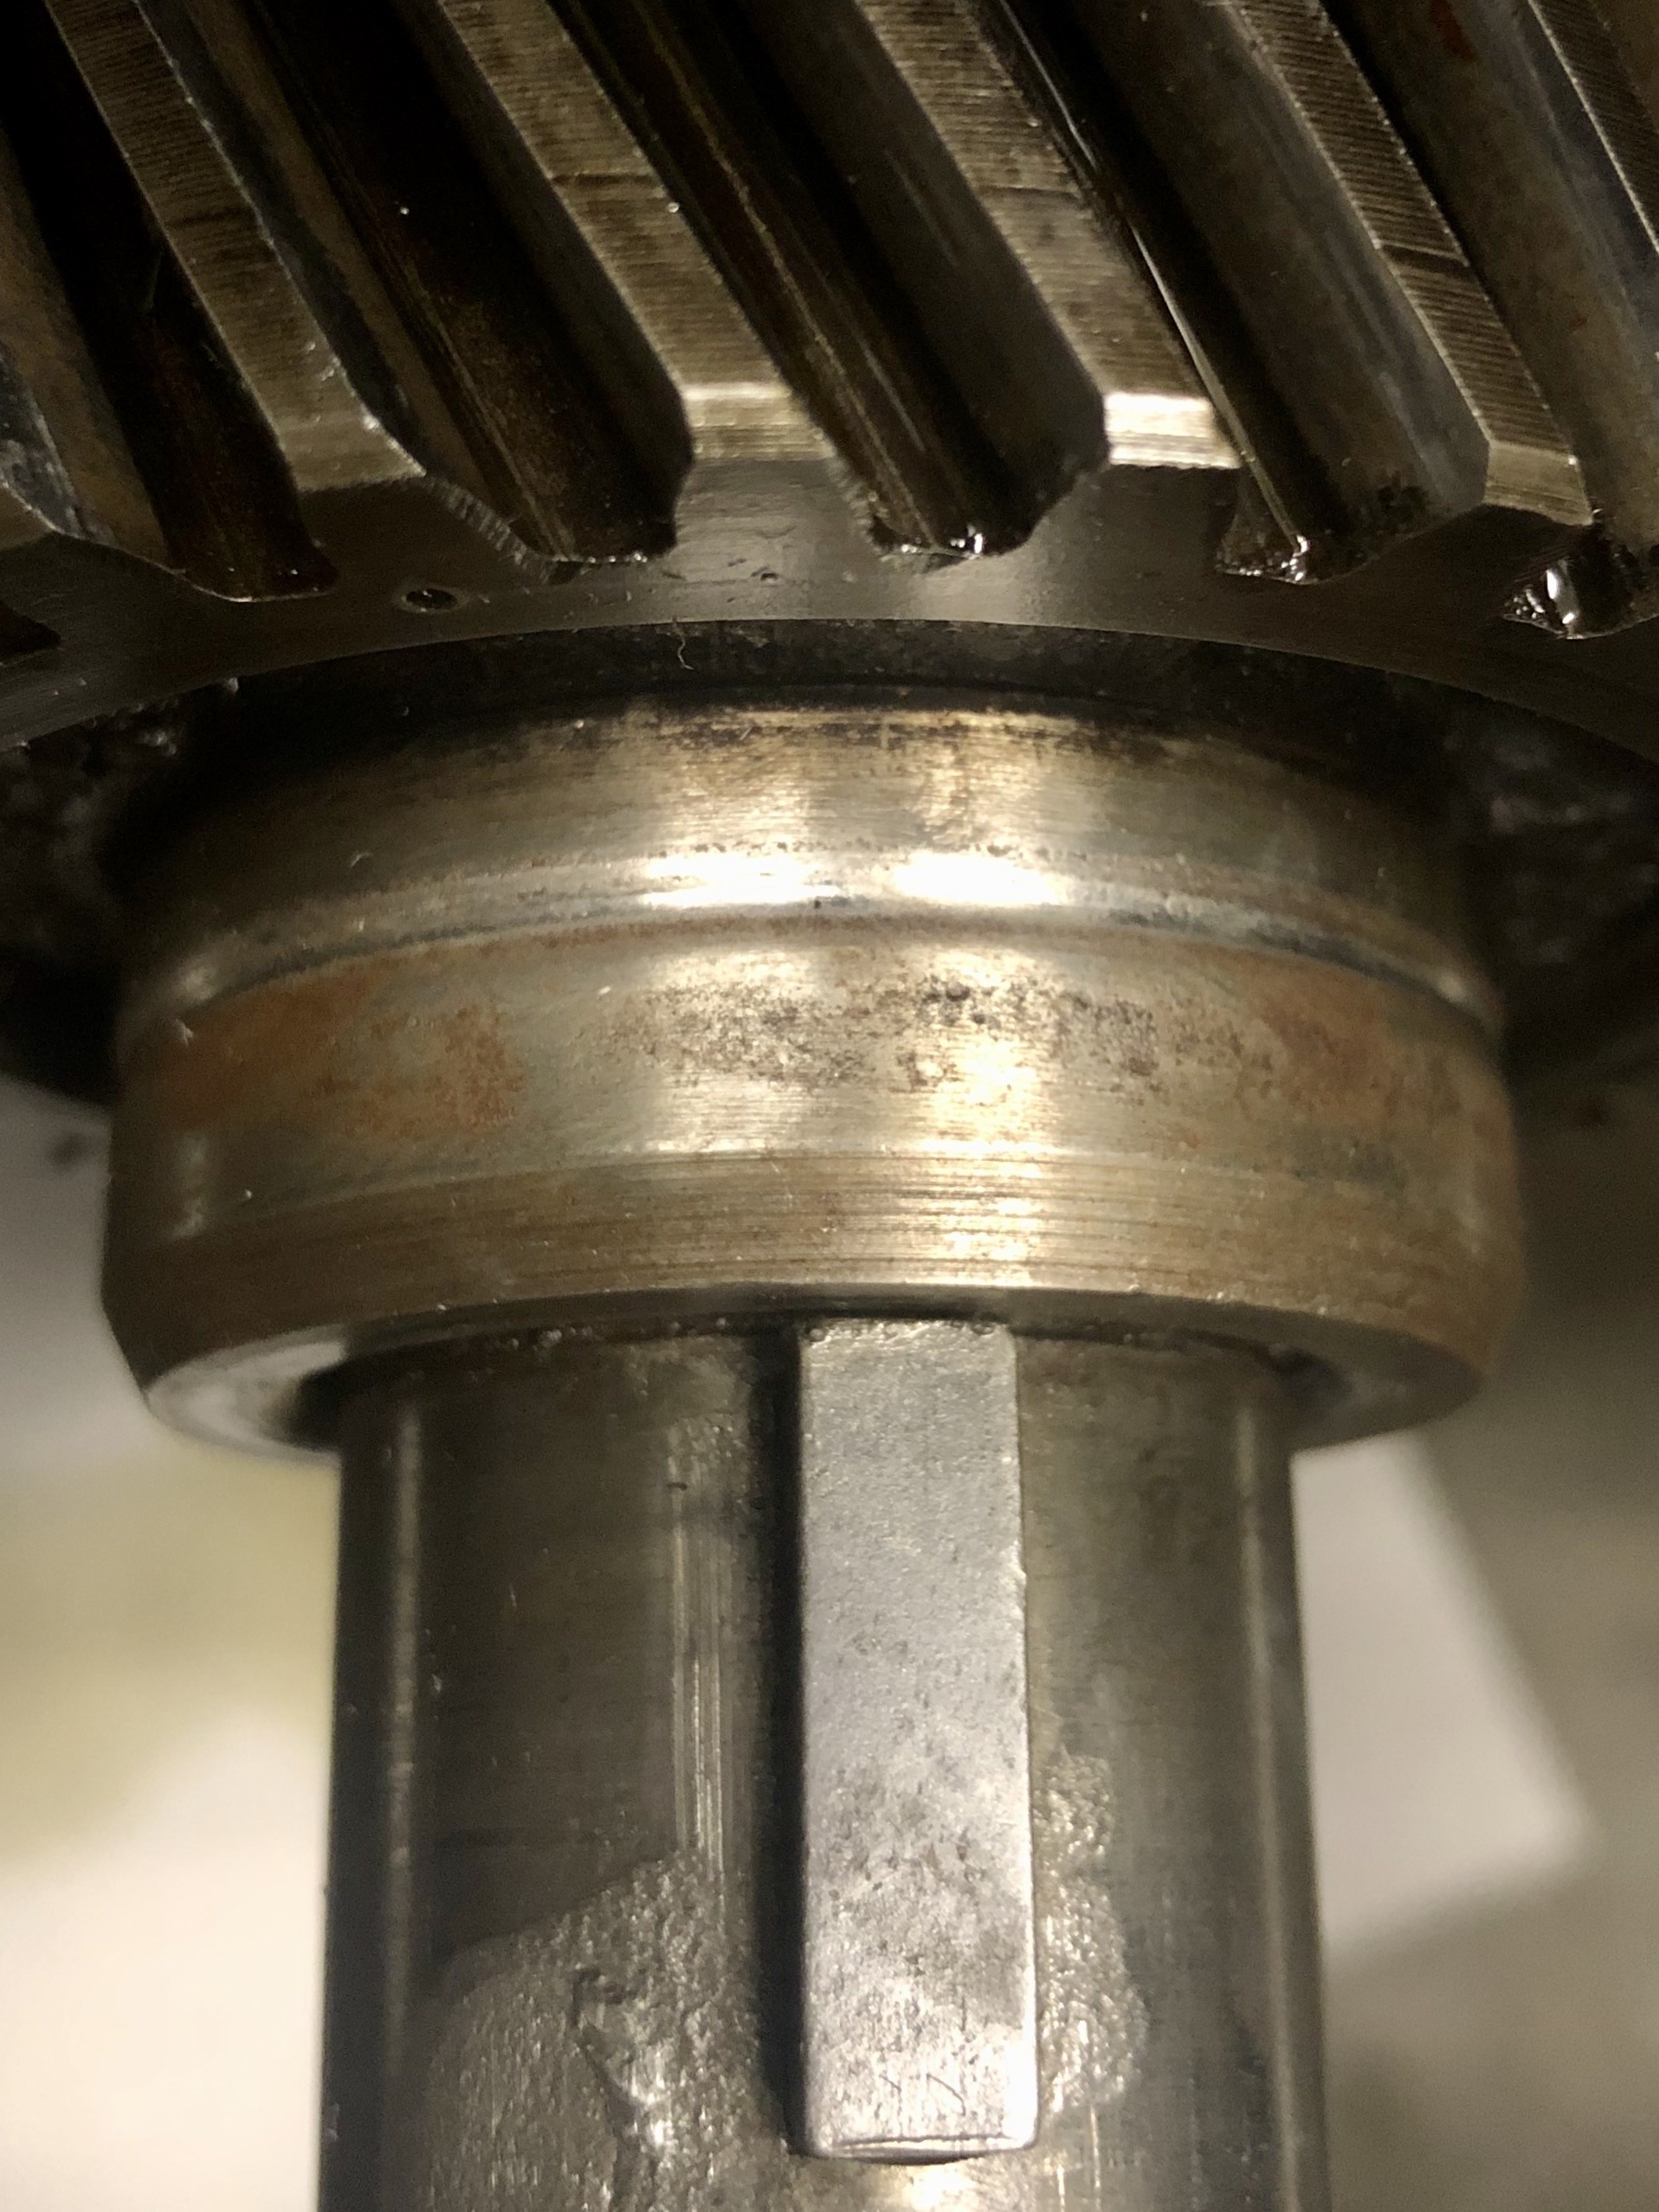
 I noticed earlier the raised spots on the front of the crank, you can see it at the bottom of the top picture above. Which may have lead to part of the difficulty in removing the balancer, thus it’s been cleaned up some for now.
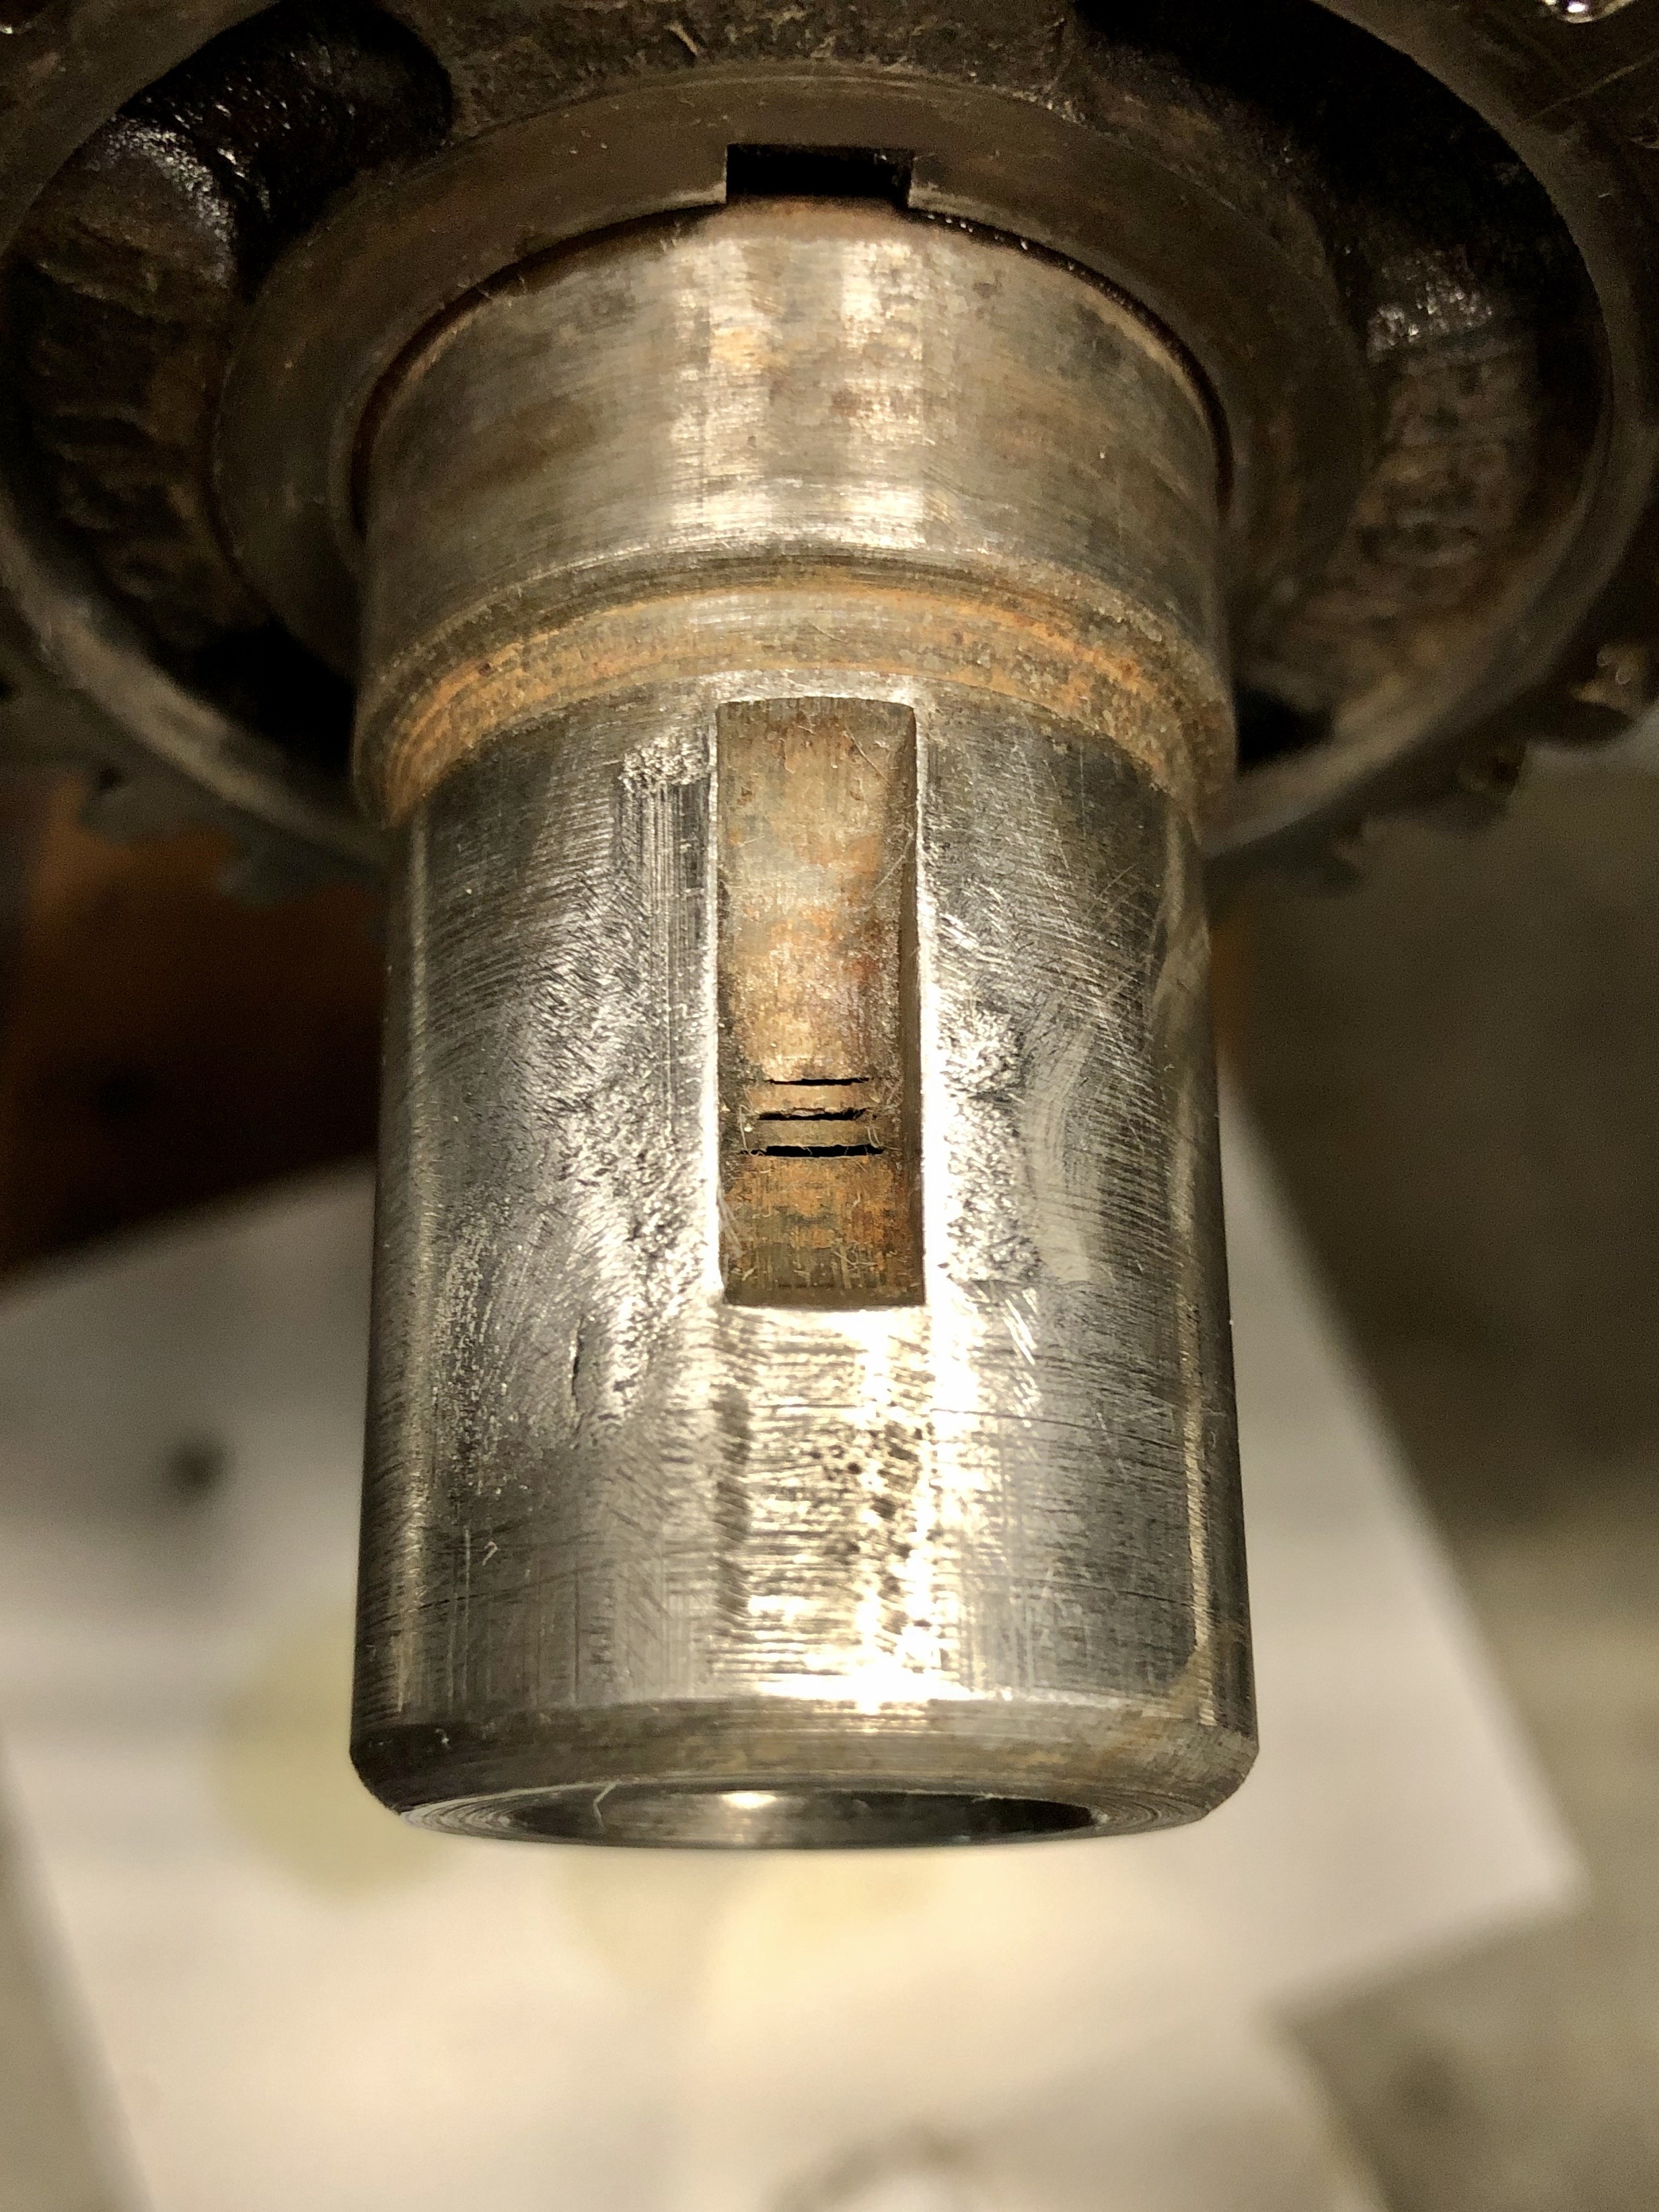 0
0 -
This issue of the hitting bolt heads doesn’t explain your timing varying so much, so I wonder what that is, could it be the distributor drive off the cam? I don’t know whether this is ever something to consider on these engines, but while you’ve got the cam gears open it would be good to hear some collective wisdom.0
-
Use either a speedi-sleeve, or fit a new collar on the nose, available from Dale Cooper. As Denzill has mentioned, this does not explain the varying timing, as the alloy gear will be in permanent mesh with the crank gear, so you need to look elsewhere.0
-
Ok guys, I’m not skilled enough in engine diagnosis to be able to figure this out, let alone know where to look. So I’m gonna need some direction here. I can’t believe I’m still chasing this thing not running right.0
-
If the cam to distributor gears are good all that's left is the internals of the distributor. e.g. worn bushes, looseness in the advance retard mechanism.0
-
A friend who was working on his 32 T was having an issue with the timing OR lack of being able to set the timing. Upon removal of the distributor he found the teeth on the gear were worn to a fine point. Could see the gear on the cam which looked to be in good condition. Luckily he had another exact spare distributor. The teeth on the gear looked very good with little to no wear. Once installed she purred like a kitten.0
-
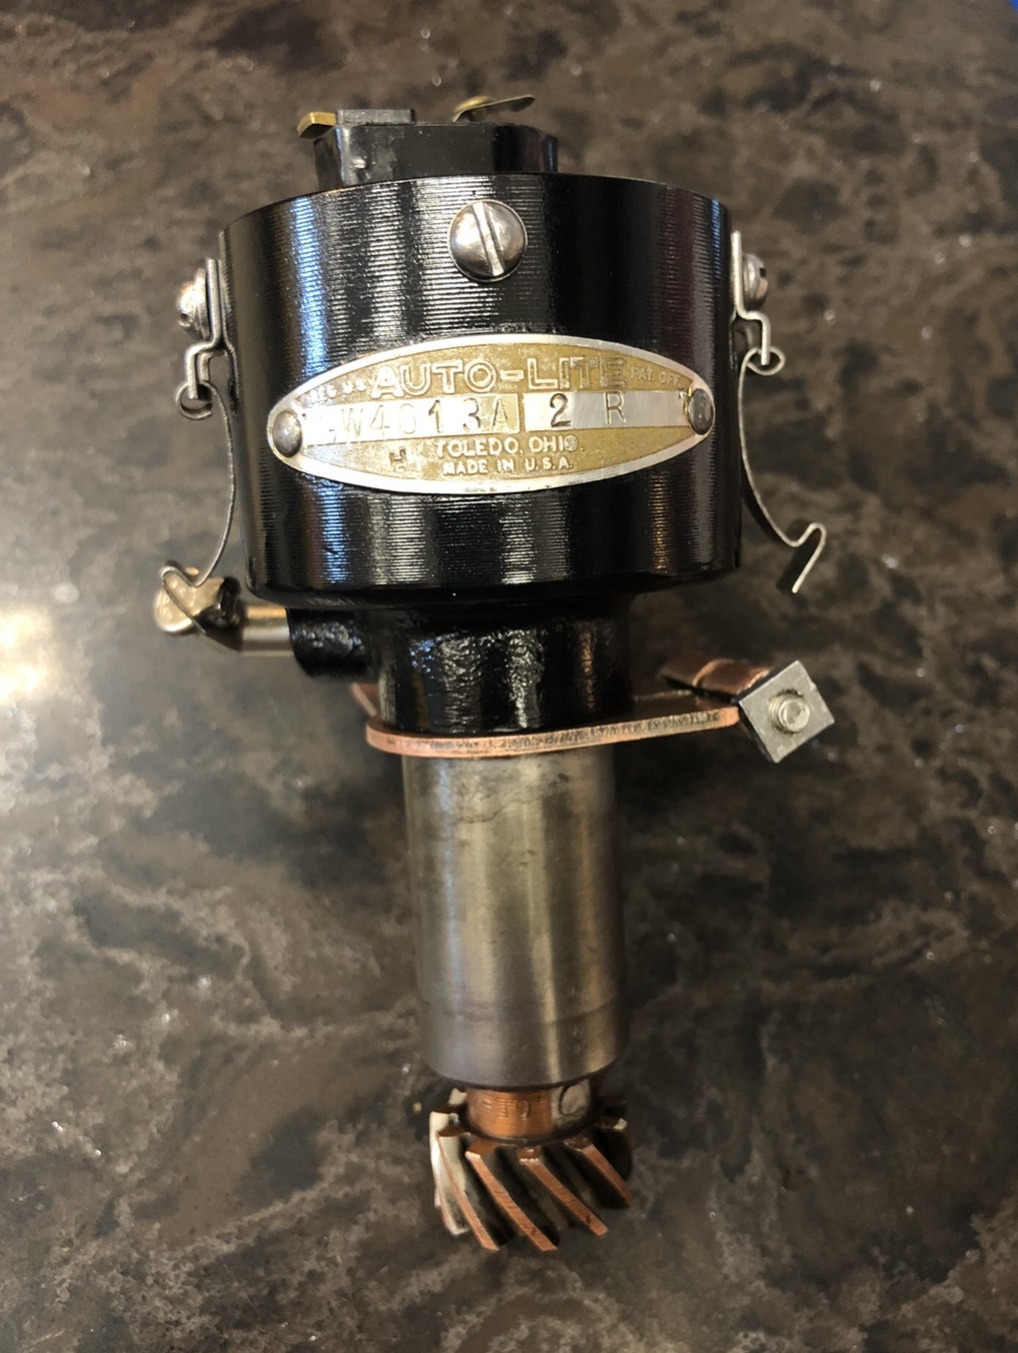
I had a retired SAE mechanic & Hudson expert look at it but he didn’t take it apart, just felt the shaft for play. I suppose that’s messed up too. Here’s the image from a few months ago when it was out.
0


Categories
- 37K All Categories
- 119 Hudson 1916 - 1929
- 21 Upcoming Events
- 100 Essex Super 6
- 28.7K HUDSON
- 595 "How To" - Skills, mechanical and other wise
- 995 Street Rods
- 151 American Motors
- 185 The Flathead Forum
- 49 Manuals, etc,.
- 79 Hudson 8
- 45 FORUM - Instructions and Tips on using the forum
- 2.9K CLASSIFIEDS
- 612 Vehicles
- 2.2K Parts & Pieces
- 78 Literature & Memorabilia
- Hudson 1916 - 1929 Yahoo Groups Archived Photos