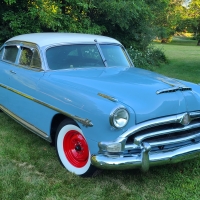
'52 Hornet restoration

Anyone know where two parts in pictures 1-2 belong? Also posting a couple more pictures of restoration progress with doors & trunk installed...Today; covered dash with vinyl, working on headliner, made template for rear window section. Shop that had my old door and rear panels closed and threw out my patterns before I returned from my European trip, therefore would any owners of coupe please post a couple of pictures of interior door & rear panels, also, where does switch for rear L/R curtsey lights go, is it located on right rear side panel.
Thanks,
Ray
Thanks,
Ray
0
Comments
-
Those look familiar. I have to look at my car tomorrow but I think they are rear seat brackets...?
P.S. Car looks great.0 -
They attach to the raised area where the rear seat cushion rests.
The two tabs are where the rear seat cushion is pushed back and rest down on so the cushion can not move forward.
the tabs come in contact with the bottom forward edge of that cushion.0 -
nhp1127 wrote:Those look familiar. I have to look at my car tomorrow but I think they are rear seat brackets...?
P.S. Car looks great.
They are rear seat brackets...0 -
Ray,Looking Good may look better than Black Beauty. Pal Rudy0
-
super651 wrote:Ray,Looking Good may look better than Black Beauty. Pal Rudy
THANKS RUDY...0 -
Ray wrote:THANKS RUDY...
Looks GREAT!
Any ETA on a completion date, anything holding you up?0 -
It's really looking good, Ray- Thanks for posting, I had wondered how the project was going.0
-
Mike (WA) wrote:It's really looking good, Ray- Thanks for posting, I had wondered how the project was going.
Thank you all for part I.D. and interest…
I now remember removing part from rear floor, as I did with all parts we’ll sand blast and paint...Other than carpet, headliner, side panels and under dash area; seats are upholstered and ready to install, vinyl dashboard looks great and with other side of dash being wood grained should look better. During my three week trip to Eastern Europe, things slowed down; then last week I had my house painted and new aluminum patio installed causing additional delay. I believe logistically I have all required parts necessary to complete restoration. Received almost every rubber piece ordered from K-Gap and will start to install inner fenders; hood and fenders already sprayed and also ready to install. About 70% of new wire harness in place, Vintage A/C unit shouldn’t represent a problem…Because we are using universal window wiper kit, held off on chrome plating windshield bezels, now that problem is resolved, I’ll bring bezels to plating shop on Tuesday.
Reference ETA, because coordinating of upholstery mechanic to make 90 mile trip it’s hard to pin down scheduling, also Allen has many other projects requiring his time, therefore it’s hard to pin down ETA...If everything would work out smoothly, I am hoping car could be completed before end of July? Returning this Wednesday and will post additional pictures with any updates, also I’d appreciate anyone with a Hornet coupe to send me a picture of passenger side rear panel or post where curtsey light bezel is installed. Once again thanks for interest and you all enjoy long Memorial Day weekend.
Ray0 -
Ray wrote:Thank you all for part I.D. and interest…
I now remember removing part from rear floor, as I did with all parts we’ll sand blast and paint...Other than carpet, headliner, side panels and under dash area; seats are upholstered and ready to install, vinyl dashboard looks great and with other side of dash being wood grained should look better. During my three week trip to Eastern Europe, things slowed down; then last week I had my house painted and new aluminum patio installed causing additional delay. I believe logistically I have all required parts necessary to complete restoration. Received almost every rubber piece ordered from K-Gap and will start to install inner fenders; hood and fenders already sprayed and also ready to install. About 70% of new wire harness in place, Vintage A/C unit shouldn’t represent a problem…Because we are using universal window wiper kit, held off on chrome plating windshield bezels, now that problem is resolved, I’ll bring bezels to plating shop on Tuesday.
Reference ETA, because coordinating of upholstery mechanic to make 90 mile trip it’s hard to pin down scheduling, also Allen has many other projects requiring his time, therefore it’s hard to pin down ETA...If everything would work out smoothly, I am hoping car could be completed before end of July? Returning this Wednesday and will post additional pictures with any updates, also I’d appreciate anyone with a Hornet coupe to send me a picture of passenger side rear panel or post where curtsey light bezel is installed. Once again thanks for interest and you all enjoy long Memorial Day weekend.
Ray
Received my classic car Happy Birthday greeting on May 27th and went to work on my car same day...Nothing is easy or goes according to scheduled plans, my upholstery mechanic didn't show up to work on headliner and make door patterns...As I never received any earlier requested pictures for installation of rear bezel courtesy switch, I decided to go by memory (which at 72 isn't great) and install under passenger side rear panel. Then we were going to work on front end suspension, after checking more closely the last individual shoddy mechanic much have forced and stripped long 5/11x11 long bolts and in small town like Logandale, NV., no chance to purchase new ones which I ordered yesterday to bring next week, couldn't believe each grade 5 bolt costs $11.30.
Did manage to accomplish installing front/rear window hardware and 4 pieces of new Solar tinted flat glass, however because of overlook on my part I didn’t have vertical vent window rubber gasket, therefore couldn’t complete installation of vent window. Luckily I called K-Gap (Kaylene) and she is putting in the mail as I write, not knowing I ordered from K-Gap, Allen also ordered a pair from Metro Rubber, so now I have two pair which I’ll add to Hudson parts I’ll offer for sale or trade.
Also installed pork chops, trunk Hornet, door handles, locks and a little of the stainless, didn’t like rear trunk (sticking) lock, therefore didn’t install trunk emblem, so I am taking to lock smith to re-key today. I have most of the old stainless steel (see pictures) retainers, but want to use some other ways to secure trim. On the upper doors from Kentucky Company we decided to use part number AP 19686 Au-Ce-Co Universal Moulding # 10-24 clips, for belt line stainless I am going to cut and use retainers I received from K-Gap. I would to learn from others that didn’t use original retainers; how they installed / what clips used for exterior stainless steel securely? One in particular is stainless piece on each door (looks like a tri-angle) I remember removing spring clip but can’t find them, any recommendations? Oh yes, all hinges, supporting hardware was sand blasted, painted silver or black and used white grease before installation.
Seems like my two quarter and front fender belt line stainless have been misplaced, I have plenty of already polished stainless steel, 51 chrome plated already hood ornament that I would be willing to trade, also have polished beltline stainless for four door car which I may have to cut to fit front fenders, however I’ll still require quarter panel stainless which I am will to buy or trade. Lastly can’t remember where black pieces in picture 17 and two pieces of what looks like interior stainless goes, also is there any instruction manual for various size bolts to install properly?
Thanks,
Ray0 -
looks like you gat some strays.
You only need one of the black pieces. it goes around the front side of the radiator bolting to the core support on either side and the hood latch panel in the front.
if you are talking about the stainless piece with the sheetmetal tabs down the back, it is for 53-54 doors. since you don't need them, I could:D0 -
WOW! Your work looks great so far. Can't wait to see it finished.0
-
nick s wrote:looks like you gat some strays.
You only need one of the black pieces. it goes around the front side of the radiator bolting to the core support on either side and the hood latch panel in the front.
if you are talking about the stainless piece with the sheetmetal tabs down the back, it is for 53-54 doors. since you don't need them, I could:D
Thanks...
Re: various pieces of stainless trim I purchased and had polished, I'll hold to use for possible trade of something needed for my car.
Ray0 -
wkitchens wrote:WOW! Your work looks great so far. Can't wait to see it finished.
Thanks, Allen never worked on a Hudson before but has done a magnificent job so far, especially because he didn't have the benefit of taking car apart, I handed him a puzzle. I too can't wait to see and drive car upon completion; I'll continue to post updates / pictures on FORUM.
Ray0 -
Ray wrote:Thanks, Allen never worked on a Hudson before but has done a magnificent job so far, especially because he didn't have the benefit of taking car apart, I handed him a puzzle. I too can't wait to see and drive car upon completion; I'll continue to post updates / pictures on FORUM.
Ray
Update: Couple of progress pictures of Hornet carpet and panel interior.
Ray0 -
Thanks Ray for posting these pics. Always interesting to see a car restoration in progress. Can't wait to see the final product. Very nice car.0
-
54SuperWasp wrote:Thanks Ray for posting these pics. Always interesting to see a car restoration in progress. Can't wait to see the final product. Very nice car.
Thanks, as anyone who has experienced with restoration, it takes time and patience; but at the end of the day upon completion one feels pride of ownership is worth past experienced problems. Feel like I am getting closer to putting geat old Hornet back on the road...
Ray0 -
Hello
very good work Rayon
: )
Pierre0 -
pierre from france wrote:Hello
very good work Rayon
: )
Pierre
Thank you Pierre,
How is your project progressing, post some pictures for us to enjoy...
Raymond0 -
Bonjour
[ URL = ] http://img5.imageshack.us/i/p1000705b.jpg/ [ IMG] http://img5.imageshack.us/img5/932/p1000705b.jpg [ / IMG] [ / URL]
Posté par ImageShack.us [/ URL]
Encore boucoup de Travail , lol0 -
hello
still much work
 0
0 -
Suite Si Voulez Vous
[ URL = [ url ] http://www.hostingpics.net/viewer.php?id=767544P1000603.jpg [ / url http://img11.hostingpics.net/pics/767544P1000603 ] ]http://www.hostingpics.net/viewer.php?id=756712P1000602.jpg [ / url http://img11.hostingpics.net/pics/756712P1000602 ] ]
http://img11.hostingpics.net/pics/408579P1000506 . jpg [ / url ] [/ img] [ / url]
0 -
Bonjour Pierre, ta voiture semble très solide au départ. J'aime le toit de ton garage. Et la vue est superbe! En effet, beaucoup de travail encore. A la prochaine, Michel.
For the benefit of my Hudson friends from this side of the atlantic,
here is what I wrote:
HI Pierre, your car seems very solid from the start. I like the top on the garage. The view is superb! Yup, lots of work to complete. See ya, Michel.0 -
pierre from france wrote:hello
still much work
Hi Pierre,
Pictures of you, car and mountainside view are great, are you located in wine country? Yes still much work to do, but car looks like a solid project which as time passes and progress made, you'll enjoy working to complete. Thanks and keep posting pictures.
Good Luck,
Ray0 -
Ray wrote:Update: Couple of progress pictures of Hornet carpet and panel interior.
Ray
More pictures of work completed today...
Ray0 -
Hello rayon
Here are two parts to the headquarters location
[ URL = ] http://img684.imageshack.us/i/p1000497fm.jpg/ [ IMG] http://img684.imageshack.us/img684/3461/p1000497fm.jpg [ / IMG] [ / URL]0 -
Ray - its getting closer!
I'm curious how the woodgrain application is holding up thru the fitting process?
Does it seem durable or at least "semi-scratch proof"?0 -
rambos_ride wrote:Ray - its getting closer!
I'm curious how the woodgrain application is holding up thru the fitting process?
Does it seem durable or at least "semi-scratch proof"?
Good Morning Dan,
Trust you & Rambo are well and progress being made on C49...Since I've had wood grain application completed and with fitting/handling process; interior supporting pieces appear durable and haven't been scratched, I am hoping to keep it that way?
Stay well,
Ray0 -
Ray,
Who supplied the carpetting for your project? Is it molded to fit the floor pan? I tried to recarpet my short wheel base Super Wasp sedan and had a bear trying to conform to the shape of the transmission tunnel in the front. Still unhappy with the results. By the way, car looks great.
Rich0 -
Ray,
I am following your coupe restoration with interest and feel your Hudson is going to be a real Beauty. I like your paint scheme too since I painted one similar back in high school and now decades later have another painted identical for racing, but neither Hudson was as nice as yours. Keep up the great Work....0 -
ratlee2 wrote:Ray,
Who supplied the carpetting for your project? Is it molded to fit the floor pan? I tried to recarpet my short wheel base Super Wasp sedan and had a bear trying to conform to the shape of the transmission tunnel in the front. Still unhappy with the results. By the way, car looks great.
Rich
Rich,
I had local upholstery shop custom make and install carpet, cut new front/rear panels and semi-custom made trunk, whereby rear center fold down back rest can be used for longer items storage (see pictures). When I purchased my last fine Hornet named Black Beauty from great southern gentleman by the name of Rudy Bennett, he had on rear window "Built When Cars Were Made To Last" I think (know) I went overboard on entire car restoration; after slight repairs on trunk floor, we used and sprayed Lizard Skin Spray, then a couple coats of POR-15 followed with alunimum rolls on floor and panels, then before final carpet cut we used light padding then carpet. Waiting for my newly ordered Hudson door sills which take nine months, however I purchased a pretty good pair and waiting for them to arrive and install. I am sure you'll get carpet to conform to floor, upholstery shop used a lot of steam and rubber ball hammer. Will add three buttons to rear seat back rests, also piping around window frames. Then have Allen pick up car and return to Overton to finish restoration.
Thanks and hope to see your pictures posted one day,
Good Luck,
Ray0


This discussion has been closed.
Categories
- 37K All Categories
- 117 Hudson 1916 - 1929
- 22 Upcoming Events
- 98 Essex Super 6
- 28.6K HUDSON
- 583 "How To" - Skills, mechanical and other wise
- 995 Street Rods
- 151 American Motors
- 181 The Flathead Forum
- 49 Manuals, etc,.
- 79 Hudson 8
- 44 FORUM - Instructions and Tips on using the forum
- 2.8K CLASSIFIEDS
- 610 Vehicles
- 2.2K Parts & Pieces
- 78 Literature & Memorabilia
- Hudson 1916 - 1929 Yahoo Groups Archived Photos