Project Creep Part 3, head, gasket, thermostat bypass, clutch....

ARGGGGGH I did it again on this forum! I forget to copy before I posted and lost all text!
Some one said part 2 was getting long so I will start part 3(twice now).
Part 1- http://openforum.hetclub.org/discussion/165555/project-creep-valve-guides-valve-job-etc/p1
Part 2- http://openforum.hetclub.org/discussion/165799/project-creep-part-2-engine-bearings-cam-head-broken-bolts-pcv#Item_38
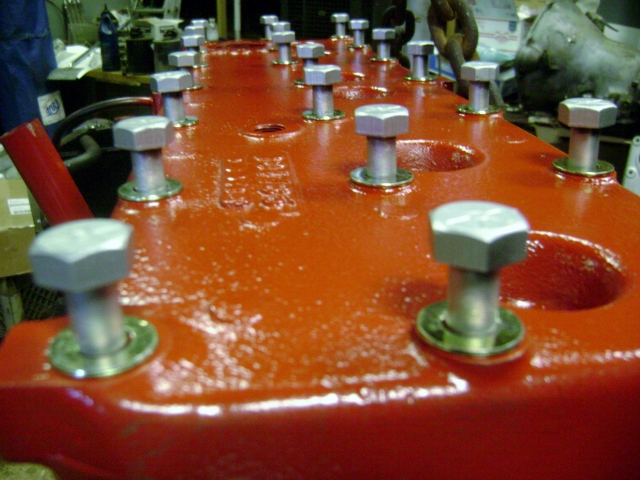
I got the cyl head cleaned up and painted and I shot a little copper coat on the new head gasket. It didn't look like a perma-torque and wasn't marked, so I shot it.
I also cut a couple 7/16 bolt heads off and used them for guide studs for the head.
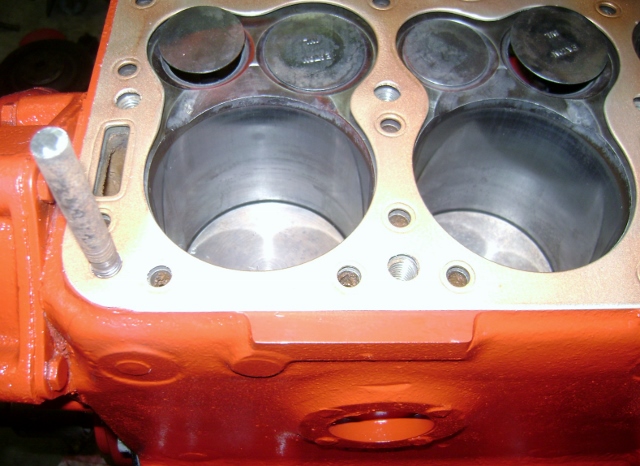
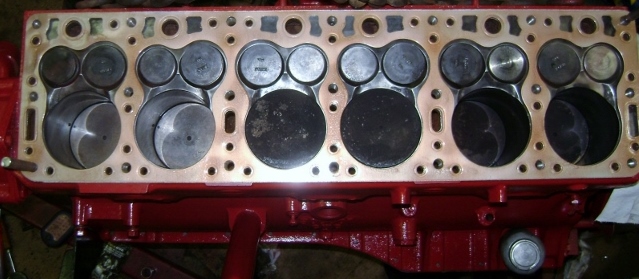
The 49 engine didn't have washers so I went to Fastenal and bought some. 7/16 grade 8 SAE gold zinc for the bling.
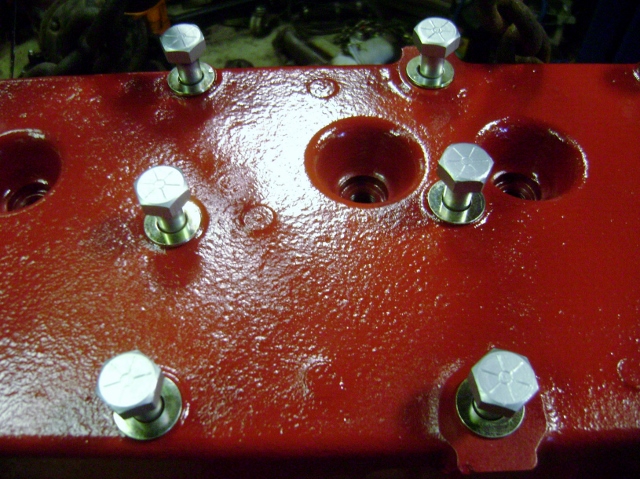
I painted the head bolts silver to match the timing cover and pan bolts.
I torque in 3 sequences or 30/50/70 lb-ft and then repeated 2 more times.
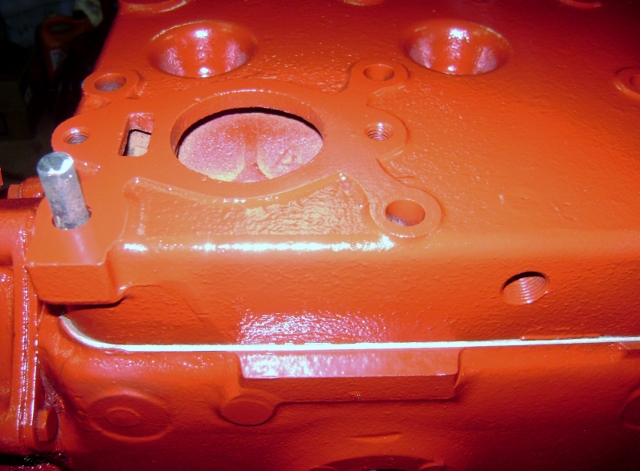
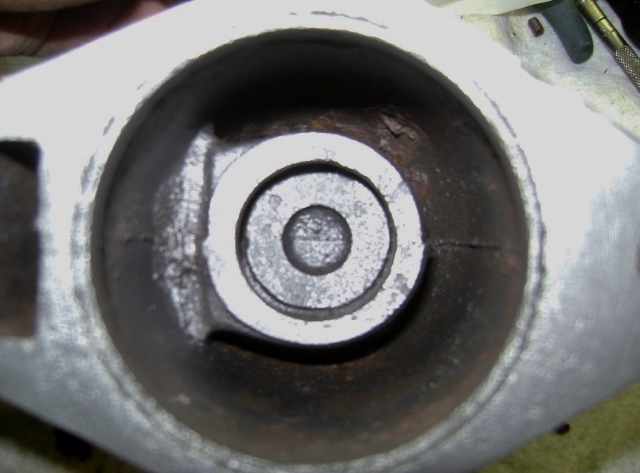
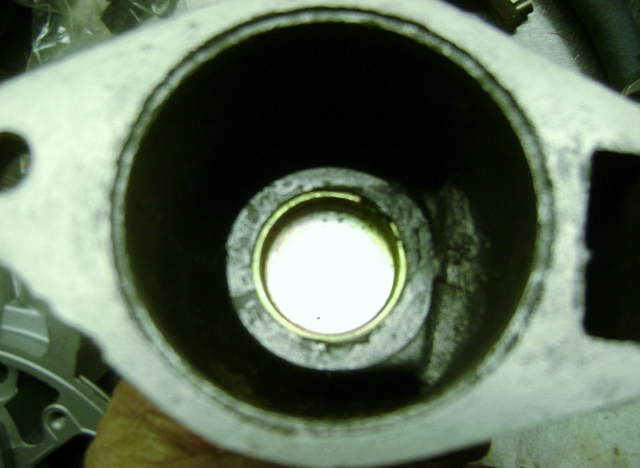
Then I cleaned up the thermostat housing and took the recommendation for this forum and installed a 1.250 freeze plug in the bypass hole.
Time to clean some more parts.
Some one said part 2 was getting long so I will start part 3(twice now).
Part 1- http://openforum.hetclub.org/discussion/165555/project-creep-valve-guides-valve-job-etc/p1
Part 2- http://openforum.hetclub.org/discussion/165799/project-creep-part-2-engine-bearings-cam-head-broken-bolts-pcv#Item_38
I got the cyl head cleaned up and painted and I shot a little copper coat on the new head gasket. It didn't look like a perma-torque and wasn't marked, so I shot it.
I also cut a couple 7/16 bolt heads off and used them for guide studs for the head.
The 49 engine didn't have washers so I went to Fastenal and bought some. 7/16 grade 8 SAE gold zinc for the bling.
I painted the head bolts silver to match the timing cover and pan bolts.
I torque in 3 sequences or 30/50/70 lb-ft and then repeated 2 more times.
Then I cleaned up the thermostat housing and took the recommendation for this forum and installed a 1.250 freeze plug in the bypass hole.
Time to clean some more parts.
0
Comments
-
Bill, don't forget to drill a 1/8" hole in the soft plug you installed in the thermostat housing. Bruce
0 -
I believe the plug in the bypass hole should have a 1/8" hole drilled in the middle of it for the modification to be efficient according to Walt, who has perfected this modification
0 -
FYI
Always Drill a hole in the side of the Thermostat is a good Idea too.....
0 -
Thanks for the reminders guys.
Here's what I did.
Thermostat I got. 180*
It had the little bleeder in it but I added an additional bleed hole.
And the bleed hole in the bypass.
Then I cleaned up some more parts and started bolting them on.
Manifold and TBI adapter.
Throttle body
How about a hub cap air cleaner?
Maybe a Hudson cap? 0
0 -
Bill, looks great. Are you selling the adapters yet? What size tbi did you use? I am interested in two of the adapters. I have an idea for a twin turbo twin h hornet.0
-
Hud,
Don't get too far ahead of me!!
The Twin H is already set up. Once I have this set up running and dialed in with the baseline tune then I will swap manifolds to the twin H and tweak the tune as required.
Turbo may be in my future as well but not until I build my 308.
The twin H can be setup with 2- 1bbl or 2- 2bbl throttle bodies.
Other than the final tuning and the throttle connection, which may be up to the installer to configure, the systems are done.
I don't have pics of the 2-2bbl set up yet. But given the manifold bore I don't know if the 2- 2bbl setup would be of much benefit?
All of the adapters for the 1 and 2bbl versions are back from the CNC shop and in stock.
You can reach me at sales at hamiltonfuelinjection dot com
or just call
36 zero 969 two 9 two 5
If I don't answer...the compressor is running!
I'm left coast0 -
Bill-Lookin' really great!Just an observation, but a 180-degree thermostat is quite hot for a Hudson engine. Does the EFI require a hotter running engine?0
-
180* is pretty standard.
IIRC 170 is supposed to be about the lowest for an engine to be efficient.
You could run a cooler stat but if you try to go too cool then the computer will need to be adjusted or it will think your still warming up.
I'll look a little deeper into the Hudson specs.
I got the flywheel and clutch installed. I was really getting frustrated trying to find the torque specs for the flywheel.
So I finally just went with my IH 3/8" flywheel spec. Then I find a list in the clutch supplement and it said half of what I just torqued them to.....so more digging and I found a reference to the correct torque. What a roller coaster.
I went ahead and soaked the new disc in type F just cause I could.
Then wiped it off and installed it. Not real sure why the 3 corks are left out of all the new disc?
I also soaked the new throw out bearing leather seal in oil prior to install.
Once everything was torqued down I decided to drop it back in the car.
Not the most fun thing by your self and I scratch the new paint on the bottom of the pan....
But it's in.
I also added the O2 sensor to the header pipe while the engine was out.
Drill the hole
Weld in the bung
Screw in the O2 sensor.
Then dropped the engine in.

Back in it's home!
 0
0 -
Dr. Doug told me that the reason for the three corks are left out is for more efficient clutch fluid circulation.0
-
My initial thought was it was the same as they do in an automatic with the clutches and band drums by having holes that allow excess fluid a path to escape quicker for a better apply. Keeps the friction material from riding on the fluid as it is pressed together.
Then the more I thought about it then more I wondered if there was even any fluid on the clutch plate with no pressurized fluid or really hardly any fluid in the clutch.
6 oz in a clutch that size with centrifugal force slinging the fluid to the outside as it spins, how much fluid is really on the clutch plate with the engine running?0 -
Bill-Lookin' really great!Just an observation, but a 180-degree thermostat is quite hot for a Hudson engine. Does the EFI require a hotter running engine?
-----------------------------------------------------------------------------
I'll look a little deeper into the Hudson specs.
-------------------------------------------------------------------------------
As mentioned, I opened up the manual and this is what it has in the 48-52 cooling section.
Starts to open 150° to 155.
Fully open at 185°.
So the 180* is still within the range but at the top of it.
A 170* would probably be the norm.
Now that the engine is in and running my temp gage is reading just above 1/2.
I'm currently running a 12v neg gnd battery for the engine/EFI and a 12v-6v regulator to run the rest of the car.
So far everything is working including the overdrive.
No other mods have been done.0 -
FYI
I use 180 Thermostats In my Hudson's with no problem, and12V thruout except for Dash Gauges where I use an inexpensive Ford 'Intermettent Regulator (IVR) that reduces Gauge s to 6V.
0 -
Thanks for the confirmation Racer.
Well I was tracking down a misfire and since I upgraded the distr and plug wires about the only thing left was the old plugs.
I ended up finding a miniature Jacobs ladder on one plug.
I put another used one in it's place but I guess I should spring for a new set.

I will say that having the correct air/fuel mixture and a good ignition makes a big difference in plug life.
Here's the old plugs I removed from the engine when I got it.

And after a little running on the EFI. You can see the old carbon build up is burning off and they are getting back to a nice ash color.
But I think it's time for a fresh set. 0
0 -
Come on Bill, put a new set of plugs in that Hudson
")
0 -
Just for you Kerry.
I splurged on some expensive plugs.
m6, thanks for the selection. I went out of the box and got the only plugs the local store had in stock.
NGK nickel.
I figure the old girl deserves them.
Since there are lots of "Doc" wanna be Hudsons, The son and I figured this one should be Nurse Betty.
Out with the old....

In with the new. 0
0 -
now we really know you are committed
0 -
Suggest putting Chrome Acorn caps on those head bolts to match the chrome air filter from a local Truck Store, JC Whitney, or Iowa 80, www.Iowa80.com
0 -
I know I should be "committed" for taking on another project with about 20 of them already in the yard!
Racer, thanks for the tip. I was planning something like that on my 308 build when using the ARP studs ad nuts.
I still need another Hudson hub cap to make my Hudson chrome air cleaner.")
0 -
A little update.
Since getting the engine/EFI all working I have been driving it and slowly working out the bugs.
Still need to install my new steering center pin and the new front wheel cylinders. After pulling hard left I fixed the plugged right front brake line and now it pulls hard right. So I got 2 new cylinders to go in.
The old worn out 262 has been running pretty good considering. No smoke and it seems to pull pretty good. So far I have only braved a run up to about 100mph and lifted. I didn't want to have to make an emergency braking and end up in a ditch.
I have also been spending a lot of time sanding and acid etching the body to remove all the surface rust out of the pits in the sheet metal.
Right now the plan is to just leave it bare metal and maybe use some meta protector on it until I can work each panel. Then I'll go with a coat of epoxy primer as a base. Still debating where to go from there.
I removed all the previous owners body filler so I can work all the bad spots.
I also started working on my Twin H EFI setup. I separated the manifolds and chucked the exhaust manifold up on my little mill and used an end mill to surface the gasket flange. My plan is to cap it with a gasket and thin sheet meta plate and then bolt the 2 manifolds back together so there is no heat riser going to the intake. Once all this is working then the next phase is to build a dual outlet flange similar to the factory one and install some 1 3/4 or 2" duals under it.
Here's some pics.
First a before, when we first dragged it out of the shed. Then the current condition.
0 -
100 mph? Nice 0
-
I would either use acid etch or epoxy you are not supposed to use both together from what I been told. Keep up the good work0
-
shes not looking to shabby as a 65 year old going into retirement
still has a glow to her skin
0 -
Yes, epoxy Primer is not recommended to be use when a true acid etch is applied first.
I use picklex 20
http://autobodystore.com/picklex20.shtml
0 -
Thanks for the input guys.
If I can combine what everyone is saying, I should not use a seld etching primer over top of an etching acid product.
Not particular to epoxy primer.
The primer I have is the 2 part epoxy primer.
Taken from the product Kerry posted-- Picklex® 20 characteristics
Water based product (has little bit of phosphoric acid)
Environmentally safe, non-hazardous, non-toxic
Ready to use and should not be diluted
This makes it right in line with the metal prep I am using and what most of them are.
I only have a couple choices, 1. scrub with acid until I completely disolve all the rust out of the heavy pits in the metal or 2. media blast the entire metal surface.
Some other notes directly from the label.
2.Do not use self etching primer (primer which has acid in it for etching the metal surface), because it will react with Picklex® 20 coating and ruin the coating and fail the bonding. Ask the primer supplier whether the primer has acid in it (some primer has acid in it, but still is not called an “etching primer”).
3.Apply the filler on the primer instead of Picklex® 20 coating.
4.Picklex® 20 coating provides a very long term corrosion resistance, which along with a good primer & paint will provide much longer paint life than just applying the primer/paint over blasted surface.
5.After blasting, the oxidation/rusting forms immediately (called micro-rust). So apply Picklex® 20 on all metal surface (whether there is any visible rust or not) to prepare the surface rust/contamination free and keeps the surface from further rusting. This provides much better bonding with the primer and also provides a much longer paint life.
6.Try to use two part Epoxy Primer (which has no acid), because Epoxy primer provides a good corrosion resistance and along with Picklex® 20 coating, the paint life will be lot longer.
From past experience I can;'t just use some mirical product and paint right over the small rust in the pits. If done that way it's just a matter of time before the little paint worms start popping up.
What I have found is if you continually apply and scrub the panel with the metal prep without letting it dry, you can disolve the rust out of the pits. Then wash, wipe, dry with your preference. I try not to leave any residue behind.
If the metal prep is sprayed on and left to dry it will convert the rust to a black oxide. The problem with that is as you sand you can break thru the surface and are left with rust still remaining underneath.
And in time the rust worms come back to life and ruin your hard work.
I do have a small soda blaster but I'm not sure if that would be any better between residue left and how effective it is on the rust itself.
There's no fast easy way to do this unless I just stip it completely and have it dipped, but then I'm still left with the metal prep and priming choices.
I think I'm going to continue to sand and scrub with metal prep until all traces of rust are gone and then scrub the surface with brake cleaner or simply laquer thinner or acetone to remove all traces of the etch on the surface and then shoot my epoxy primer base on it. I might have to do na couple test panels first?
Thoughts?
I just don't want to do all the work and have rust pop back up from under the paint. I know we can't stop all of it especially those of use that drive then all the time, but I want to give it a fighting chance.0 -
Bill, The picklex is different from most metal preps. They are manly phosphoric acid, Picklex has very little.
" The problem with that is as you sand you can break thru the surface and are left with rust still remaining underneath. And in time the rust worms come back to life and ruin your hard work."
Remember, you are now talking about black oxide, not rust. If you sand and break thru as you say, just cover with the epoxy primer and it will do it's job to seal the surface and prep it for top coating.
As with any primer, it is not meant to be left without being top coating forever, depending on the climate, even epoxy primer will allow moisture to migrate through at some point and rust will start from underneath. The primer needs to be sealed with paint. If moisture can't go through, it won't rust.
Now-- rust can start on the back side of an uncoated panel and eat it's way thru the panel and out the other side. That will take a long time.
Just for your info you might take a look at the epoxy primer that Tamco makes. I've started using their clears and primers.
http://www.tamcopaint.com/info.html
0


This discussion has been closed.
Categories
- 37K All Categories
- 117 Hudson 1916 - 1929
- 22 Upcoming Events
- 98 Essex Super 6
- 28.6K HUDSON
- 580 "How To" - Skills, mechanical and other wise
- 995 Street Rods
- 151 American Motors
- 181 The Flathead Forum
- 49 Manuals, etc,.
- 78 Hudson 8
- 44 FORUM - Instructions and Tips on using the forum
- 2.8K CLASSIFIEDS
- 610 Vehicles
- 2.2K Parts & Pieces
- 78 Literature & Memorabilia
- Hudson 1916 - 1929 Yahoo Groups Archived Photos