new front stub frame in my '49 brougham
Comments
-
and here's the continuation of the spring hat mods.
Now with the trimming done, I mocked up the filler pieces with some cardboard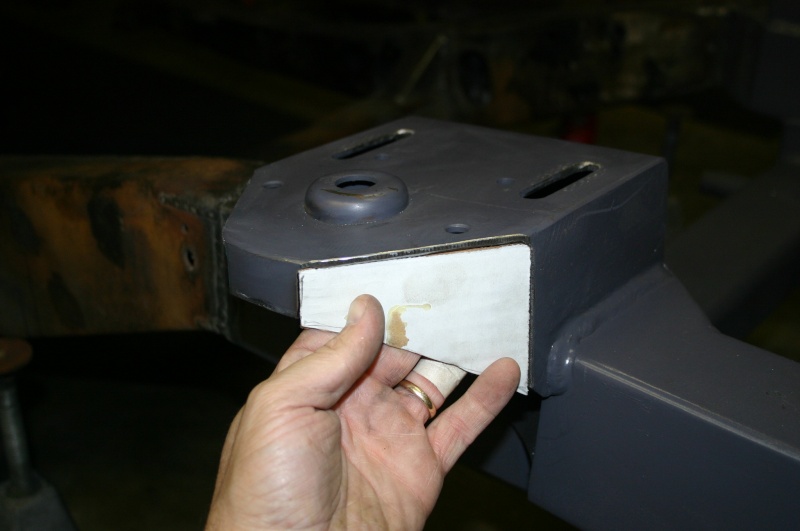
Then cut them out on the bandsaw and tacked the first one in place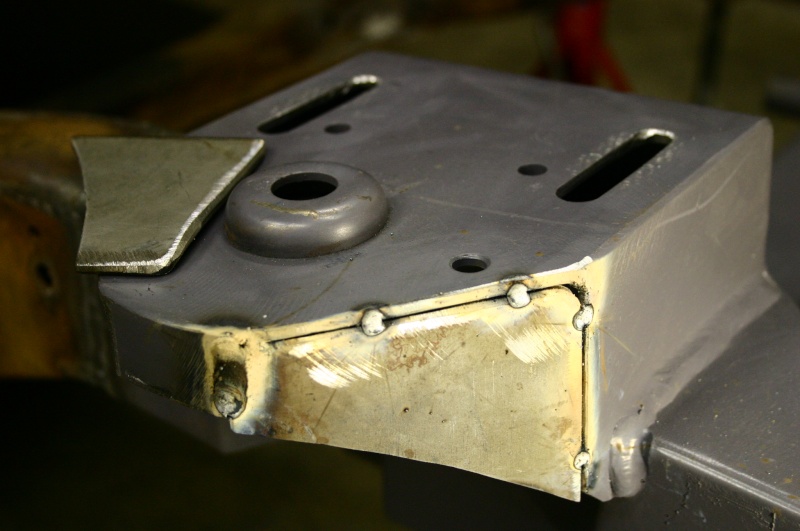
Then welded them both in place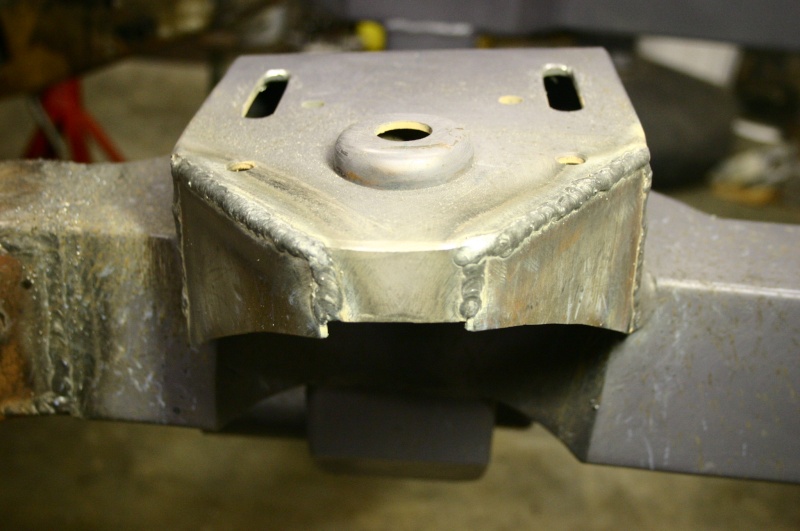
and ground the welds smooth (still need to make a final weld pass on the underneath side). Then a final check for clearance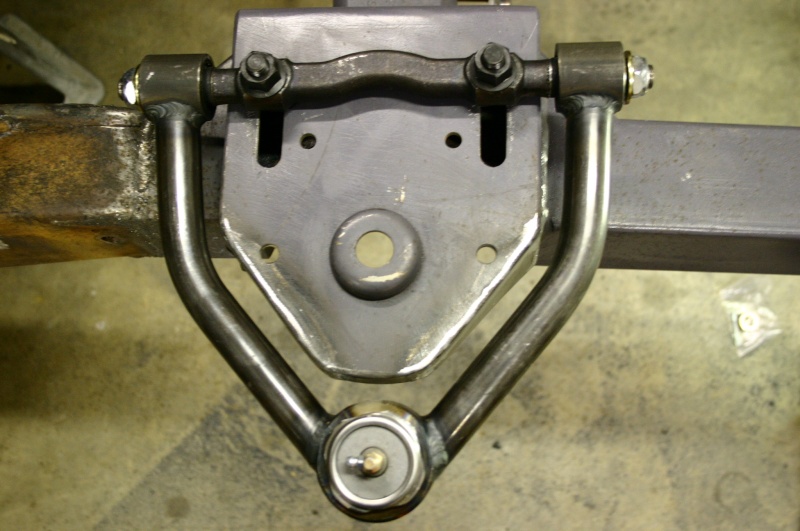
And now we have full range of motion......now all the same steps on the drivers side!!!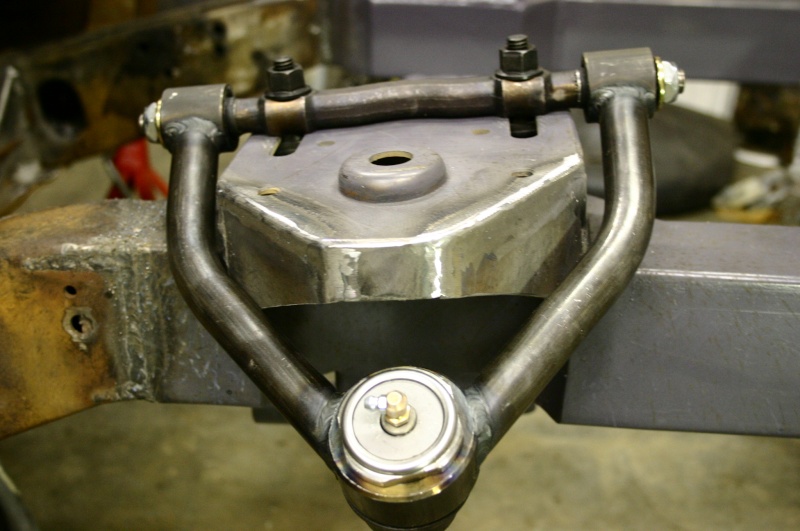
Now I need to build the airbag supports, add the shock mounts, put the hubs and wheels on, and I should have a ROLLER!!! Then I can get started on the 4-link!!!
Let me know if I'm boring you guys with too many pictures.....it is fun to see progress though!!!
Thanks,
Lee0 -
Yes, I love it. It is better than visiting a junk yard and almost as much fun as doing it yourself.0
-
Very nice work dude. Definately keep posting pics. That's one reason this sight is here. I need to get my Dodge done so I can get on my Hudson's MII install. I gather that different companies have some sort of propriety shapes just so that most folks won't be using some of their parts and some from another, at least that would be my guess.0
-
Please do me a big favor and add nice little diamond shaped fish plates over the welded seams of the frame so I can sleep at night knowing you are a little safer.
Peace,
Chaz0 -
mrsbojigger wrote:Please do me a big favor and add nice little diamond shaped fish plates over the welded seams of the frame so I can sleep at night knowing you are a little safer.
Peace,
Chaz
How thick should it be (about the same as the base metal)? What about the top and bottom? Should I use weld through primer between the plate and the frame?
Thanks,
Lee0 -
Great thread, love the pics. I'm hoping to eventually put a Fatman sub into my truck.0
-
lsfirth wrote:How thick should it be (about the same as the base metal)? What about the top and bottom? Should I use weld through primer between the plate and the frame?
Thanks,
Lee
Lee,
I've read thru some the tech articles on the installation of the Fatman stub on a Hudson stepdown.
The internal fishplate (as you have already used) is the only thing they show, and no recommendations for using an external fishplate is noted.
That being said, you'd probably be ok to not add external fishplates as I and others have suggested.
Still - if it was my job/car I would add the external fishplates for added protection and piece-of-mind. Welding around the perimeter of the plate and strategic plug welds.
Why?
* There's a lot of stress in the graft area due to the location of the suspension mounts.
* The internal fishplate doesn't extend far enough into the existing frame or stub IMO and also I would also plug weld the internal fishplate to really distribute the load (again IMO)
* If you didn't pre-heat the frame before welding the stub on, this would be another reason to add the external fishplates. IMO anytime you weld to a frame, you should pre-heat the area so you're not welding cold.
If you decide to go ahead then to answer your questions...
* I'd only re-inforce the sides - I don't think the top and bottom would be necessary.
* The same thickness or a little thicker stock would be fine.
* Using weld-thru primer when sandwiching metal is always a good idea.0 -
So that's the place you said was cheaper than Air Tech on that TRi 4 Link. Looks like the same kit to me too, I've bookmarked it future reference, thanks.0
-
Okay, here's another partial update on the MII installation.
Now that the upper control arms have the needed clearance, I can make the airbag supports that attach to the upper hat where a typical coil spring would ride. After a call to JWRG, they said the installed height of the airbag (at least the ones they sell with the kit) needs to be 5 inches which gives them an opperating range of 3 to 7 inches. So, 4 inches at the bag would translate to ~ 8 inches at the wheel. 8 inch range of motion sounds pretty reasonable. BUT since I want this thing to "lay bumper" I thought I would give it 5.5 inches so I could drop it even an inch lower at the wheels. So the "bag kit" from JWRG comes with a lenth of pipe, the bags, and 4 circular plates. So, prior to starting I took a few careful measurements such as spring hat anti-dive angle, and overall height needed for the bag support. The anti-dive angle was 7.5 degrees and the height of the support needed to be 3 inches (on the higher fwd side). Here's a pic of that: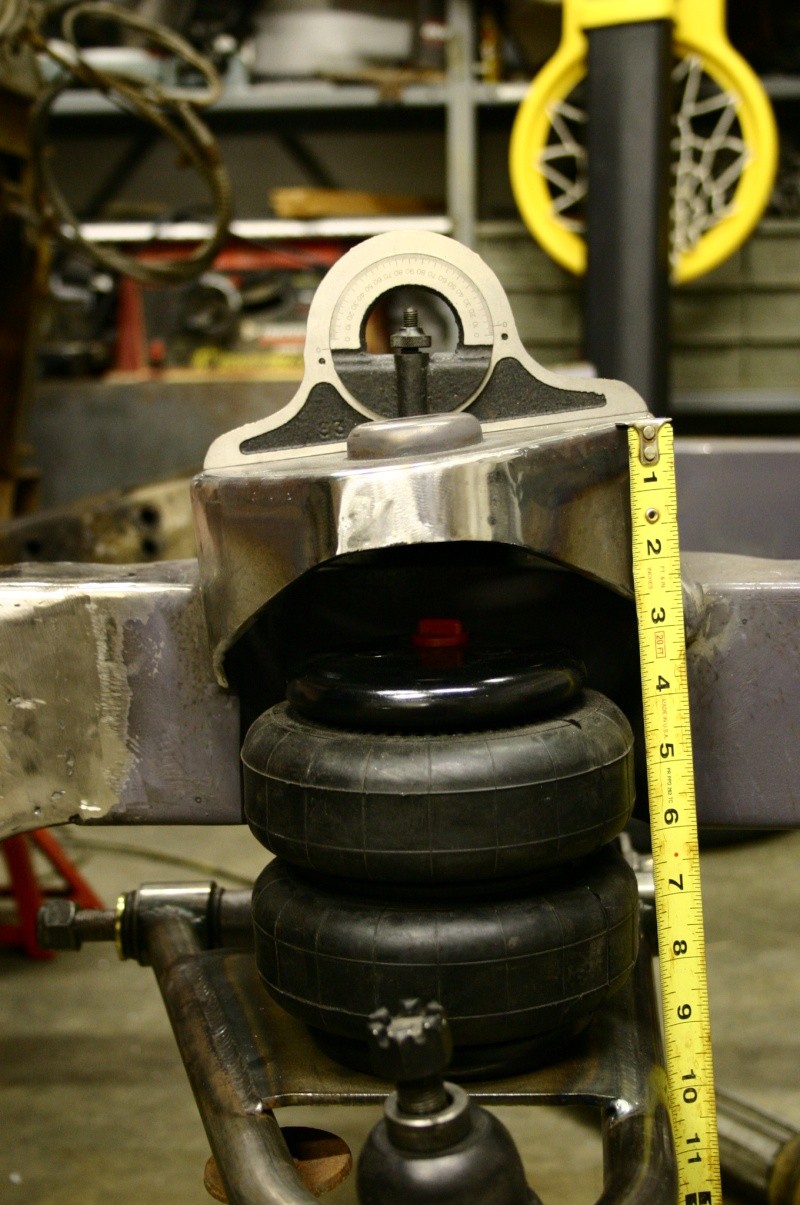
So with those measurments in hand, I set the bandsaw table to 7.5 degrees and c-clamped a bar to the table to guide the cut at 3 inches.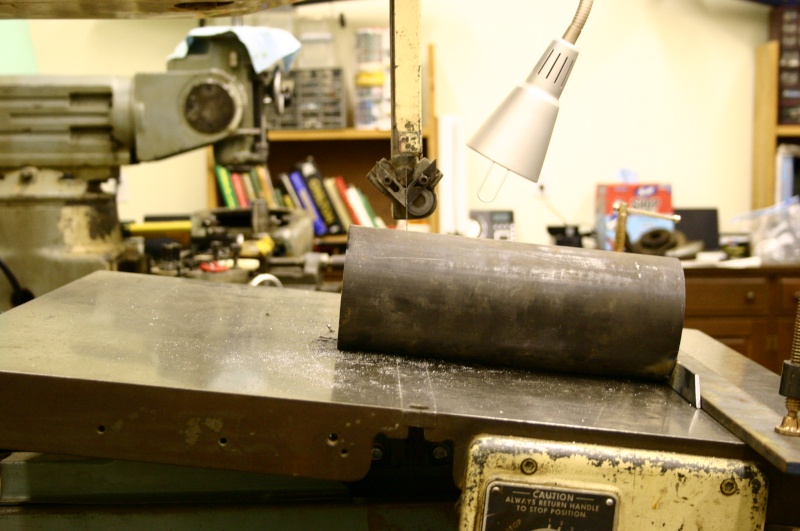
Here's where I tacked a piece of bar to the pipe so it wouldn't roll while cutting. This also helps guide the pipe through the cut. Believe me...you wouldn't want to "free hand" cutting a pipe like this. It MUST be supported like this when cutting: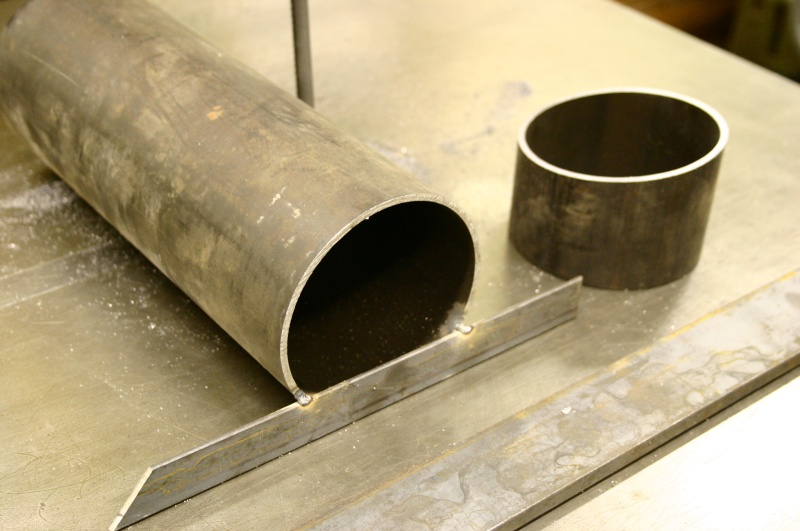 0
0 -
And here's the rest of the update since you can only add 5 pics per post.
Next, since I had to modify the hats to clear the upper arms, a full circle upper plate wouldn't fit inside the hat, so I had to trim them and "hollow out" the middle so I can get the plumbing up out of the support when it come time for that. So I made a cardboard template of for the upper circular plates. Here's a shot of the template sitting on the top of the hat: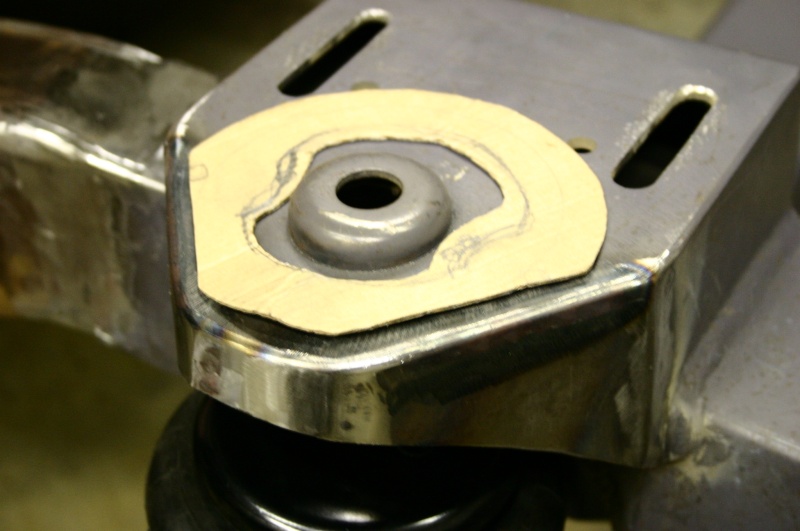
And here's the parts cut out. The one on the left is tacked together and almost ready to weld. I welded the nuts on the back side of the upper plate so I can simply bolt the supports in without trying to get my fingers underneath to hold the nuts.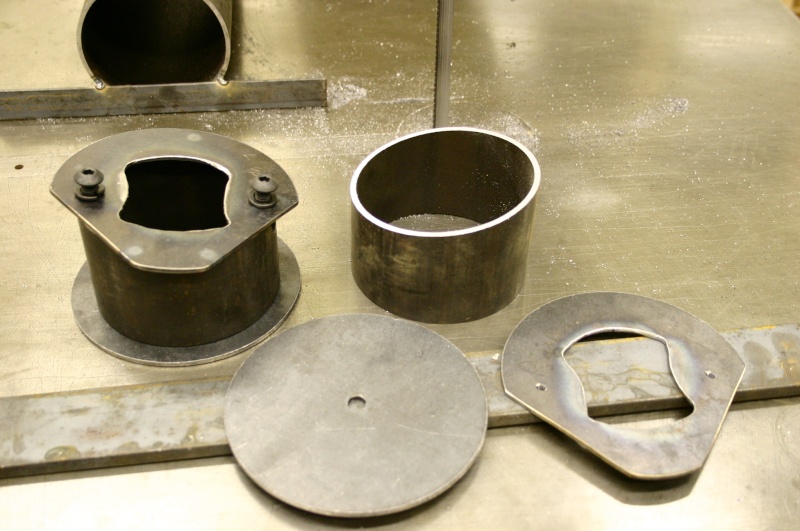
And here's a shot of the partially tack welded support being test fit into the spring hat. Notice the bottom edge is nice and level. This will keep the ends of the bags level at normal driving conditions (ie lower control arm level).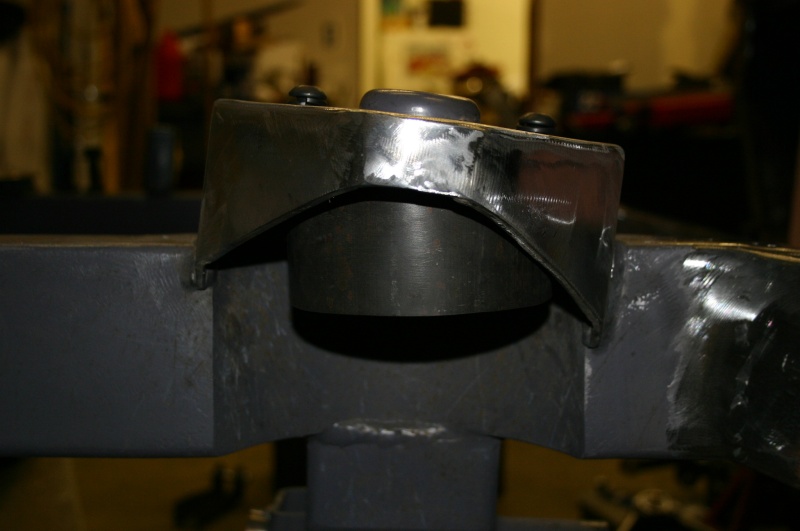
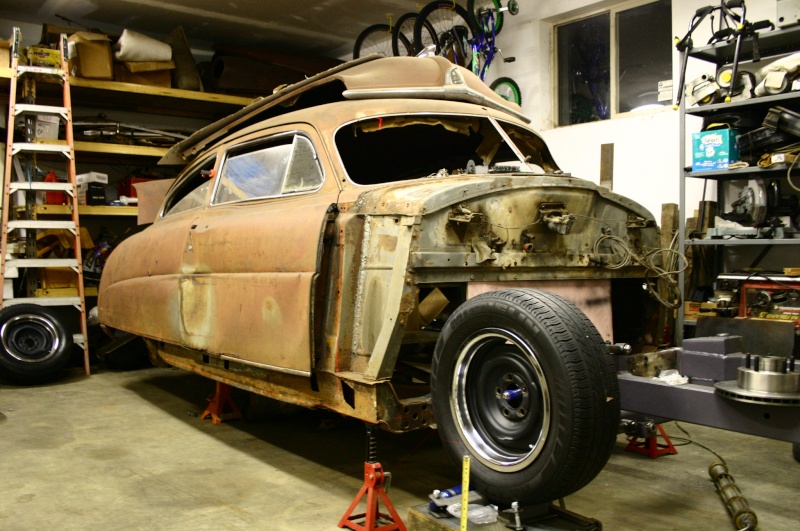
So this is what it looks like with a wheel propped up there at about standard driving conditions....
This thing should be draggin' ass when it's aired out!!! Looks like there'll be no problem clearing the calipers with these 15" steelies either!! So this is the ride height you get with the fatman stub frame and 2" drop spindles with 15" wheels wearing 205 - 65's......I'm thinking there's about 4 inches of clearance.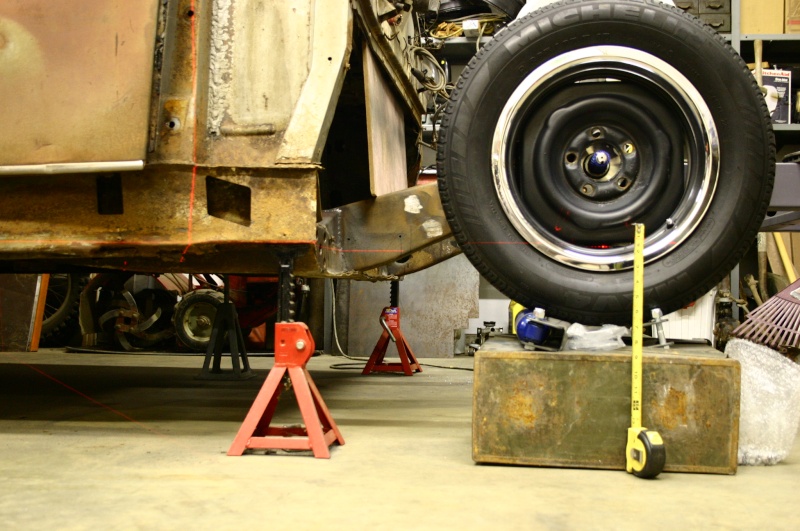
 0
0 -
Nice work man! I made the mistake of ordering the Fatman's stub with coil overs, now I want airbags. I guess I may have to go your route or buy shockwaves for the front. At least, as I have their full kit, I won't have to go thru your fitting challenges. That said, wish I had your fabrication skills. Thanks for this thread.0
-
Yes, Rick, I got the MII Stage II full kit, V8 coil springs, Ford bolt pattern, coil overs, power rack and pinion, the full boat. I'm happy with it theorectically, as it's been sitting on my workbench since late 2005! They usually reccomend shockwaves for the rear, but my thought was they may make converting the front to airbags easier than going the full on fab route, something I'm no good at and will not trust my family's lives on a crappy fab job. I planned to call Fatman's tech and ask them about using the shockwaves on the front and whether they are a bolt in to replace the coilover shocks. If it will work, that's my route.
The only thing unusable about my kit is a ordered the chevy engine mounts. I've got 60's style Hurst front mounts I got with the 331! I think with the Fatman stub, the Hurst mounts, and the rack and pinion, I should have plenty of room for headers for my Hemi.
Here's some pics of the stub, not great pics but here (looks like pretty thick steel to me):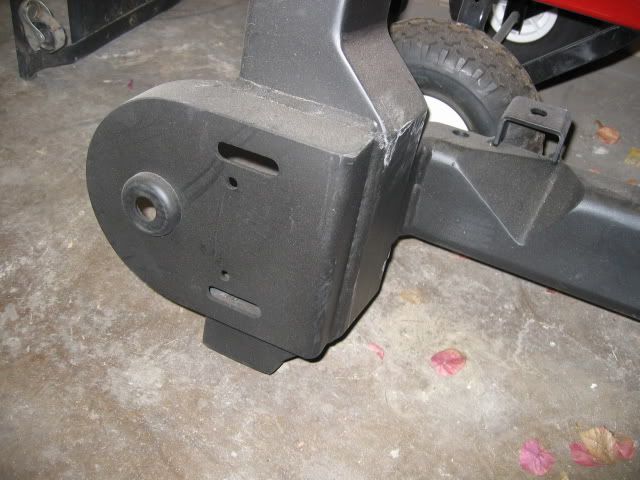
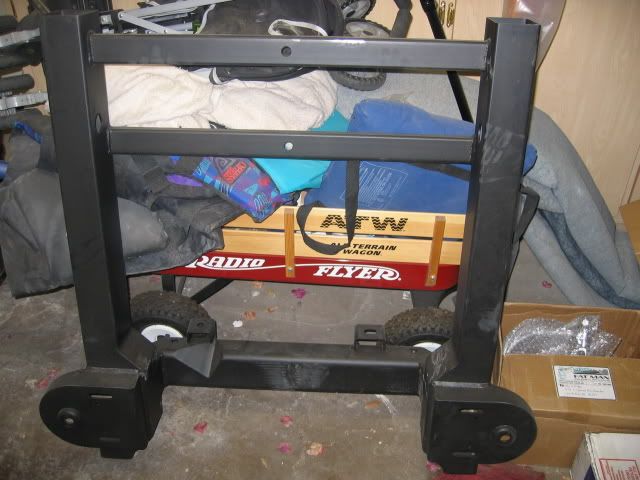
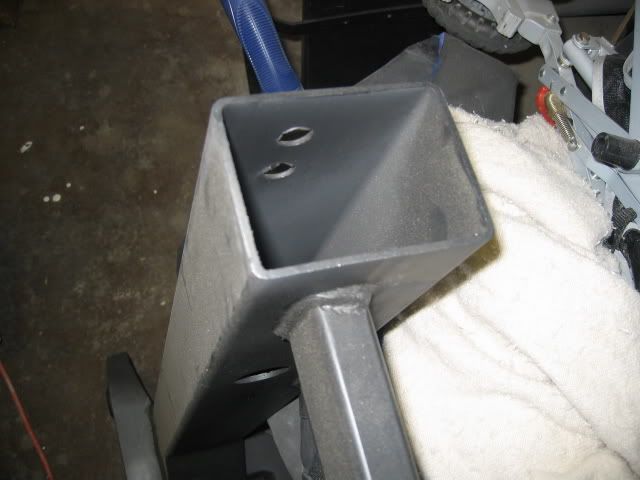
I sure am hoping I get to start on the Hudson next year. It makes me sick, VP of our Chapter and doesn't even have his Hud running after 4 1/2 years! lol
Jay0 -
Rick, the one thing that is going to make it a bit more critical in the measuring dept. for me is that a good friend of mine needed a front end for his wife's 49 sedan after a woman hit her. So, I sold them the front suspension before I could make a jig to include the wheel mounting surface. But, as long as the rad core support and a couple other measurements on the original frame stay true on the Fatman stub, it's supposed to fit perfectly. I'm just goin to be measuring a million times before cutting and welding! LOL (actually someone else is going to have to weld it!)
Jay0 -
Your right Rick, geez where is my head these days! It is the Stage II with the springs. But looking at the where the shock bolts up thru the center of the hat, I think the Air Ride Technologies Shockwaves (original and black series) bolt up just like a shock and thus would mean you just replace the spring/shock set-up with the Air Ride Tech Shockwave, and you have an air suspension without having to modify the frame stub.
http://www.ridetech.com/shop/index.php?dispatch=categories.view&category_id=1869
Jay0 -
Okay guys, just spent time on the phone this morning with both Fatman's and Air Ride Technologies (Darren). As far as Fatman's is concerned, you can buy a bolt in kit to change the Stage II to their airbag system, about $485 for the kit. Of course, then you have to buy the airbags, etc.
But, seems to be an easier way.............
A call to Air Ride was very informative. Basically, first, I may try this to lower my coupe without the c-notch for right now (money and fab is a concern for me being disabled), and these are systems they have installed on cars. He suggested pulling all but 3 leafs and use lowering blocks. Then in place of the stock shocks, you use their Shockwave 7000's (which will hold 1600lbs total). These are about 4" in diameter, so I have to look at the shock mounts and see if there is enough room or they may have to be moved a bit, not a big deal. They have done this on '61-'66 Lincolns, which, having owned a '64, are heavier than a Hudson Coupe, so of course they won't do this if they would not warranty it.
Cost for the front system (w/o tank. vales, etc.) runs about $900 (for an adjustable shock, $700 for non-adjustable), while the rear using 7000's is also about $900. Then you have to buy the compressor/controller kit, which will run around $1,500 for their RidePro3 digital system, the analog is a bit cheaper, but a much bigger mounting area required for under your dash, or in a console vs. the didgtal, which is about the area of a credit card.
So, I think this is the system I will try first. Means I don't have to do anything to my frame stub but sell the springs and shocks. The rear as mentioned above should be a breeze. Now, the one issue is the ride height. Without a tri-four link and c-notch, I will not be able to know how low I can go right now, but it does save me cutting out the floor, the c-notch, etc. The Sjockwave 7000's I would buy, would still be the ones to use if I later decide to do the c-notch and tri-4 link.
Also, Air Ride will give you air valves for each airshock so you can install them and air them up individually and run your car, while you save up the cash for the compressor/controller kit.
Okay, my fingers are sore typing, so I leave you guys with this research, and I hope it helps.
Happy Thanksgiving to all!0 -
Rick, I was the one that made a mistake posting. I just thought that this info might help everyone in some respect that was anticipating doing what Lee and some other of us wanted to do. This might help you a bit though you are working with a frame and we have to deal with the unibody.
Lee, some fantastic work you've done there, I could only hope I could ever have your talent. I have ideas, but guys like you can put yours into action and I, like others, are following your mods here closely.
I guess since I have some down time here, I should buy a welder and try learning how to do it.0 -
jsrail wrote:Rick, I was the one that made a mistake posting. I just thought that this info might help everyone in some respect that was anticipating doing what Lee and some other of us wanted to do. This might help you a bit though you are working with a frame and we have to deal with the unibody.
Lee, some fantastic work you've done there, I could only hope I could ever have your talent. I have ideas, but guys like you can put yours into action and I, like others, are following your mods here closely.
I guess since I have some down time here, I should buy a welder and try learning how to do it.
Hi Guys,
Excellent discussion!! In a small way I hope I've given a "nudge" on some old projects. I'm a bit of a "hack", but if I spend enough time things ususally come out pretty good. Most of this stuff is pretty straight forward....if you're trying something for the first time, just practice on a piece of scrap until it's something you can live with. Welders are pretty reasonably priced these days and I've been using flux core wire and getting satisfactory welds. Using shielding gas would be better and give less spatter, but the flux core is so simple that vitually anyone can use it! For the thicker stuff like the frame, I've been using the thickest wire I can get (0.035"). This would be too thick for doing body work though. And a good 4 1/2" angle grinder is indispensible.
Anyway Jay, that sub frame of yours looks very familiar. If you want to go to a bag set up, that's one of Fatman's big advertising points is that you can "upgrade" easily. Now that I'm working with these airbags, I'm totally sold on them....I can't wait to get mine to the point of being a "roller"!!! Now that I essentially have my airbag supports finished, I'm about to start on my "external shock" mounts. I think I have it all figured out, so stay tuned for the pics in a while. The only thing on yours that might cause an issue is that the Fatman arms are usually stainless steel. So you might have to take your lower arms to a place that welds stainless in order to get your lower shock mounts welded on. Or as you mentioned, the Shockwaves would be the sweetest if you have the dough!!!
Rick - I really like how my Fatman setup is turning out, but at this point, I can't give you any feedback on how it all opperates since I'm a ways out on driving this thing. If definitely look like it should all work well!!
Thanks for the words of encouragement.....I'll need them in the next few years as I work on this beaut :-)
Jay - if you need me to measure my frame anywhere, let me know. Sounds like you don't have a good set of measurements anymore.
So here's how the airbag supports turned out. Both of them are now finished except final welding.
Here I bolted in the upper part and centered the bag and lower plate in the spring pocket in the frame. I then tack welded the plate in this location and traced the bag periphery.
Now I have to transer the bolt hole and air supply port hole to the plate.
So I made a paper stensil of the airbag upper surface and taped it to the center of the airbag markings on the lower surface of the airbag support and centerpunched the holes for drilling.
I made the drivers side exactly oposite of the passenger side. Here's a picture of the completed parts (except for final welding). Notice the temporary air valve plumbing I bought at the hardware store for a couple bucks. I'll have to bend the long pipe to get it to fit up through the spring hat on the frame.
And here's a shot of the completed assembly in the installed position. The bag is just where I want it and the installed height is right on 5.5 inches. I think it looks right with the upper and lower airbag surfaces parallel in the standard driving position with the lower arms level. I've seen some airbags with non-parallel surfaces and they look funny. On to the "external shock" mounts.....and painting!!! 0
0 -
Tech at Fatman's said they sell the weld on kits for the shock mounts, said it was very easy to do, but I didn't ask about stainless welding, which is a good point. I was thinking hat the only weld on shock part was at the top along the frame and that there was a bolt-on part for the control arm, but I can't remember where I heard that, maybe when I was first ordering my kit. Anyway, it wouldn't be a problem for me as I know an awesome fab and weld guy that owes me some favors cause I traded some tax work to him. As far as a cup, there is a bolt on kit for about $485 to convert to their airbags, not sure if it includes the airbags, etc. I really like the shockwave idea, as it requires no add'l shock mounting, but will have to do some saving up for it, but it wouldn't require me to do anything to my current set-up.
As far measurements Lee, the kit comes with a complete set of instructions and where to measure for the cut-off spot just ahead of the firewall. I looked them over and they are almost exactly like the one I printed off that Doc Frommer did on a '52 Hornet install. I just printed them off to look over before I bought my kit. Fatman's install instructions do not require any measurements to the front hub/wheel mounting surface. Actually, the only measurement they give you is the cut-off spot, the rest are your measurements to the existing rad core support and bumper bracket holes. With these measurements and a plumb bob, you've got everything you need. If you don't mind, I may still ask you some questions as I go along, I appreciate the offer to help.
Basically, I'm much less worried about the job than I was before. Changing to airbags is pretty simple as is the instruction for the kit. As Lee is doing, measure. measure, measure before I cut and don't get in a hurry. I am really interested in Air Ride's suggestion on the rear suspension lowering and airbags. I've decided to try it before I get into plasma cutting the trunk and backseat flooring out and c-notching. If it gets me to a satisfying height, that's cool, if it doesn't, then I'll cry and start cutting!
Lee, thanks much for this thread and keep it coming. Wish you lived closer! lol Thanks Rick for the observations, now if only I could afford to fly you guys out here! LOL
Jay0 -
Excellent!!! I'm excited to see you get started on the stub frame Jay!!! Yeah...it'd be fun to drop by your place and transfer any "lessons learned" from my project if I lived in the southwest!!
A "bolt on" shock mount to the lower arm would be nice.....now you tell me :-) I think you're right.....you shouldn't need any other measurements than what you have there. If you look at my post, I think the way I did the cut off works very well rather than measuring from the rivets. I essentially lined up the new stub direclty below the old one and used a plumb bob to mark where I wanted the cuts leaving 1/8th to a 1/4" gap to fill in with weld. It worked great. It was quite liberating actually making the cuts!!!
Anyway, you got a good head on your shoulders, so just do what you feel is right and let common sense guide you. I definitely want to see some progress, so keep us posted!!!
Thanks,
Lee0 -
Addendum: Even if you go with a 110v MIG welder, you'll most likely need to upgrade the outlets to be safe - depending on the AMPs the welder requires. That will require an electrician unless you are experienced & comfortable enough to do it yourself. Caution - This type of work can be very dangerous!
I've got a couple of 220v 30A outlets that I wired into my garage, ready for my Hobart 180... I'm also running a 220v 30A for my air compressor.[/quote]
I have a dedicated 220 line in the garage that was for a dryer that I use the gas instead on. I just need to wire a box to the wall. Though I may have to wait a little as the 220's are a bit more expensive than the 110v's.0 -
Lee, I forget, is "ride height" the distance from the lower control are to the ground? Or the frame bottom and the ground?
Those bags look good and the frane work seemless. Really nice man.
Jay0 -
jsrail wrote:Lee, I forget, is "ride height" the distance from the lower control are to the ground? Or the frame bottom and the ground?
Those bags look good and the frane work seemless. Really nice man.
Jay
Hi Jay,
I'm not sure if my nomenclature is right, but here's a picture of what I mean by ride height. I threw this picture together with power point so I could ask JWRG the same question. They told me 5 inches.....I ended up using 5.5 inches so I could drop the car another ~1 inch when all the air is out of the bags.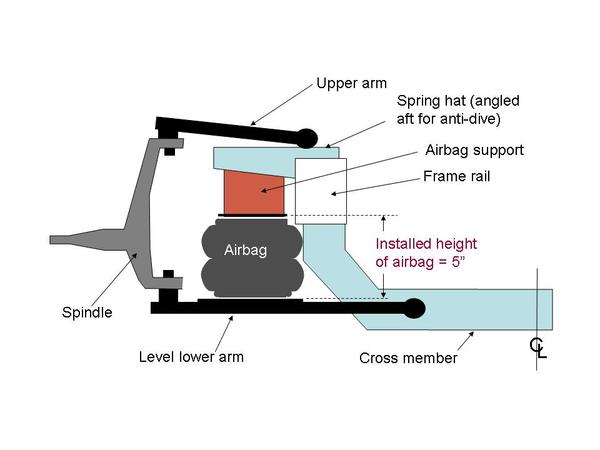
Lee0 -
Hi All..........not even sure where I left off.....been a while.....holidays kinda got in the way of progress :eek:
Anyway, I did a bunch of fit-up work and clearance checking of the shocks etc. I needed to get some of the parts painted so I could assemble the rotors and the spindles and not have to take them appart again. Anyway, here's some of what I got done in the last couple of days.
First of all, I had to finish welding the airbag supports....they're ready for paint now!!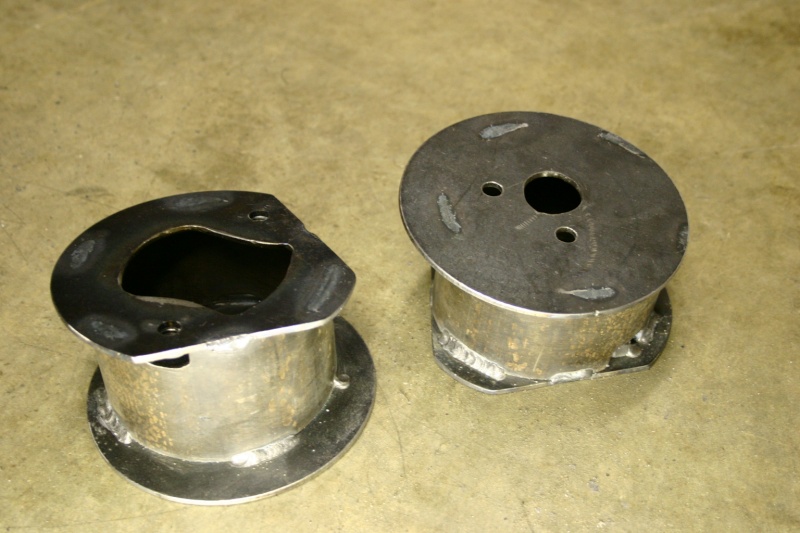
So now....with the help of a friend (for a small fee of pizza, beer and a brownie), we were able to finally settle on the mounting location of the external shock mounts.
Here's the lower mounts prior to cutting out of a 1/2" bar:
Here they are cut out and ground into shape....these will be welded to the lower a-arm: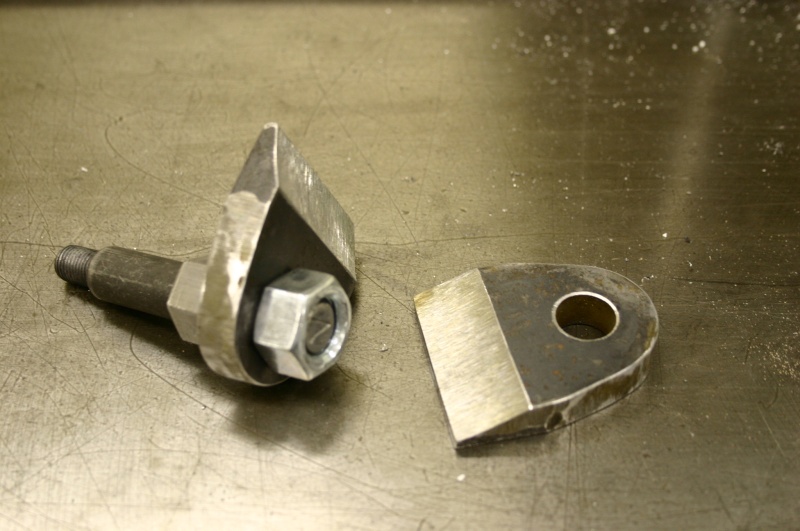
After much measuring and clearance checks through the entire range of motion of the lower arm as well as turning of the spindle left to right, the lower mount is tacked into place. The compressed length of the shock is 10", so I made the mounts locate the shock to only compress to 10.5" when the airbag is bottomed out. I've heard that you don't want to actually "bottom out" your shocks....so the airbag should be the limiting component when the suspension is bottomed out. So, here's the lower shock mount tacked in place: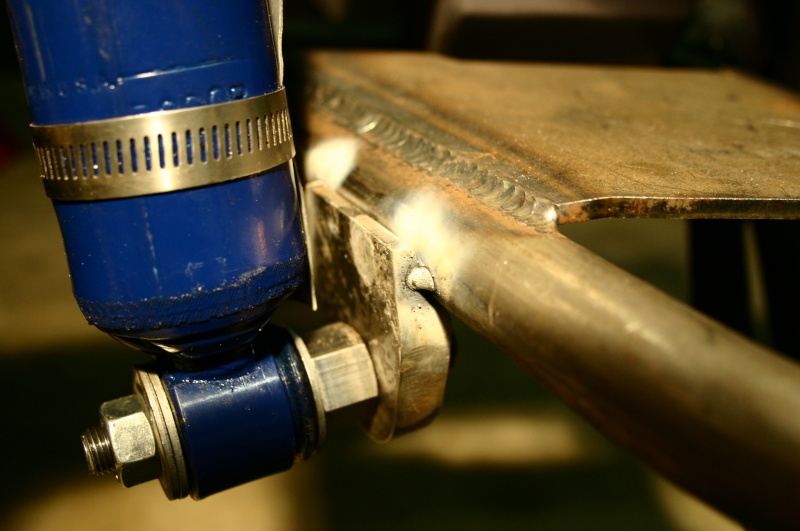
continued on next post.....0 -
Continuing from previous post....
So, now to the top mount.....after much cutting, grinding, fitting again and again, here' the upper mount located and tacked in place: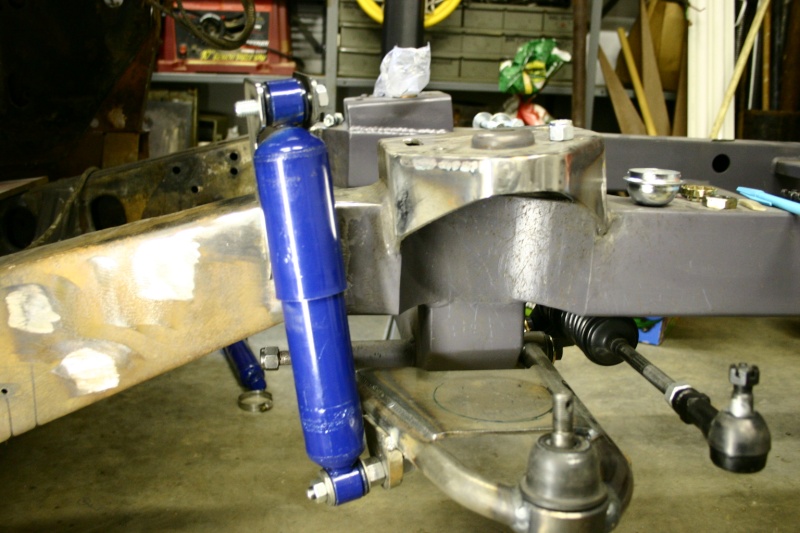
Now, after a final clearance and range of motion check, final welding is performed (notice the damp rag to keep the ball joint from getting hot):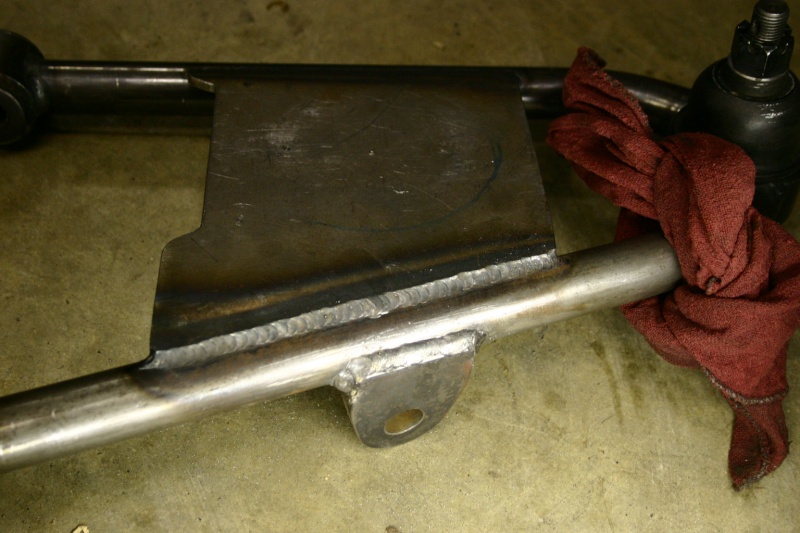
Then the other side is welded at the same time to make sure left and right are exactly the same: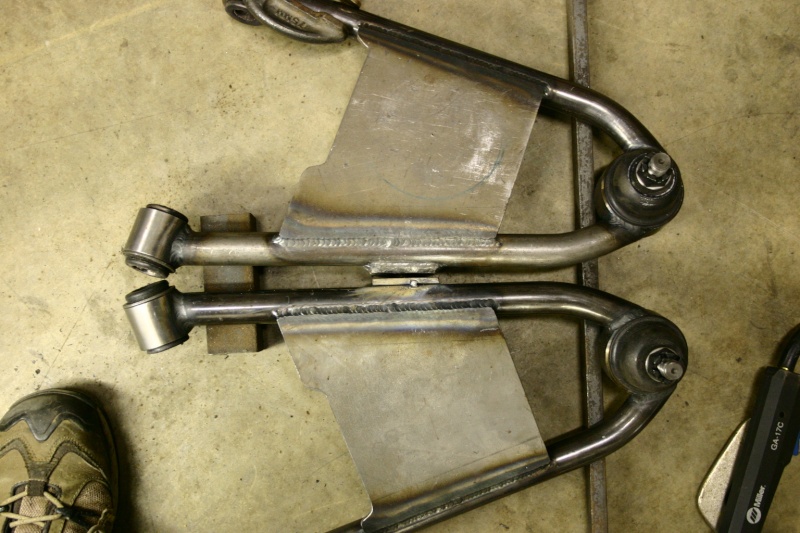
Here's a final look at the lower mount welds for both left and right arms: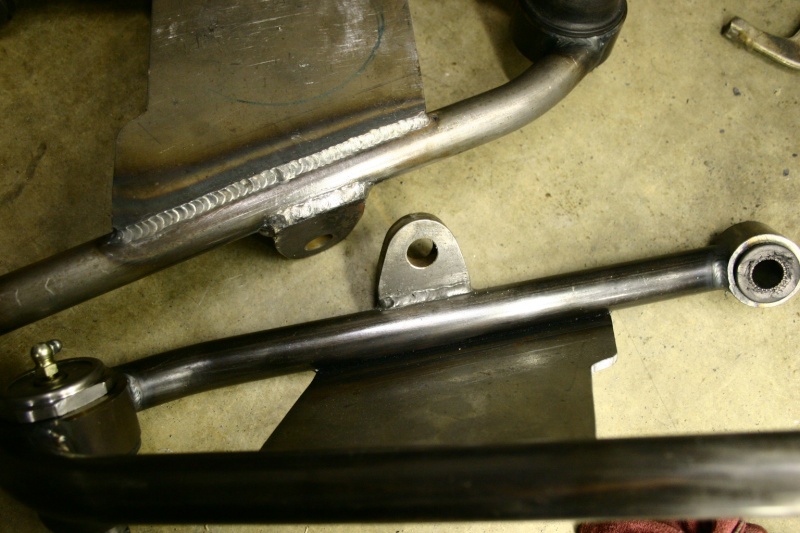
continued on next post......0 -
continuing from previous post.....
Then the upper mount is finally welded into place: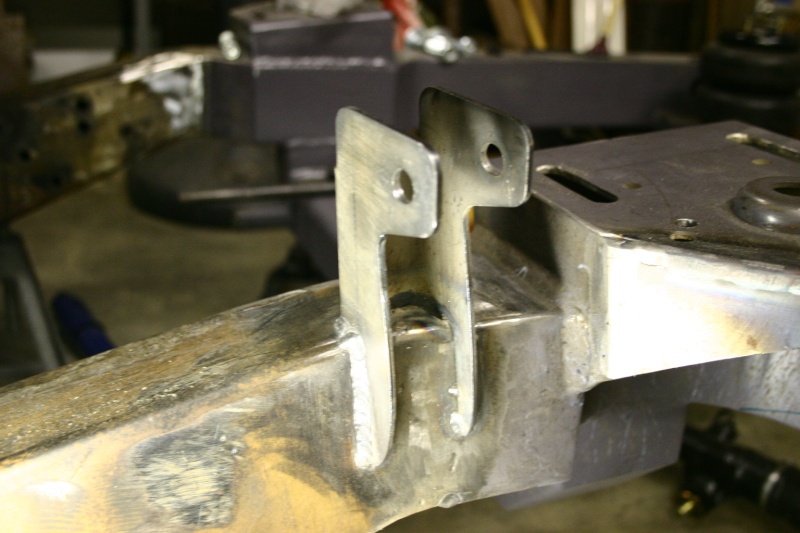
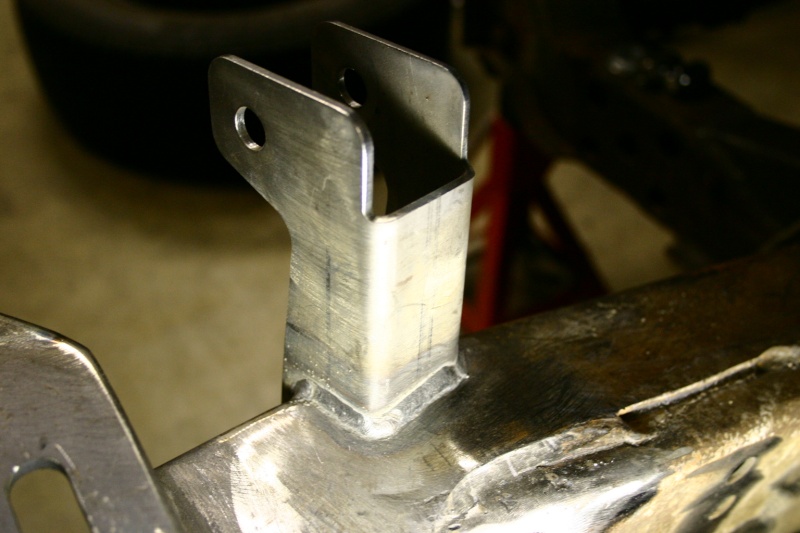
Now I need to finish the upper shock mount on the driver's side and the shocks are DONE!!!
The shocks were one of the most time consuming parts of the build thus far, but I'm confident they'll perform well and not have ANY clearance issues.
There was another issue that show up with all the clearance checking. The steering rod coming out of the rack interferes with the lower surface of the frame when the wheel is fully turned and at the upper end of the wheel travel. The frame will have to be trimmed and a filler piece welded in. Here the frame is marked where it will have to be cut out: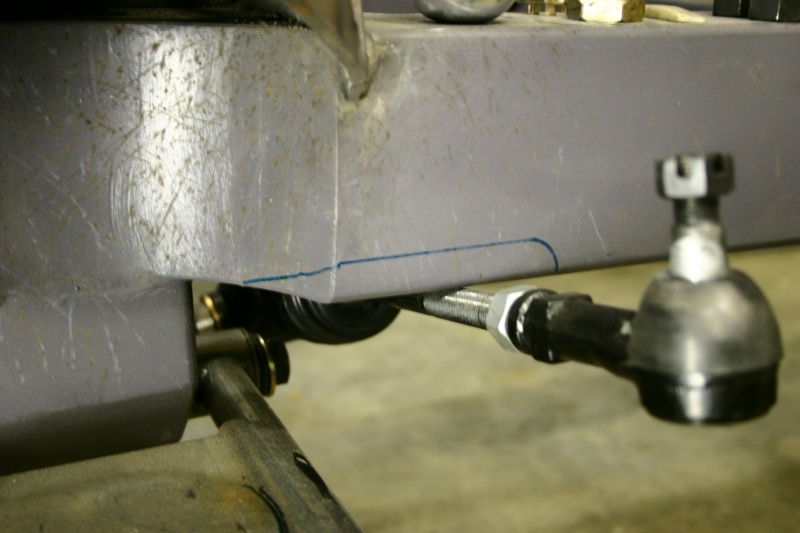
So now, I need to finish making clearance for the steering rods, weld up some holes, add engine mounts, put it all together and paint it (actually that sounds like a lot)!!! Then I can start on the 4-link at the back end...stay tuned!!!
Lee0 -
Hello Lee,
Nice Work!
Peace,
Chaz0 -
Wouldn't something like the ShockWave (shock/airbag combo) be an alternative? It would seem to simplify the installation.
I've never installed an air-ride system - Just curious as to your thoughts?0 -
rambos_ride wrote:Wouldn't something like the ShockWave (shock/airbag combo) be an alternative? It would seem to simplify the installation.
I've never installed an air-ride system - Just curious as to your thoughts?
Hi Dan....yep - shockwaves would make it easier in all departments except the wallet :-)
I guess you gotta ask the question "what's my time worth" .....my time obviously isn't worth very much otherwise I would've paid for it 3 times by now :-)
It's all about "the journey" ....at least that's what I keep telling myself!!
Lee0 -
0
-
davidhugo wrote:I enjoyed seeing your Avitar

Hi David, Looks like you and I are about in the same boat :-)
Have you made any progress lately???
I'm about 1/2 way through making clearance for the tie-rods to the bottom of the frame, then I need to weld in the engine mounts, paint and re-assemble...then I can get to the 4-link in the back. Here's an old post of mine with a few more pics and what I had to do to fix and strenghten my frame:
http://classiccar.com/index.php?option=com_jfusion&Itemid=62&jfile=showthread.php&t=17943&highlight=lsfirth0
This discussion has been closed.
Categories
- 36.9K All Categories
- 113 Hudson 1916 - 1929
- 20 Upcoming Events
- 92 Essex Super 6
- 28.6K HUDSON
- 574 "How To" - Skills, mechanical and other wise
- 995 Street Rods
- 151 American Motors
- 178 The Flathead Forum
- 49 Manuals, etc,.
- 78 Hudson 8
- 44 FORUM - Instructions and Tips on using the forum
- 2.8K CLASSIFIEDS
- 608 Vehicles
- 2.2K Parts & Pieces
- 77 Literature & Memorabilia
- Hudson 1916 - 1929 Yahoo Groups Archived Photos


