Little update on Lola, April 5 2010

mrsbojigger
Senior Contributor
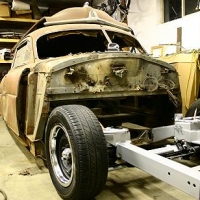
I am lengthening the Lola's butt by 6". I never have liked the squared off rear because it looks like the end of a loaf of bread. I felt it needed a better "flow" to the curve. The bumper and curve of the trunk will also be changed to match this new curve.
Enjoy and Peace,
Chaz
Attachment not found.
Attachment not found.
Attachment not found.
Enjoy and Peace,
Chaz
Attachment not found.
Attachment not found.
Attachment not found.
0
Comments
-
Sweet Chaz!!! Can't wait to see how you do this?? I think they look pretty good stock, but your new curve does indeed look like it's "Flows" real nice!! Keep us posted!!!
Lee0 -
Thanks Lee,
That elusive "Flow" is what I am trying to achieve. I am not trying to destroy the Hudson's DNA but carry the design that one step further. The Auto Designers back then had certain criteria and manufacturing limitations as to what they could design and build. As an example, the tall interior to allow for wearing hats while driving which was common back then. People rarely wear full hats like a Stetson while driving these days thus we can lower the roof line for better asthetics and less wind resistance which can give better gas milage. We have better synthetic foam cushions so our seats don't have to be so thick and bulky for comfort which allows for better use of interior space. This goes on and on but you get the idea.
To put everyone's mind at ease, it will still be and look like a Hudson when finished right down to the Hudson Logos!
Peace,
Chaz0 -
Chaz...don't worry about else's mind, they'll get over it! :-) Ben meanin to get a reply out to your email, I promise I will soon, its been so crazy around here!
As usual, I am breathless at your fabbing skills, dude! That line flow is much better than the original, though I hope you have garage space long enough to fit that oceanliner in! LOL0 -
This is going to be interesting! It looks like that flange turned real nice. Did you have to stretch it to get the panel to sit flat?0
-
Hi Jay,
Oceanliner? Maybe I should call her "Queen Mary" rather than Lola! Grin
Hi Bent,
Actually the 1/2" flange is the same length on both sides when its bent over at a 90 degree so it keeps the panel flat. I'm flying by the seat of my pants doing this since I've never done this before but as I always say, "No Guts, No Glory".
Peace,
Chaz0 -
More Pics Please!!!
We love pics!
Craig0 -
mrsbojigger wrote:
Oceanliner? Maybe I should call her "Queen Mary" rather than Lola! Grin
My little sister's friend had a '59 Buick Invicta 4 door hardtop, back in the late '60's in high school- one of those with the pancake top, and tiny A, B and C pillars, so it was just basically glass all around. They called it the Seaview, after the submarine in a TV series at the time.0 -
Chaz - what have you gone and done now
 :D
:D
So - if your'e taking this stretch on the rear...can I assume a subtle chop is coming?0 -
Dan,
You know me. Subtle is not in my vocabulary!
Hudson308,
Darn, you found me out!
HotrodHR,
I'll keep everyone posted with photos as I progress but the problem is that there is just one of me and I'm the only one working on it.
Peace,
Chaz0 -
Dan-
Try to envision this: Stepdown, LWB, chopped, 3W coupe, slammed, extended roofline in the rear, extended rear end (as in picture). The chopped portion should be real interesting, because I know Chaz will not do a "normal" chop by simply removing XX" out of the middle of the windshield post. More than likely, it will involve taking a little there, extending the top of the windshield higher, and lowering the bottom into the car.
If you notice his '47, the chop was achieved in this manner and you cannot tell that it is chopped without comparing side by side with an original. Looks factory-perfect.
Chaz-
Sorry for stealing your thread!0 -
Any time Russell, anytime!
It's been a coons age since I talked to you. How have you and the family been doing? How is your car coming along?
Peace,
Chaz0 -
Lost a full day yesterday! In all the 25 years I have been welding, this is the very first time I made this mistake. I was in the process of making the new extended bumper brackets alternating between grinding/sanding and welding. I was alternating back and forth between the two and changing out protective face shield for welding helmet. During the process of back and forth I had a mental glitch. A REAL MENTAL GLITCH! Started an arc with my face about a foot from the weld joint with only my face shield on. Bam!, I was temporarily blinded. I have never in my life seen such a bright burst of light, not even when looking directly into the sun. I made it to the phone and called my eye doctor. He said that it may have been such a short burst that probably I had not damaged my eyes permanintly. I put some drops he had given me to kill the pain and relieve the scratchyness and spent most of the day in bed with my eyes closed. I am much better today with just awful red eyes and a continued headache.
SO, saying all that, I did make a little more progress on the rear extension today. I made the cardborard template grid for the lower extended plate. This will insure the correct curve for the outer sheet metal shell and newly formed trunk. Photos show how I will use the template.
Peace,
Chaz
Attachment not found.
Attachment not found.
Attachment not found.0 -
Chaz! Dude! Be careful man, we need your skill, art, and wisdom around here. Glad it seems to be temporary.0
-
Chaz, there is no pain like your eyes as you can't scratch them like other parts of the body, i had welding flash in my eyes when we were welding my 57 Chev grill and it took a week or so to get over it
i feel your pain
Mike0 -
jsrail wrote:chaz! Dude! Be careful man, we need your skill, art, and wisdom around here. Glad it seems to be temporary.
. X2") 0
0 -
bent metal wrote:. X2
. X3 0 -
lsfirth wrote:. X3
Hey Chaz....we haven't heard from you in a while....we're all concerned about your eyes.....how are you doing??
Lee0 -
Lee,
Thanks for the concern. Doing better but having some trouble focusing. Will be making an appointment with eye doctor this week.
Peace,
Chaz0 -
0
-
So, are you going to remake the trunk and tail light area? Or move that all back and blend it in?:)0
-
Hey Bent,
Yes, looks as if I will be making and/or modifying ALL the trunk channels, the trunk, and adjoining sheet metal of the tail light area. We'll see! I'm working on the flat panel between the body and bumper today. I found out my bumper curvature is not bent to match the bumper brackets correctly so I'll have to do something about that. I'm having to compensate for that little glitch. The car had some body damage in that area before I got it.
Peace,
Chaz0 -
Hi Chaz,
Nice to here that you are back into, life is a learning experience
Mike0 -
Made the extension panel today and installed it. The bead roll is functional and decorative but will not show when all is finished. Too bad it will be hidden.
Peace,
Chaz
New Panel with Bead Roll and Punched Holes for Attaching
Attachment not found.
Panel in Place
Attachment not found.0 -
mrsbojigger wrote:Made the extension panel today and installed it. The bead roll is functional and decorative but will not show when all is finished. Too bad it will be hidden.
Peace,
Chaz
Chaz...excellent work as usual....can't wait to see how this turns out. Hope this means your eyes are back to 100%....
Lee0 -
Nice clean looking panel. Very nice.
Are you using steel rollers on you bead roller? How bad is the distortion when the part is right out of the machine?0 -
Hi Bent,
I'm using a combination of steel and poly rollers. On the raised center section I used all steel upper and lower rollers. On the bent over flange, I used a combination of rollers. I start by using the sharp tipping roller with one of the steel bottom rollers for making a good crease along the line I want folded. As I'm running the piece thru the bead roller a few times, I am gently raising the outer portion of the part by hand so I am getting more and more of my desired angle on each pass thru. Once I have about 45-60 degrees angle to it, I switch to a poly lower roller. By doing this I can really "crank it down" and get a bend a little over 90 degrees. The rest of the bending over is done with a hammer and dolly.
As for keeping the part flat as I work on it, that's simple. I picked up a piece of 2'x4' 3/4" plywood and mounted it level with the mouth of the rollers. As the piece goes thru it will lay flat on the surface of the plywood. If there is a slight curve afterwards, that can be taken out with slight adjustments from my shrinker/stretcher on the flange. If you are interested, there is a excellent CD out now by David Gardiner on traditional sheet metal work. It shows how to flatten panels with raised edges.
Peace,
Chaz
Attachment not found.0 -
Oh nice, you have a motor on your bead roller! Put that on my wish list.:)
Thanks for the great explanation. I appreciate that.
The CD that you mentioned, what else is on it? And how much is it.:)0 -
Bent,
I'm in the process of writing you a PM about this since it is "off topic" for the HUDSON Street Rods thread and more like general metal working. Check your PM's in a few minutes.
Peace,
Chaz0 -
Chaz, again beautiful work! That's why you are an ARTIST, and guys like me are number crunchers! LOL Your work with shaping metal is as your painting, Keep posting your pics.0
-
It's taken 2 days of constant work but I designed, fabricated and installed (welded) the 4 new 19 ga. CRS Rear Body Braces in place for structural strength as part of the streamlining process. These are installed so that when the rear sheet metal skin is cut loose from the un-body "frame" the whole back area won't sag down and I lose the body's shape. The center bumper piece is at the Bumper Shop being straightened and fine tuned for placement before the body's center sheet metal can be made. If the bumper is not perfectly straight now, I have no guide for forming the lower edge of the body and it's gap in it's relationship to the bumper. You don't want to have it finished and have a wavy uneaven gap between the two.
Peace,
Chaz0


This discussion has been closed.
Categories
- 37.1K All Categories
- 121 Hudson 1916 - 1929
- 21 Upcoming Events
- 101 Essex Super 6
- 28.7K HUDSON
- 595 "How To" - Skills, mechanical and other wise
- 995 Street Rods
- 151 American Motors
- 185 The Flathead Forum
- 49 Manuals, etc,.
- 79 Hudson 8
- 45 FORUM - Instructions and Tips on using the forum
- 2.9K CLASSIFIEDS
- 612 Vehicles
- 2.2K Parts & Pieces
- 78 Literature & Memorabilia
- Hudson 1916 - 1929 Yahoo Groups Archived Photos