Little update on Lola, April 5 2010
Comments
-
Very cool. I like the inside bracing too. Looks nice.:)0
-
Chaz:
This work is looking mightly good, lots of ideas, cant wait for the next show. Dont stop, keep feeding us, we need more. Thanks, Bob0 -
SNEAK PREVIEW!
Wednesday morning and still waiting on my bumper part to come back so I can continue on the project. While waiting, I did a quick sketch of what I have in my "minds eye" of what the rear section will look like.
Peace,
Chaz
Attachment not found.
This is OFF TOPIC but one of the reasons why I'm not moving faster on the Hudson. Being an Artist, I actually keep at least 3-5 projects going at any given time. I just finished all the sheet metal body work on a 1/8th scale model of the Southern Pacific SW-1 Switch Engine and it will be shipped to Omaha at the end of the month. It is built totally from scratch using only photos and 3-view drawings from 19 ga. CRS sheet metal. This will weigh in at about 600 lbs. when finished. You will be able to ride on it.
Attachment not found.0 -
Chaz, If it looks like the drawning it is going to be one sweet ride. Look forward to seeing it in person.
By the way, Big train fan--but then I only live a few miles from where the Golden Spike was driven. It was only a few miles from where I worked for 44 years.0 -
Hi Chaz, your a true artist, its always uplifting to see the passion that you put into your work and the skill that's in it Iam always in awe to see what you and Bent Metal can do with a piece of metal and wished I had though sort of skills
Mike0 -
Whoo-Hoo! Just got back from the Metal Shapers Gathering in Granbury Texas last night. I was one tired puppy. Besides teaching newbies the basics of metal shaping I worked on the rear fender panels getting the form I want shaped into them. I started by placing 6 Tucks at equal intervals and then beat them into themselves thus shrinking the upper sheet metal area to match the pattern. I was trying out my new Wray Schelin "Signature Series" metal shaping hammer. I am the proud owner of Serial #1. That sucker really packs a whallop and pushes metal around with ease. It's almost a little much for my wimpy left hand.
If you are interested in what happens when you "Tuck Shrink", look it up on You-Tube under "tuck shrinking metal". It's very interesting as you see what happens to the metal.
Peace,
Chaz
Attachment not found. Attachment not found.
Attachment not found. Attachment not found.0 -
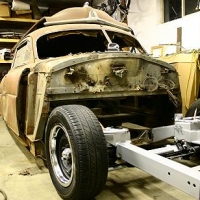
Just returned from Omaha. Took the sheet metal body for the SW-1 Switcher up there to mate with the chassis. Started back on the rear extension portion of Lola. I took the left over sheet metal from the old 4-door panel and I am in the middle of rough shaping it to fit the contour of the new vertical ribs. I will use the English Wheel on it next to smooth it out and get better proportions but this will give you a better idea of what I am trying to achieve.
Peace,
Chaz
Attachment not found.0 -
Well I stopped working on the 4-Boy Scout Memorial today to give it a rest so I can look at it later with a "new eye"! Sometimes it's good to get away from a project and come back to it later. Got back to working on the Hudson's right rear fender extension.
Peace,
Chaz
Attachment not found. Attachment not found.0 -
July 10th 2010
More progress today! I now have the right rear 6" fender extension in place and made the lower reveal piece today. It will need some fine tuning and welding in place but I'm getting closer to seeing what my ideas will look like in "real life". This side was made from pieces from the old 4-door panel but since I now know what to do to get the form, I will make the left side from scratch from raw sheet metal.
Peace,
Chaz
Attachment not found.
Attachment not found.
Attachment not found.
Attachment not found.0 -
That is one beautiful piece of work, Chaz. You can be forever proud of what you've done!!!
Keep up the great work.
Hudsonly,
Alex Burr
Memphis, TN0 -
Super nice!
") I like the way you made that off-set. Very cool. 0
I like the way you made that off-set. Very cool. 0 -
Hi Bent,
The sheet metal was first screwed to the back side of the buck so it wouldn't slide around and lose my place. Then it took literally hundreds of little taps with different shaped mallets and then wheeling it to get the little lumps smoothed out. The end result was worth it though.
Peace,
Chaz
Refinement after refinement in progress of the design. Photoshopped concept of what I'm shooting for as of July.
Attachment not found.0 -
mrsbojigger wrote:Hi Bent,
The sheet metal was first screwed to the back side of the buck so it wouldn't slide around and lose my place. Then it took literally hundreds of little taps with different shaped mallets and then wheeling it to get the little lumps smoothed out. The end result was worth it though.
Peace,
Chaz
Refinement after refinement in progress of the design. Photoshopped concept of what I'm shooting for as of July.
Attachment not found.
Woooooow!:eek: That's awesome. Can't wait to see more pictures!:)
Keep the details coming!!! Love it.:)0 -
yes....no doubt.....gonna be sweet!!!!
keep up the great work!!!
Lee0 -
Love the photoshopped picture, Chaz. Project is really coming along well. You should be proud of what you're accomplishing. Hopefully, I'll see you soon and can check out the progress firsthand.0


This discussion has been closed.
Categories
- 37.1K All Categories
- 121 Hudson 1916 - 1929
- 21 Upcoming Events
- 101 Essex Super 6
- 28.7K HUDSON
- 595 "How To" - Skills, mechanical and other wise
- 995 Street Rods
- 151 American Motors
- 185 The Flathead Forum
- 49 Manuals, etc,.
- 79 Hudson 8
- 45 FORUM - Instructions and Tips on using the forum
- 2.9K CLASSIFIEDS
- 612 Vehicles
- 2.2K Parts & Pieces
- 78 Literature & Memorabilia
- Hudson 1916 - 1929 Yahoo Groups Archived Photos