35 T running rough

Any help would be appreciated.
Tom

Comments
-
That's quite normal. You need to do a bit more analysing. compression, spark, timing, mixture?0
-
Thanks Geoff
0 -
I consider Geoff the world’s number 1 authority on all things mechanical regarding Hudson’s. So I will gladly accept any correction to my following on this post.Tom, since you mentioned condenser, I believe the first place you would see the effects of a bad condenser would be in the points.
This statement is only mentioned because of Tom’s original post.
I agree 100% with Geoff’s response.
Regards, (another) Tom0 -
Having seen the picture, I thinkyou need to look at the carbon button in the centre of the cap. It is not normal for the spring arm contact to be burnt in this manner. I think you will find the center button eroded away, and will need a new distributor cap.0
-
Most if not all distributors have a model number stamped on the side of the barrel... I'd at least start there... Once you know the part number you can easy find out the year and type of replacement parts used for that unit... Cheers ken0
-
Distributor carbon buttons can be DIYed and fitted to the centre spring. If the centre spring is RS the spring from a biro or similar can be adapted.
Wildrick have Terraplane distributor caps.0 -
Fogey These are 6 cyl
CAP 1927-33ET IGB 1031, 1934-47ALL IGB 1240
ROTOR 1927-33ET IGB1002, 1934-47ALL IGB 1239
0 -
The IGW-4103A Distributor factory installed in the 1938 Series 83 6 engine.
Service parts for this distributor are:
IGB1240 - Distributor Cap
IGW3028S - Contact points
IGB1239 - Rotor
IGW1025J Condenser -- This condenser is .20-.25 MFD per Autolite manual
IG4650 - Coil
Information source: 1942 Chilton Flat Rate and Service manual
EddieHudson's information is identical to that in this manual.0 -
The distributor cap on ealry models was "squatter" than the later ones, hence, even though a later one may fit okay, the tern inals are sitting higher, resulting in arcing from the button to the rotor, which looks to be the case in the illustrated rotor.0
-
A good word 'bodged' its still very much in use in the southern colonies.Old Fogey UK said:
My friend's car has been what the British call "bodged" - meaning that it's been restored using parts from different years and/or makes that have been adapted/tortured to fit.")
0 -
We call it "cobbled" here. "Bodgied" usually means thrown together out of sundry bits, or unorthodoxly modified.0
-
We call it FUBAR in the United States.0
-
So finally getting back to tuning the 35 T. After emailing with Geoff C in NZ I think I've figured out what my problem is. A shop here in Auburn NY purchased much of the tooling for molding distributor caps and rotors from Echlin and other. The owner tells me he uses the original heavy duty Bakelite for both. Says the parts that are coming from off shore use a different inferior material that tend to "leak electrically". The web site is taromfg.com. Anyway I've attached a few pic of the cap & rotor I purchased from them.


0 -
Thanks Tom, taromfg.com has an amazing selection of ignition parts .. and from your experience , the knowledge also !Bill0
-
The current spark plugs in my engine AutoLite 295. When I search for them I find 295 resistor type and 295 non-resistor type. Does it make a difference in which is used?
0 -
35 Terraplane: I run the non-resistor 295 plugs in my ‘34 Terraplane0
-
Toddh, thanks for the reply. I’ve ordered a fresh set of the non-resistor 295’s. What did you gap them at?0
-
.022”. Do you have the resistor on your distributor?0
-
I don’t think so, should there be? I’ll check tomorrow as I just received a new condenser from Brillman today. Plugs are supposed to be here Sunday. I’ve been running down things in the ignition system and have found a few things. I’ll write a summary once I the run down is complete.0
-
It’s an open wound resistor mounted on the outside of my distributor. The primary wire from your coil goes to one side of it and the other side is connected to the distributor primary connection0
-
make sure you’re not running resistor plug wires. Have you done a compression check yet? Vacuum tested?0
-
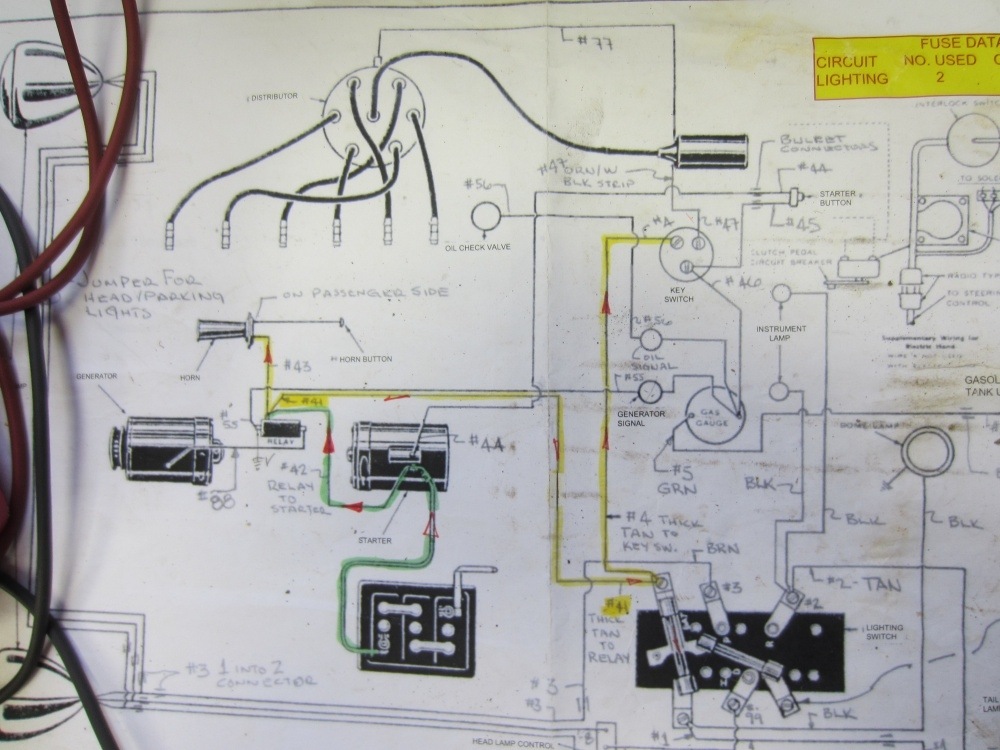
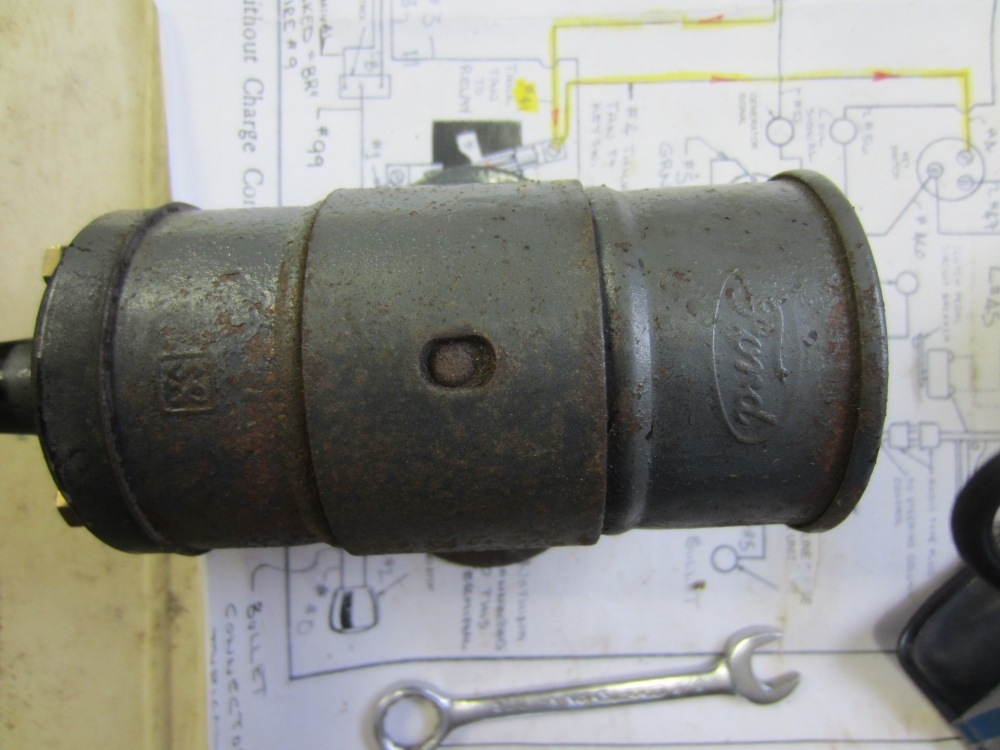
My car was retrofitted at some point eliminating the original ElectroLock coil and replacing it with a separate key switch and in this case a Ford coil mounted on the fire wall with terminals facing down. Funny thing the mounting bracket on the Ford coil lined right up with mounting nuts fixed it the fire wall. I replaced the wiring, except HT leads, in 2016 with a set made by Rhode Island Wiring. The HT leads were replaced in 1998 by my father-in-law. I assume they are correct for the non-resistor type plug. I plan on replacing them.
Upon advice from Geoff C, I traced down a few things. Had battery voltage thru the starter relay, cutout relay, circuit board under the dash to the key switch BAT terminal.
With full battery voltage at the BAT T with the switch on, got a drop of 0.4 volts across the BAT to the ING / ACC terminals. With all wires removed from SW got 1.3 to 1.5 OHMS across the BAT to the ING / ACC terminals.
At the distributor terminal it had dropped to 5.93 V.
I’d tracked down a new key switch over the winter. It’s a Pollak #31-122P, a div of Standard Motor Products, made in Mexico. It feels robust. I had to wait about 4 weeks for it as they only make this model to order. 0.01 OHM’s across its terminals. After installing it had 6.39 volts at the BAT T, dropped to 6.3 V across the BAT to the ING / ACC terminals. At the distributor terminal it had dropped to 6.31 V.

I checked the OHM’s across the Ford coil as I’ve seen done on the net not knowing if it is a full true test of the coils health. 1.3 across the primary and 3.6K across the primary/secondary.
Installed a new Standard Motor Products coil UC14 from O’Reilly’s.
Installed a new “Condenser for Autolite / Prestolite Distributors” from Brillman.
Installed new AutoLite 295 non-resistor spark plugs.
Installed New Cap & Rotor
Points looked to be in order with no pitting. Gave them a slight filing.
The distributor was set as shown in the attached pic turned to max on the advance arm slot.
 Used a TDC whistle on #1 to get close then lined up the first mark on the flywheel with the pointer.
I used BIG SKY’s method from his excellent description in a 2018 post to reposition the distributor so the hold down bolt is in the middle of the advance arm slot.
https://openforum.hetclub.org/discussion/171643/timing-marks-initial-timing-w-o-light#latest
Lined it all up. Set full choke, once the gas got to the carb she fired right up. Slowly pushed the choke in and she settled into a decent idle.
I’m searching the Forum for instruction on the use of the vacuum gauge method for timing. I’m waiting on the Snap On guy to let me know if they’ll repair or replace my late 60’s compression gauge. It no longer holds the max pressure on the gauge making it difficult to get a good reading. Will report back again later.
0 -
What model Terraplane do you have? I ask because it’s possible you have the wrong carburetor on the car. Most of the Terraplane models that year had a Carter carburetor with automatic choke (Climatic Control). However, the commercial cars and the very basic Terraplane model had manual choke.0
-
My car is the base Special G model with the manual choke and cutout relay. I had Daytona Carb rebuilt the Carter 311S last fall. Had Jeremy Burris rebuild the fuel pump shortly before that.0
-
Gotcha.0
-
Hi Tom,Some people prefer the vacuum gauge for timing ... it is believed to tune to the present condition of the engine rather than when all was new. Easy and fun to try !Geoff might fine tune this a bit !Good luck Bill
0 -
Thank you Bill. I didn’t have much luck searching the forum on this topic. I’m on it0
-
There are many things to consider when "tuning" an engine, or setting the timing. The main one is that Murphy's law states that : All instructions will be either a. Incorrect, b. unavailable, or c. unreliable. In the case of the page that is referred to in Bill's post, it states that to advance you turn the distributor clockwise to advance. This only applies to '41 and later Hudson 6's. All others the rotor turns clockwise, hence you must turn the distributor counter-clockwise to advance. Also, you will have to have the timing so far advanced to get any trace of a "ping" on modern fuels that it will kick back on the starter and run very rough. The state of the carburetor, the high tension wires, the points, the bushings in the distributor, (and in later models, the condition of the vacuum diaphragm,) the counterweights and springs, the voltage at the coil, coil polarity, all have a bearing. However, I have found the best method is for the cars without vacuum advance as the '35 Terraplane is, is to do the basic static timing with the points just opening at t.d.c. With the engine thoroughly warmed up, set the idling jet to it's smoothest point. If you don't have a timing light, turn the distributor anti-clockwise until the exhaust starts to "fluff" , and then retard until it just runs evenly. This is more difficult to do on an 8 cylinder. The best method is to use a timing light, and these are not too expensive, and I would recommend buying one. With the engine idling, set the distributor so the light flashes on the long mark about half an inch before the T.D.C. mark. If you have vacuum advance this should kick in immediately you speed the engine up slightly and you should see the mark disappear out of sight. To check the mechanical advance, disconnect the vacuum pipe and block the port, then start the engine and speed the engine up slowly. This should show a gradual advancement of the timing. if it jumps aorund and jerky, or flicks up fast, then springs are defective, or you have sticky or worn flyweight slots or pins.0
-
I forgot to mention, if you have uneven compressions, this will also of course affect the vacuum reading, and sound of the exhaust beat.0
-
Thank you Geoff. I have a few more things to look at. Hoping to have an answer from the Snap On guy this Tuesday on my compression gauge.0


Categories
- 37K All Categories
- 117 Hudson 1916 - 1929
- 22 Upcoming Events
- 98 Essex Super 6
- 28.6K HUDSON
- 581 "How To" - Skills, mechanical and other wise
- 995 Street Rods
- 151 American Motors
- 181 The Flathead Forum
- 49 Manuals, etc,.
- 78 Hudson 8
- 44 FORUM - Instructions and Tips on using the forum
- 2.8K CLASSIFIEDS
- 610 Vehicles
- 2.2K Parts & Pieces
- 78 Literature & Memorabilia
- Hudson 1916 - 1929 Yahoo Groups Archived Photos