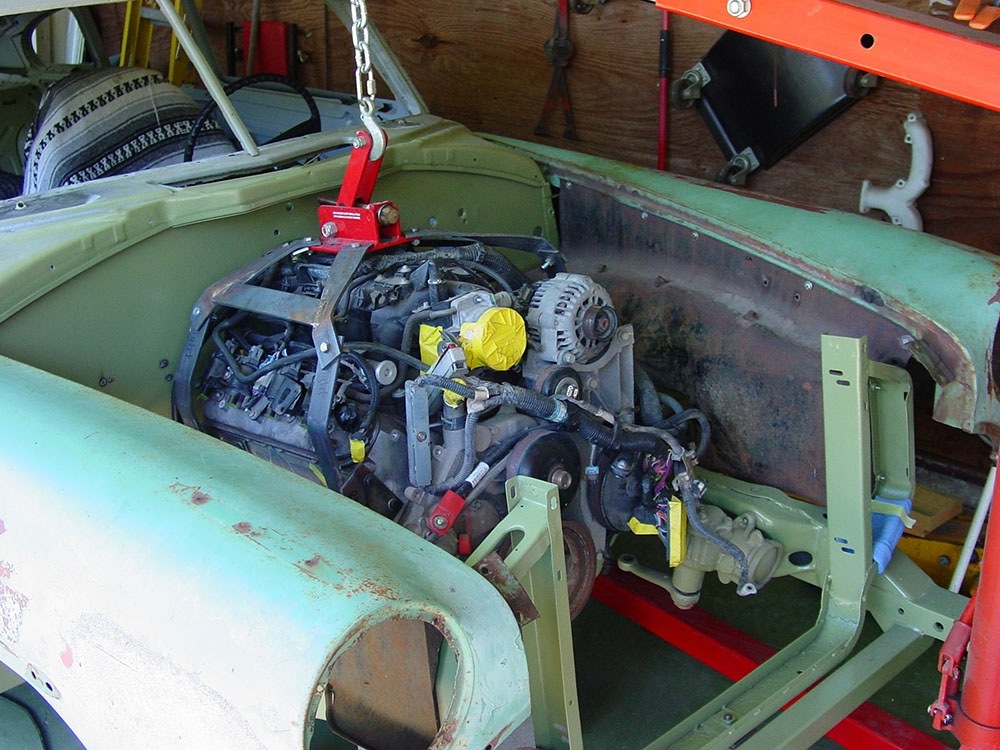
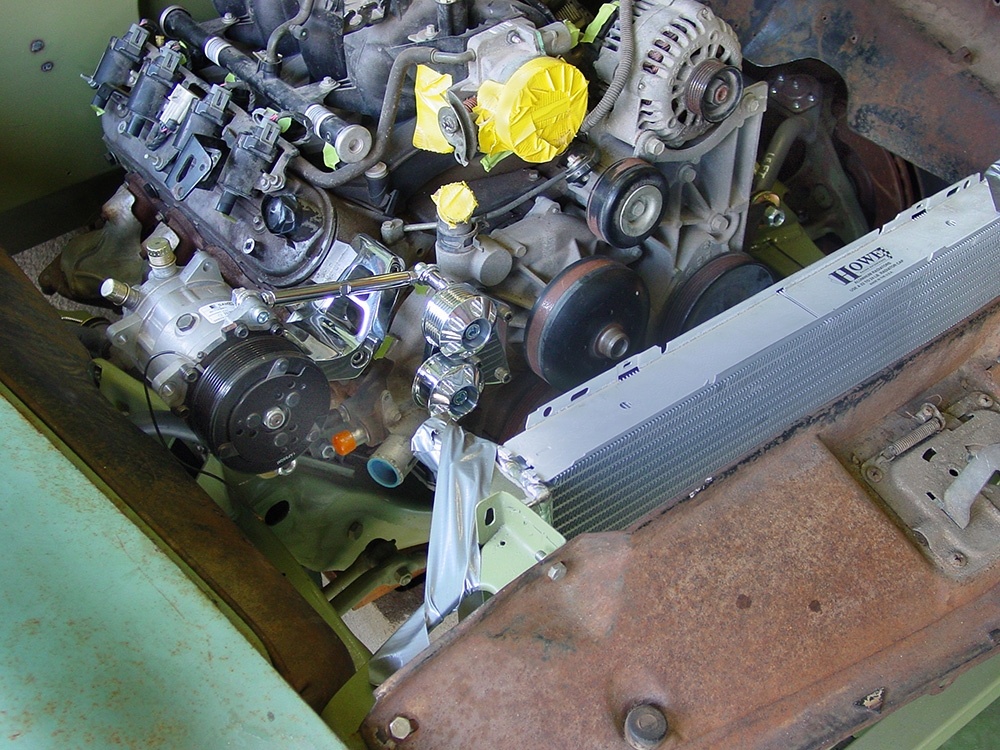
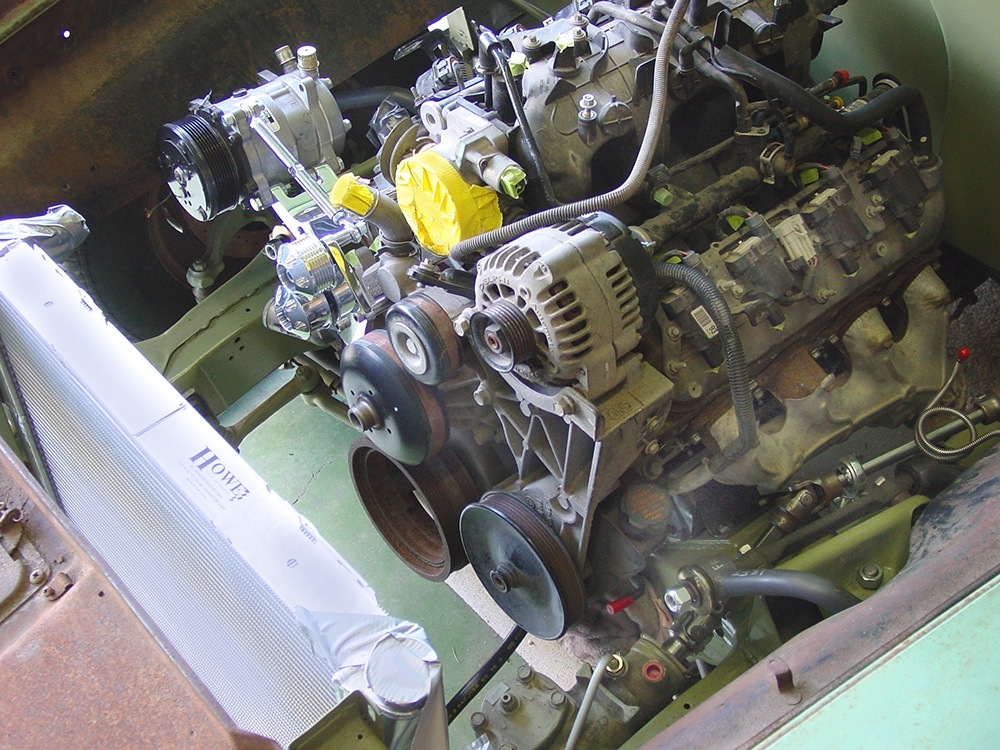
A little update on the "Sleeper"! Uh, I mean Lola!

mrsbojigger
Senior Contributor
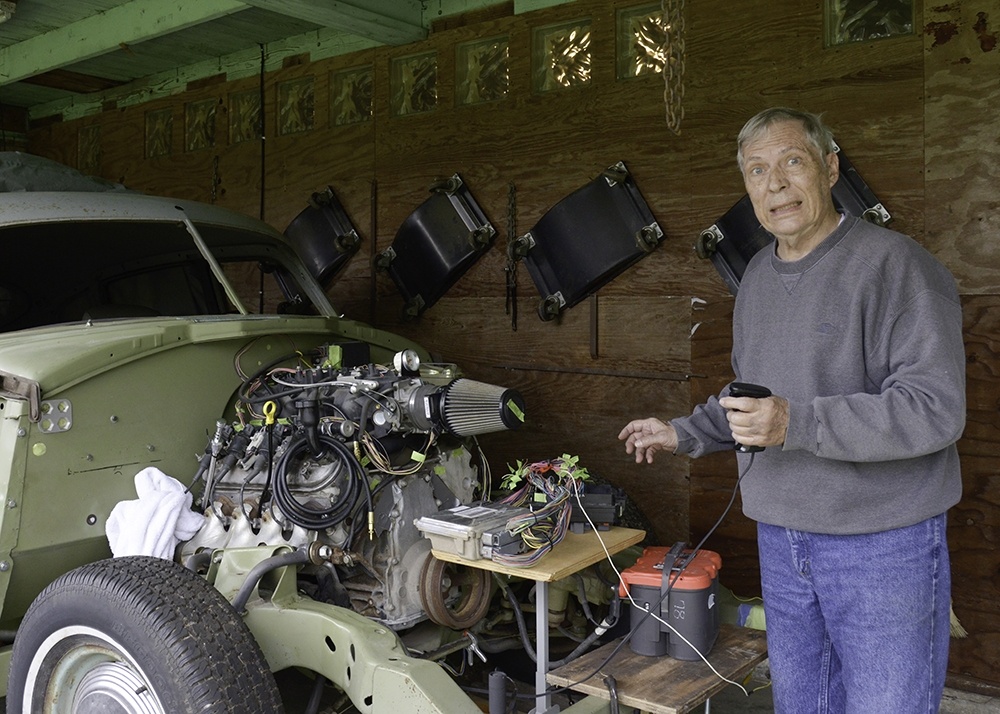 Well, life has a way of changing our plans. My "2-door" custom is now reverted back to it's original 4-door configuration. We got older and are going for comfort instead of the cool factor. I made some progress on the engine in the last few weeks. I completed and installed a Stand Alone 4-Wire Harness for the LS1 5.3 cu. in. engine and got it running. It sounds healthy and robust. I do want to tame the exhaust so it will be a lot quieter.
Peace,
Chaz
0
Comments
-
Great! Thanks for the update.0
-
Keep it up, Chaz!0
-
Love the look of "what-am-I-in-for-next"!...k0
-
Please keep notes on it all (and share them here) - I have an LM7 engine (essentially a 'Gen III' GM 5.3L Vortec that were put into trucks and SUVs) that I am considering for a project.
According to what I understand - A LOT of the LS stuff applies-to (and FITS!) most of the GM engines that were produced in the last 10-15 years.
0 -
Just happened to check this site, good news, looking for pics, thanks0
-
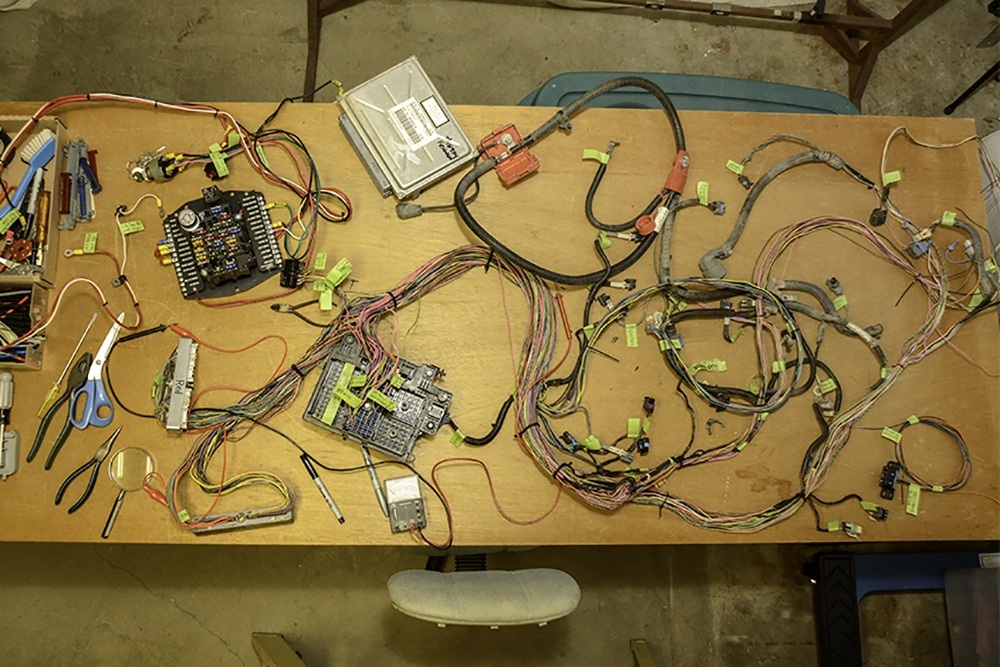
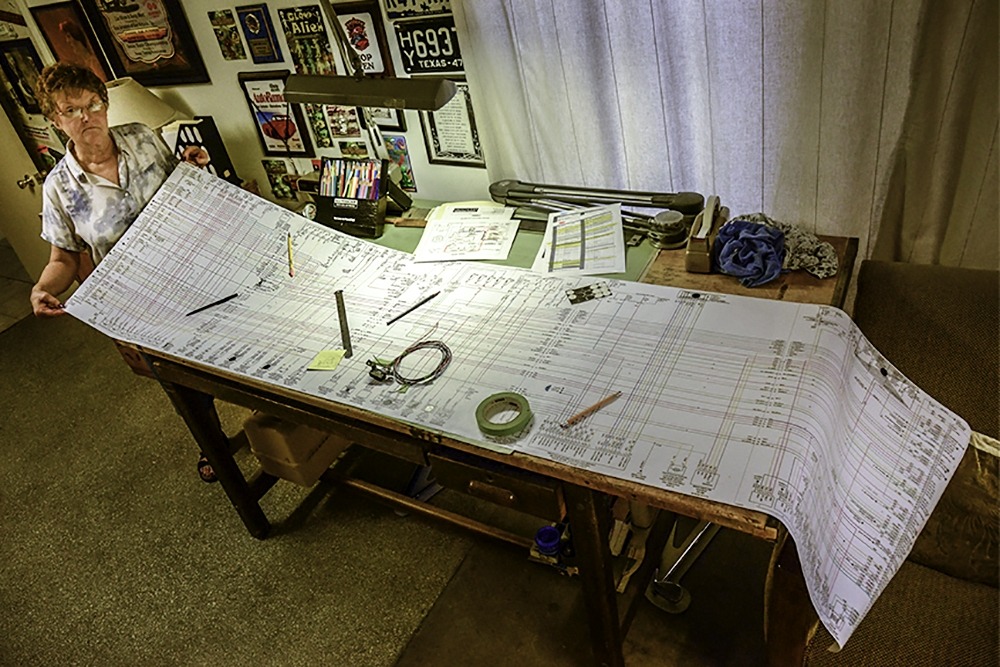
Hey Bob,Photos huh? My Stand Alone wire harness for the LS engine. It was pared down to a 4-wire isolated setup for engine only. All other wires are kept for other things such as diagnostics, routine wiring for the rest of the car. I learned a lot of this from watching YouTube.Peace,Chaz
 0
0 -
-
Thanks Chaz....0
-
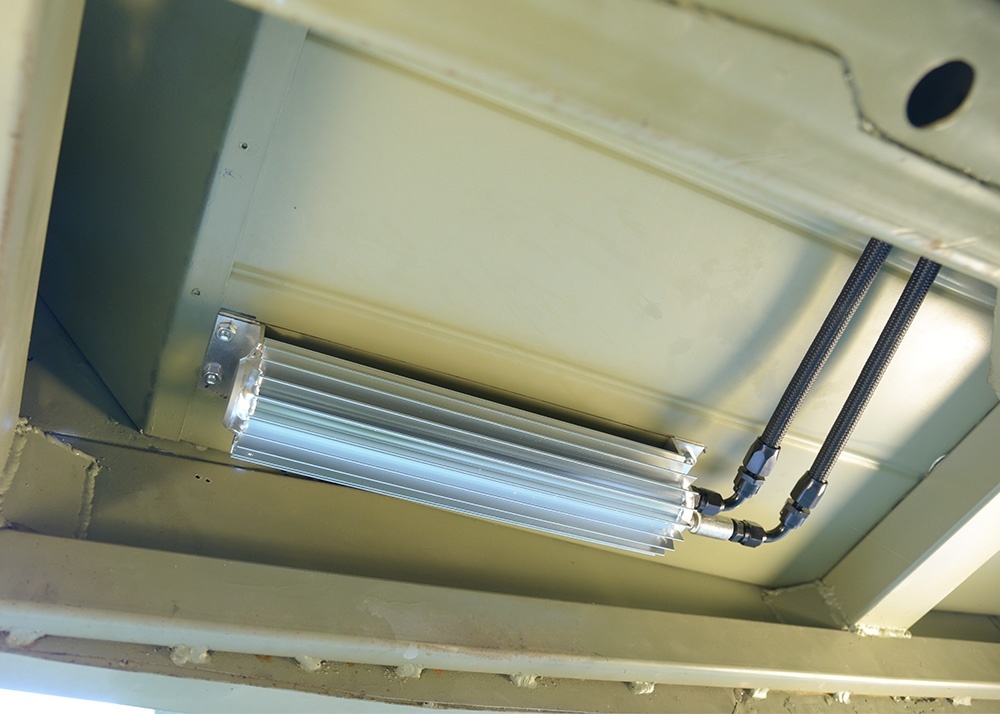
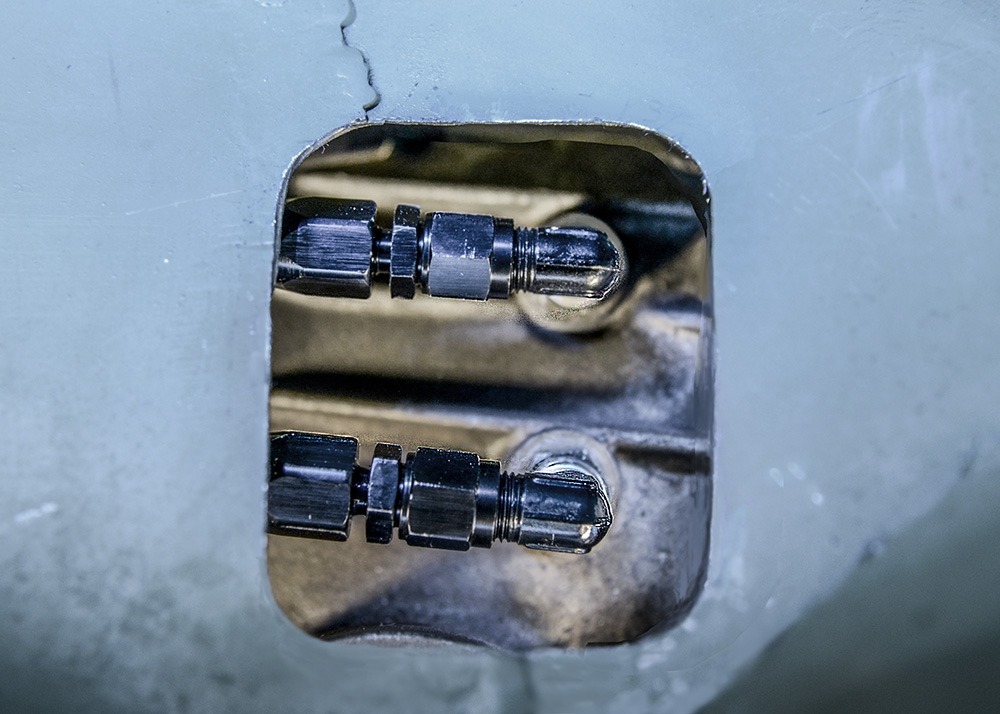
I have made a little more progress on my Hudson. I installed a Finned Trans Cooler. This is the same type that I am using on my ’47 Ford Convertible. It is mounted under the passenger side up close to the front clip mounting piece and behind the “mud guard”. By doing this I will have a minimal amount of road debris and water getting onto it. I had to cut a inspection plate into the right side of the trans hump so I could get to the 2 cooler fittings on the trans. I didn’t find out later that most guys doing this installation attach the 2 OEM trans cooler lines BEFORE installing the engine/trans in place in the car. Anyway, this is how I dealt with it which really isn’t that bad. It gives me an inspection window if I ever need one. I used Earls right angle fittings that snug up close to the trans giving me plenty of room of getting my hand and wrench into that narrow area. The other option I had after I had the engine/trans already installed was to pull the whole thing out with an engine hoist. Nowadays, thats not an option for me! Attached are two photos of how it looks now. It is both functional and neat and tidy.Hope this gives you some food for thought.Enjoy and peace,Chaz
 0
0 -
Thanks Chaz ....0
-
I worked all day on moving my Optima battery to the right side of the trunk. It's not as easy as it seems it should be. That sucker weighs 40 lbs. I placed it back there because I reasoned that I could not lift it Up and Out of the engine bay if I needed to. It also transfers more weight to the rear of the trunk. I'll post mere later and photos of what I am doing.Peace,Chaz0
-
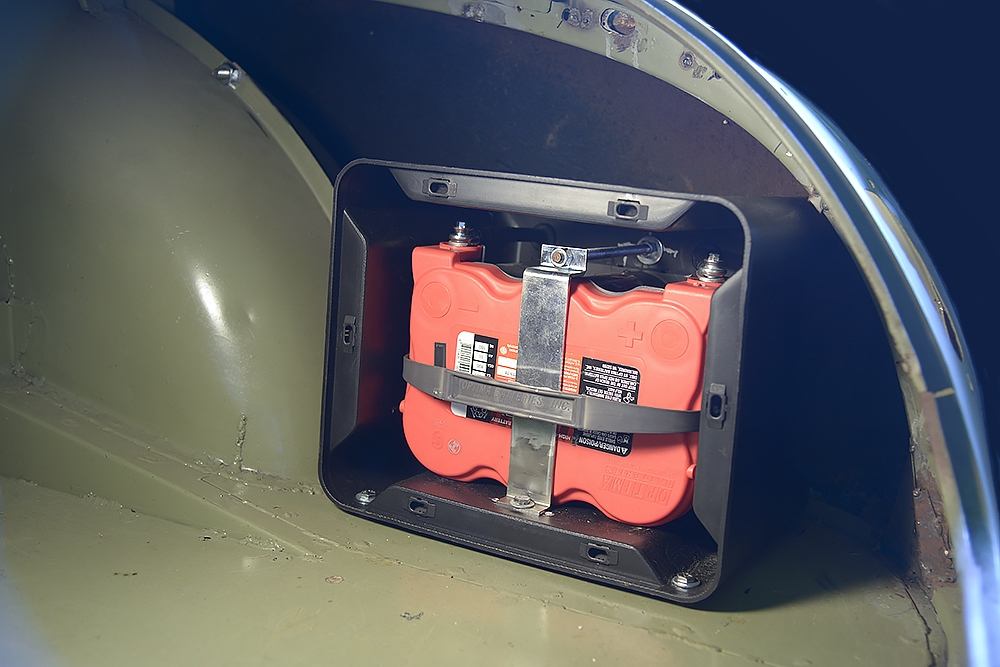
I now have the Optima battery moved to the trunk area. I am using Moroso's battery box turned on it's side for a better fit. The battery doesn't care how its oriented since it is a dry cell. I have the box bolted to the trunk floor with a space up at the opening so the lid can be affixed later. I am using 1 gage cables for both the positive + and for the ground -. I also installed a heavy duty cutoff switch on the positive cable. I did this so I can keep it in an OFF position while doing all the other wiring without having some sort of mishap like a melt down or sparks flying everywhere near any fuel or my face. The Positive cable runs all the way to the firewall via the area below the doors and will be covered up by the rocker panel. I will use the ground cable attached to the fender well but then I will branch out from there to other points so I can get a good ground for the LS1 engine and PCM.Peace,Chaz
 0
0 -
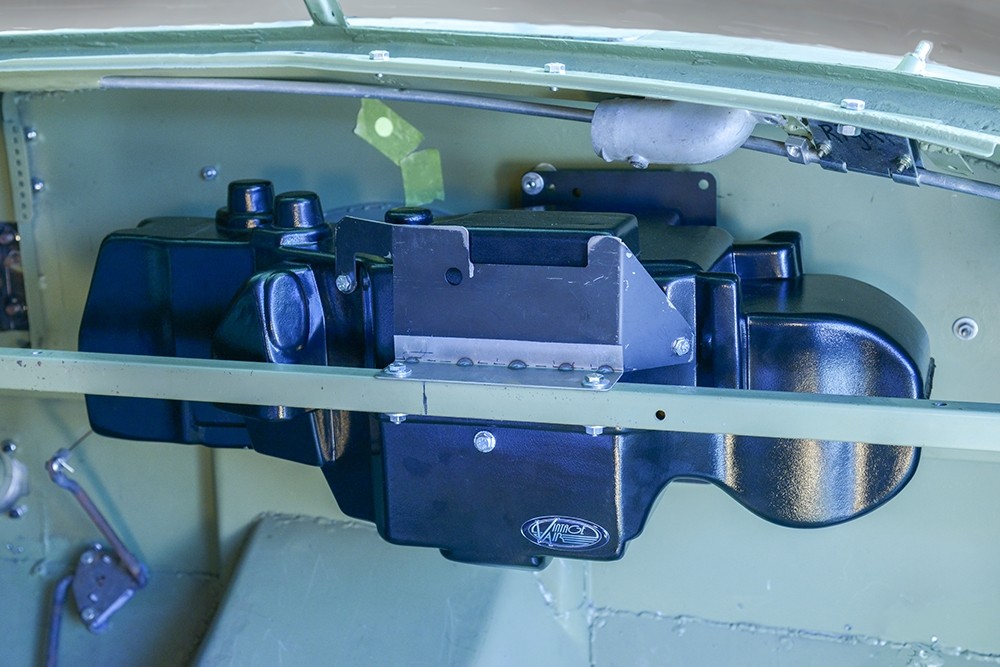
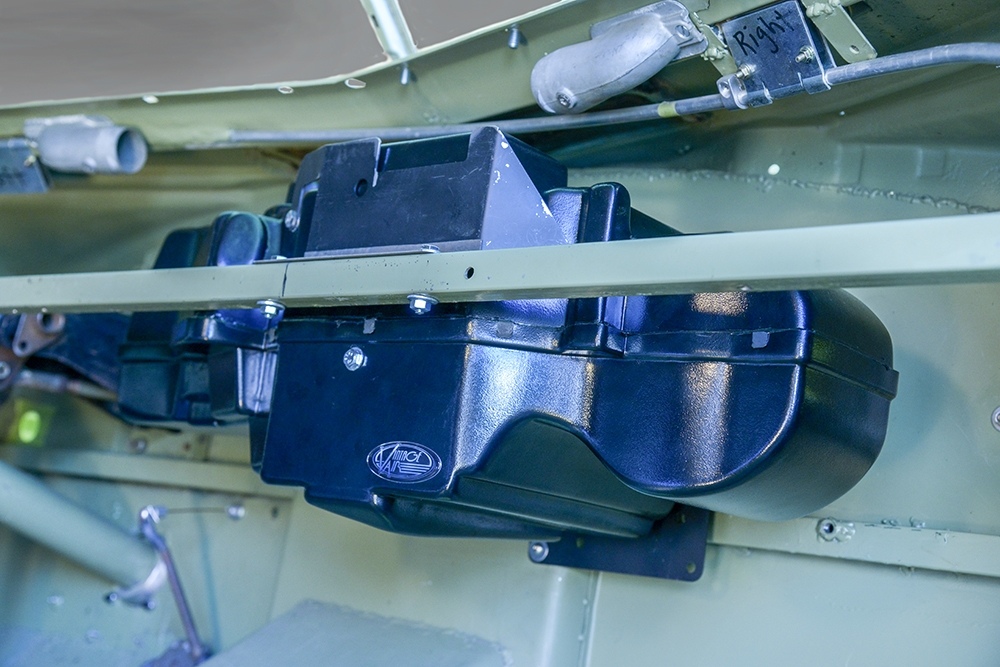
Ok, Ok, I know it seems a little premature to be having concerns about A/C but since there will be so many other items that need to fit under the dash it was a no-brainer. This is a Vintage Air Mock-up unit that you can purchase to aid in positioning it for it's final correct location. I will have the PCM (computer), the Painless Fuse Panel, multiple controllers from Dakota Digital and a couple of hundred wires to deal with. I'll be needing A/C anyway since Grandma doesn't like to ride in the Hudson with Grandpa without cool air. Happy wife, happy life! Here are 2 photos of where I will be installing the permanent real evaporator.Peace,Chaz
 0
0 -
This seems to be a good fit now. I have a ridged mount to the firewall and to the stock horizontal bar. This placement also gives hot or cold air directed to both sides of the trans hump towards the floor for lower leg comfort.
Peace,
Chaz0 -
I think it's awesome that you're using an LS1 engine. I'm putting a LS3 with 525 hp in my '37 Hudson Terraplane coupe. What's the year and model of your car?0
-
Hey Charger,It's a 1951 Commodore with a Camaro front clip. More progress today. I'm installing 4 gage ground wires from body to the engine/trans. It's a lot easier since since it's a uni-body which means that I can tie into just about anywhere on the body or frame. Photos later.Peace,Chaz0
-
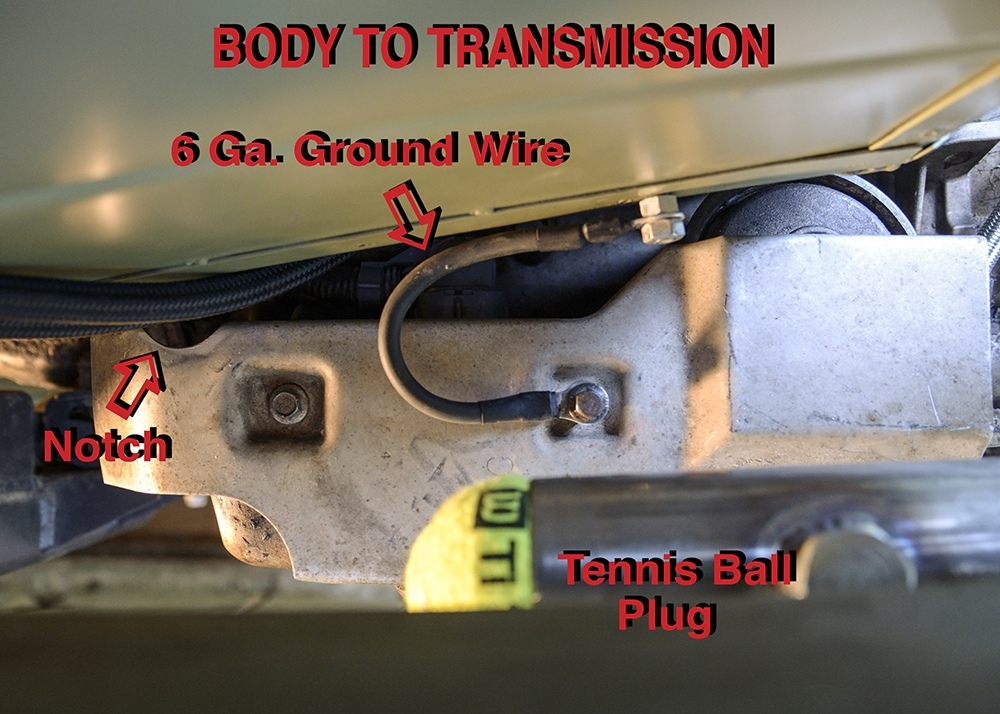
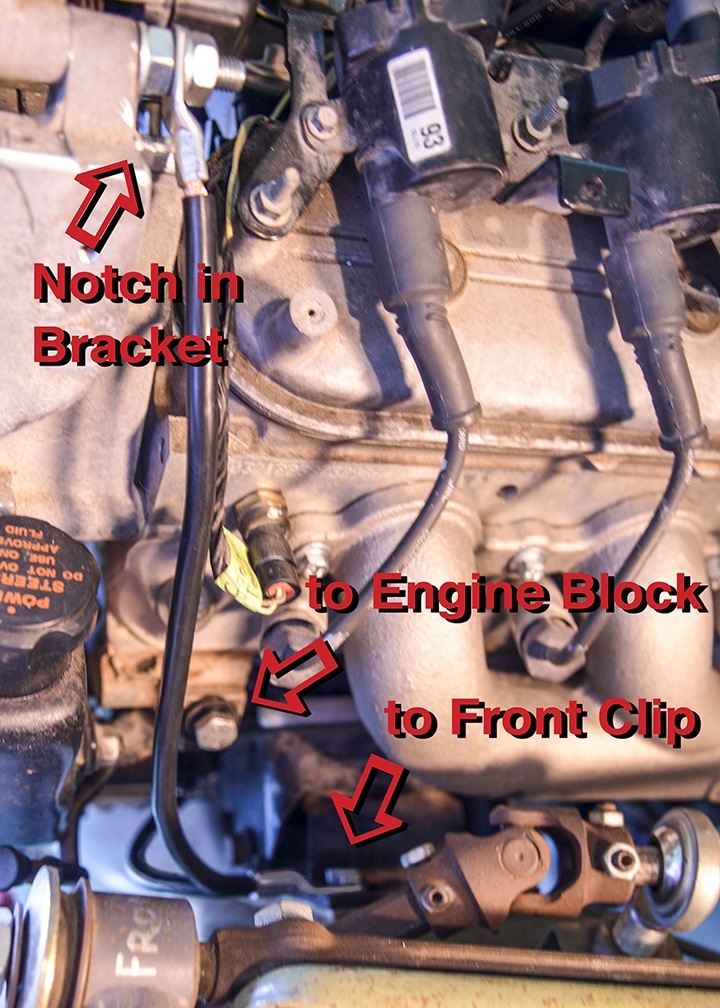
A little more wiring and some photography. I now have my large ground wires in place. This includes an extra 4 gage battery ground which I ran over to the left side of the trunk. On the drivers side up front, I have a 4 gage ground wire secured to the frame suspension yoke, then over to the engine block and up to the alternator mounting bracket. The notch in the alternator mounting bracket allows for the cable to lay a little closer to the engine and not rub against anything. The other ground wire is also 4 gage connecting the body to the transmission. As for the tennis ball, I use them to keep out little creatures such as mice and insects. Works well for me! I have also used them on the sharp corners of the hood. Ask me how I know. Ouch!Peace,Chaz
 0
0 -
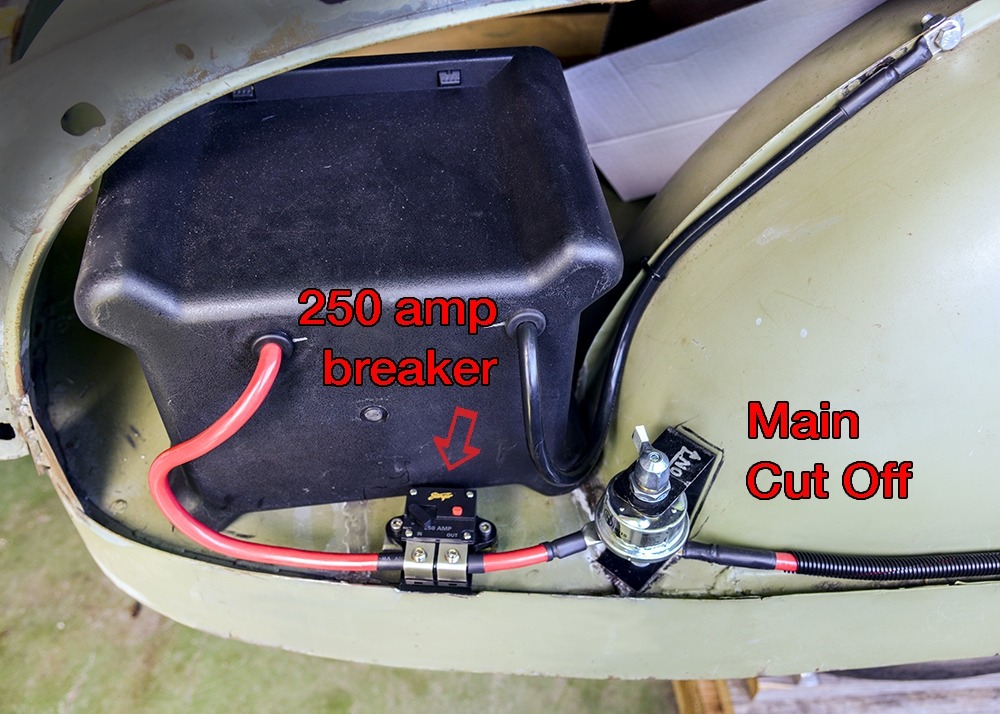
Maybe I should have called this post the "Electrical Progress" of the Hudson.I have now added a 250 Amp Breaker Switch close to the battery in addition to the Main Cut Off Switch. This also shows the 1 gage positive+ and ground cables- and their routing.Peace,Chaz
 0
0 -
Keep it coming.One of better threads around here.No grandma keep it stock stuff but a guy in the shed fabing and coming up with his own ride.I just got an american Autowire 22kit and interested in your progress. 4 months so far seems a bit of time to install wiring.I also plan to throw the battery in the back.alex0
-
Hi Alex,Glad to help if I can. I really doesn't take 4 months for wiring a car. I'm learning this as I go since I am from the old school of carbs and distributors on my engines.Peace,Chaz0
-
A little more progress on the wiring. I now have the OEM Silverado junction box mounted in place with the positive battery cable from the rear of the car running forward and thru it and directly over to the starter. The red junction box is where I split off with a #6 cable going first to a 150 amp breaker and then over to the alternator and a # 8 cable going thru a 70 amp Maxi-Fuse over to the Painless Performance Fuse Panel inside the car.Peace,Chaz0
-
-
Wow, I came across this thread by accident but I'm glad I did. After going through 3 308 blocks I got a wicked deal on an ls1 and 4l60e out of a camaro. It looks like you have a mustang II front stub. I'm trying to keep the og front but possible Fatman dropped uprights. What did you do for rear trans mount?0
-
Hi Majumbo,Sorry I haven't got back to you sooner. The LS/4L60e combos are awesome. You are gonna love it's performance. The Fatman Fabrications have good products and service. I have had their MII unit under my street rod for 15 years with no problems. As for a trans mount, I made mine from scratch since I had the materials on hand and a good welder. I took a LOT of measurements before any cutting and welding was done. You may want to check out some of the ads for a rear trans mount specifically for that engine/trans combo since they are so popular these days such as brphotrods.com, etc.Peace,Chaz0
-
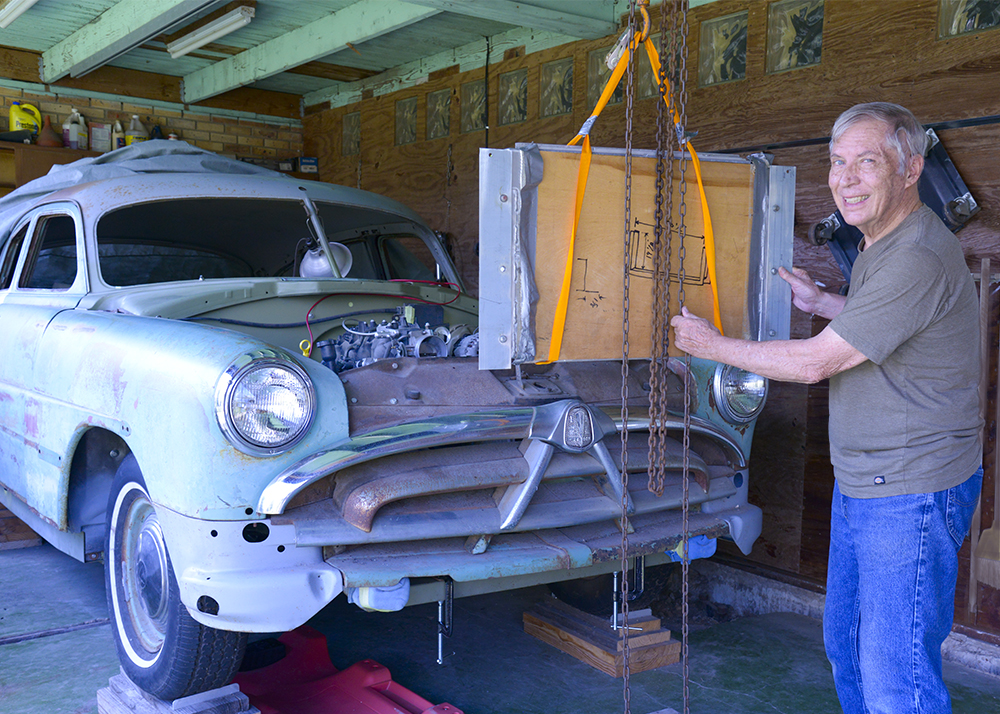
Making more progress of getting everything onto and into the car to get it drivable. I have moved the radiator back a couple of inches to allow access to the A/C condenser when it is installed. My goal is to have all parts in their permanent placement before doing all the finishing touches, (making it pretty). Also note in the photo is my body stands. It gets the car up high enough that I can comfortably work under the car.Peace,Chaz
 0
0 -
Way to go Chaz!
Larry
0 -
Great progress, I enjoy reading your story and watching your installs. Continue on. Bob0
-
I'm not only working on the Rack & Pinion steering (see other post) but doing a little modifying of the dash. This is being done so that I can have the switches that I need. Don't worry, as usual, It'll look stock when finished.
Peace,
Chaz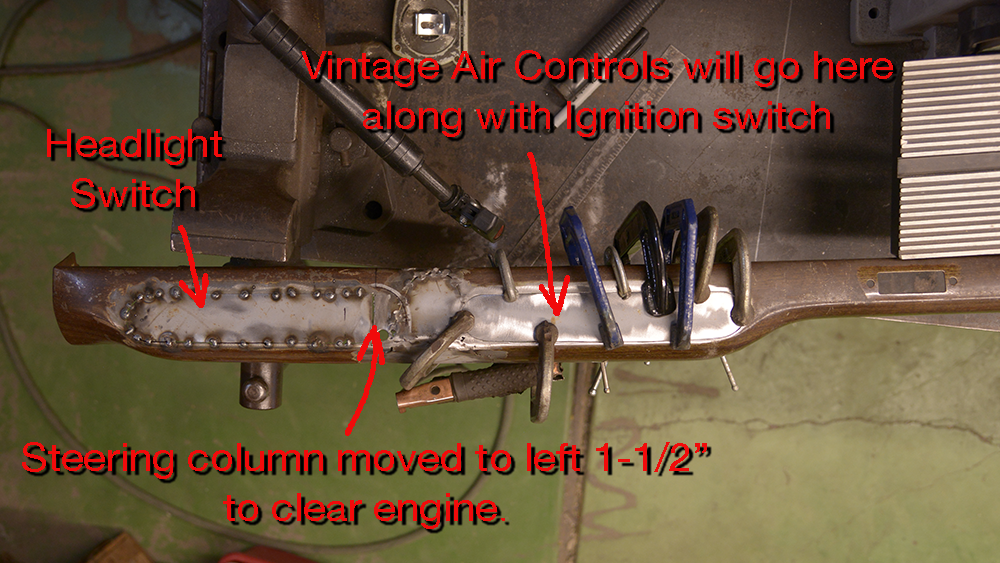 0
0 -
Lower dash panel filled in so I can add switches later. I will eventually apply a wood grain finish on the completed dash so it will look "factory".
Peace,
Chaz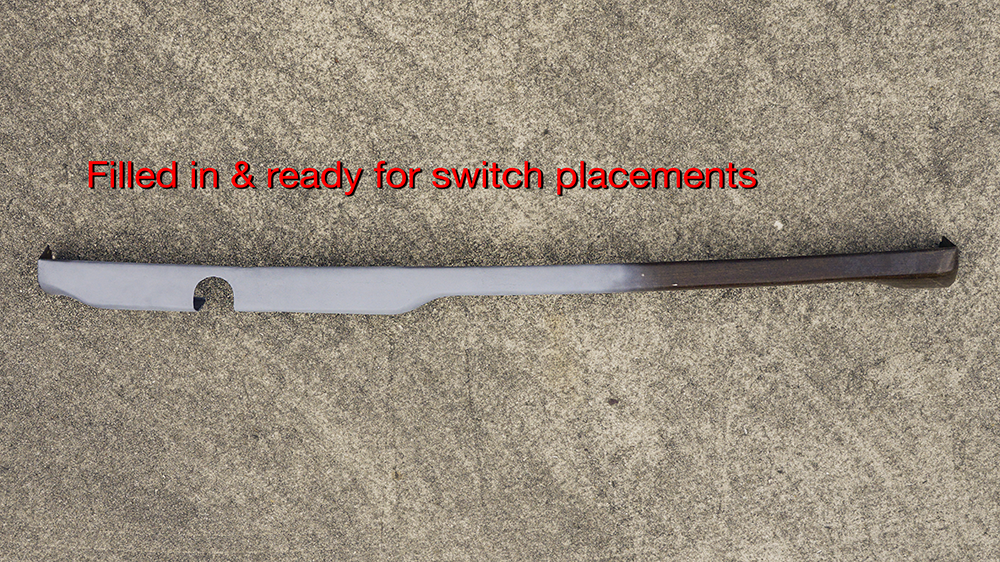 0
0 -
Love your thought process and work, Chaz0
Categories
- 37K All Categories
- 115 Hudson 1916 - 1929
- 21 Upcoming Events
- 94 Essex Super 6
- 28.6K HUDSON
- 576 "How To" - Skills, mechanical and other wise
- 995 Street Rods
- 151 American Motors
- 180 The Flathead Forum
- 49 Manuals, etc,.
- 78 Hudson 8
- 44 FORUM - Instructions and Tips on using the forum
- 2.8K CLASSIFIEDS
- 609 Vehicles
- 2.2K Parts & Pieces
- 77 Literature & Memorabilia
- Hudson 1916 - 1929 Yahoo Groups Archived Photos
