A little update on the "Sleeper"! Uh, I mean Lola!
Comments
-
Thanks! I love my car so I want to do right by it. My main goal ever since I brought it down from Oregon was to have a car that we could get in and drive safely and comfortably across the U.S. As I've said before, I am not a purist but I am a perfectionist. If you remember my '47 Ford convertible, it looks like a restoration with just the addition of fender skirts, lowered slightly and a bright red paint job. A couple of years ago I had taken it to a local car show where it was entered as a "Full Custom". There were only 2 other cars entered beside mine. They both had excellent graphics paint jobs and lowered to the ground, nothing else. They got both 1st and 2nd place with mine getting 3rd place (last). I asked one of the 3 judges that had judged our cars why mine got 3rd place. He said that they all 3 agreed that mine was a nice restoration and not entered in the proper class. I took them over and explained and showed that my little car had over 100 MODIFICATIONS to it. They were quite surprised! I went away quite angry but after thinking about it for a while, I realized I had pulled off the ultimate deception by making it look as if nothing had been done to it. So after that, I was quite proud of my little 3rd place trophy.
Peace,
Chaz0 -
Oh, I almost forgot. While working on the Rack & Pinion PS Unit, I had purchased and installed an all new and better set of control arms. They are the Hotchkis Camaro Sport Suspension Units. This is combined with a new larger sport sway bar. Should be good handling for the old girl.
Peace,
Chaz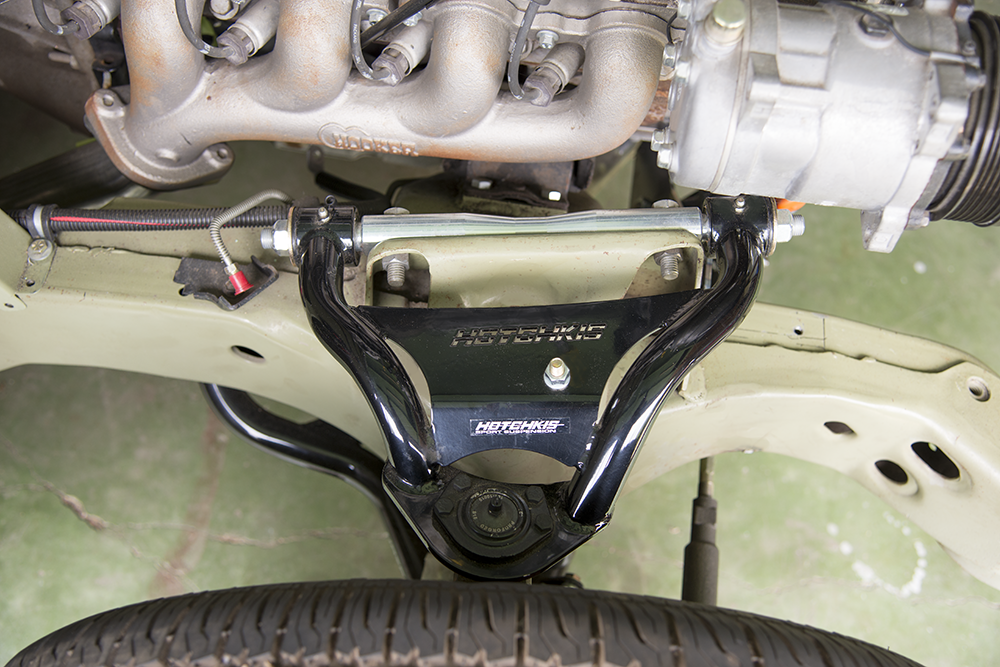
0 -
Interesting to follow your work! Good stuff----
0 -
Hey KustomKreeps,
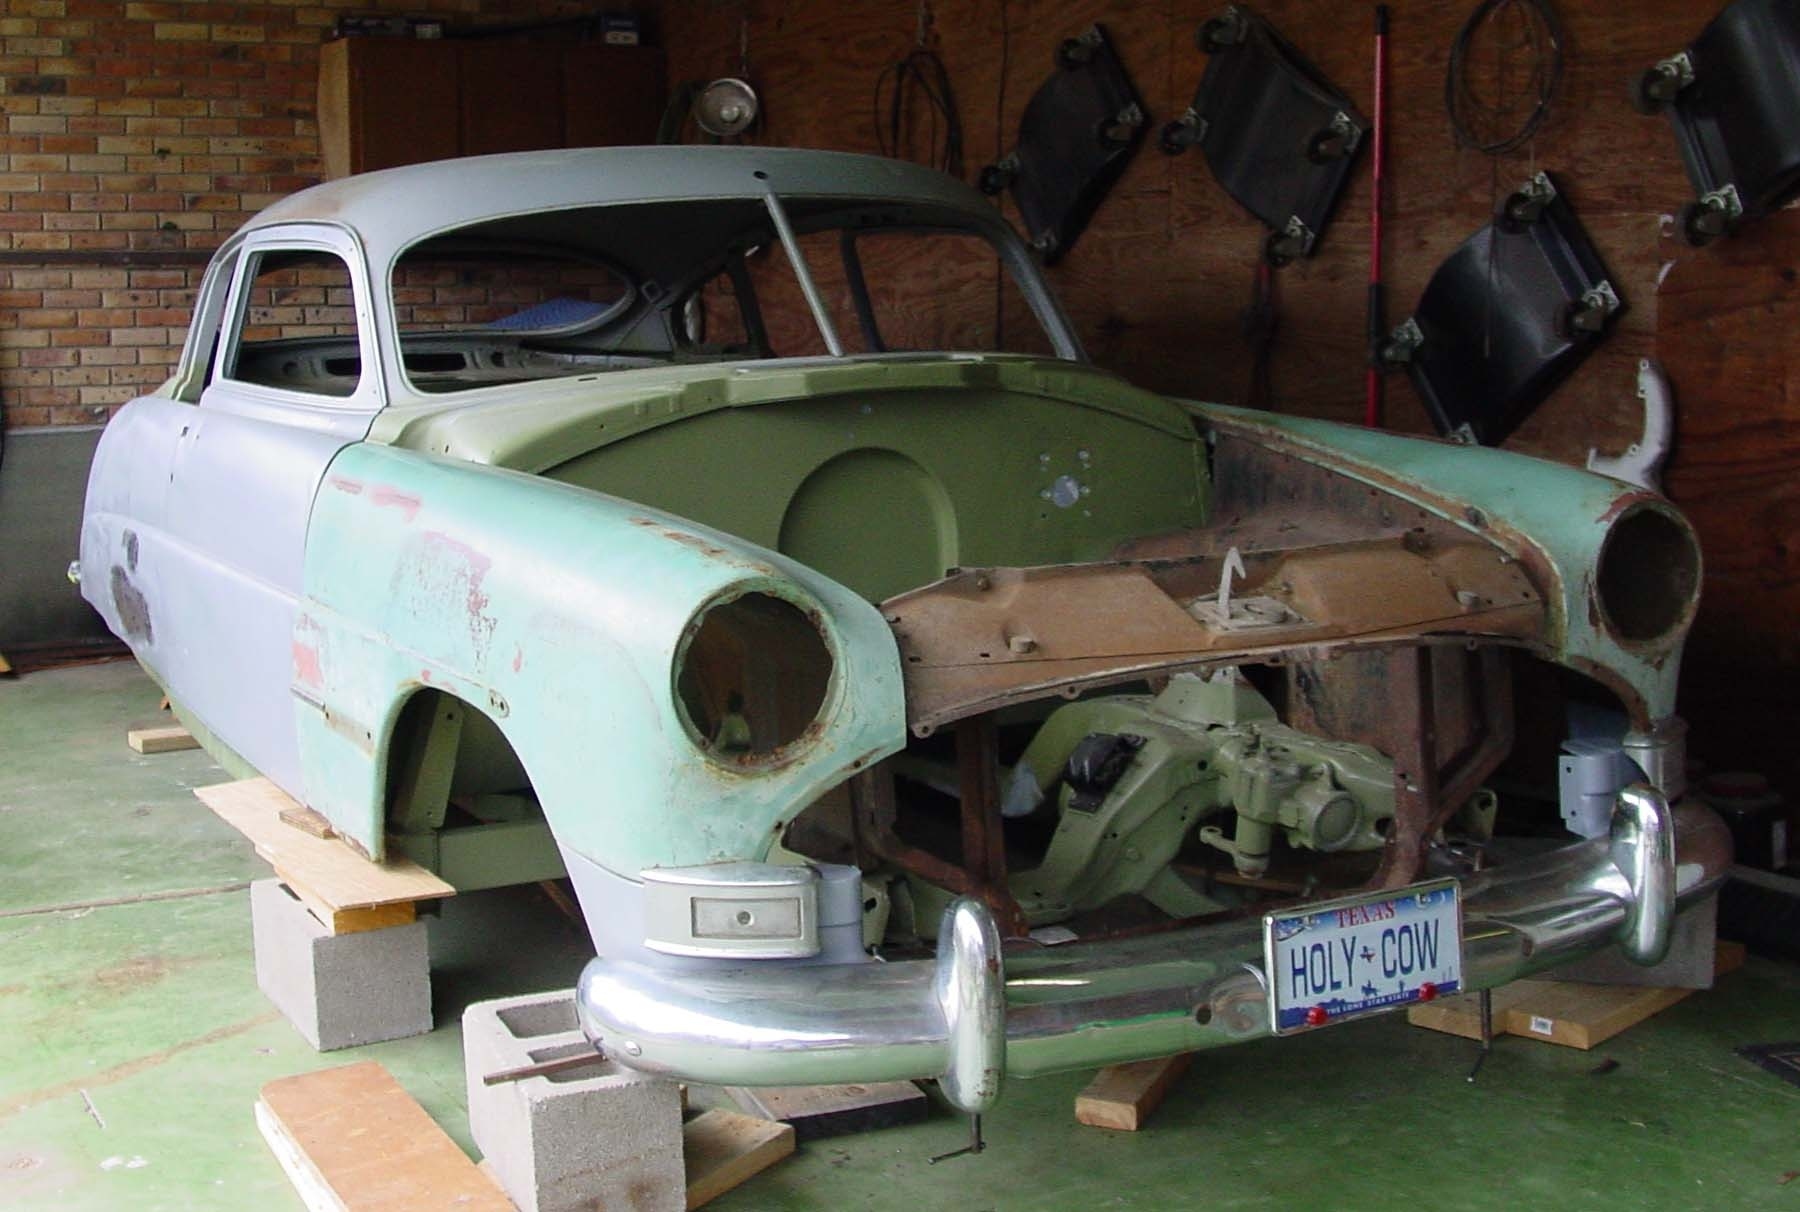
I didn't want to invade a foreign photo onto your beautiful site. (love your photos and progress) Here is a photo of the way I did my setup for alignment of my future mounting points. It is similar in concept as yours. When I re-assembled all the body parts onto the new Camaro front frame clip, everything fit perfectly.
Peace,
Chaz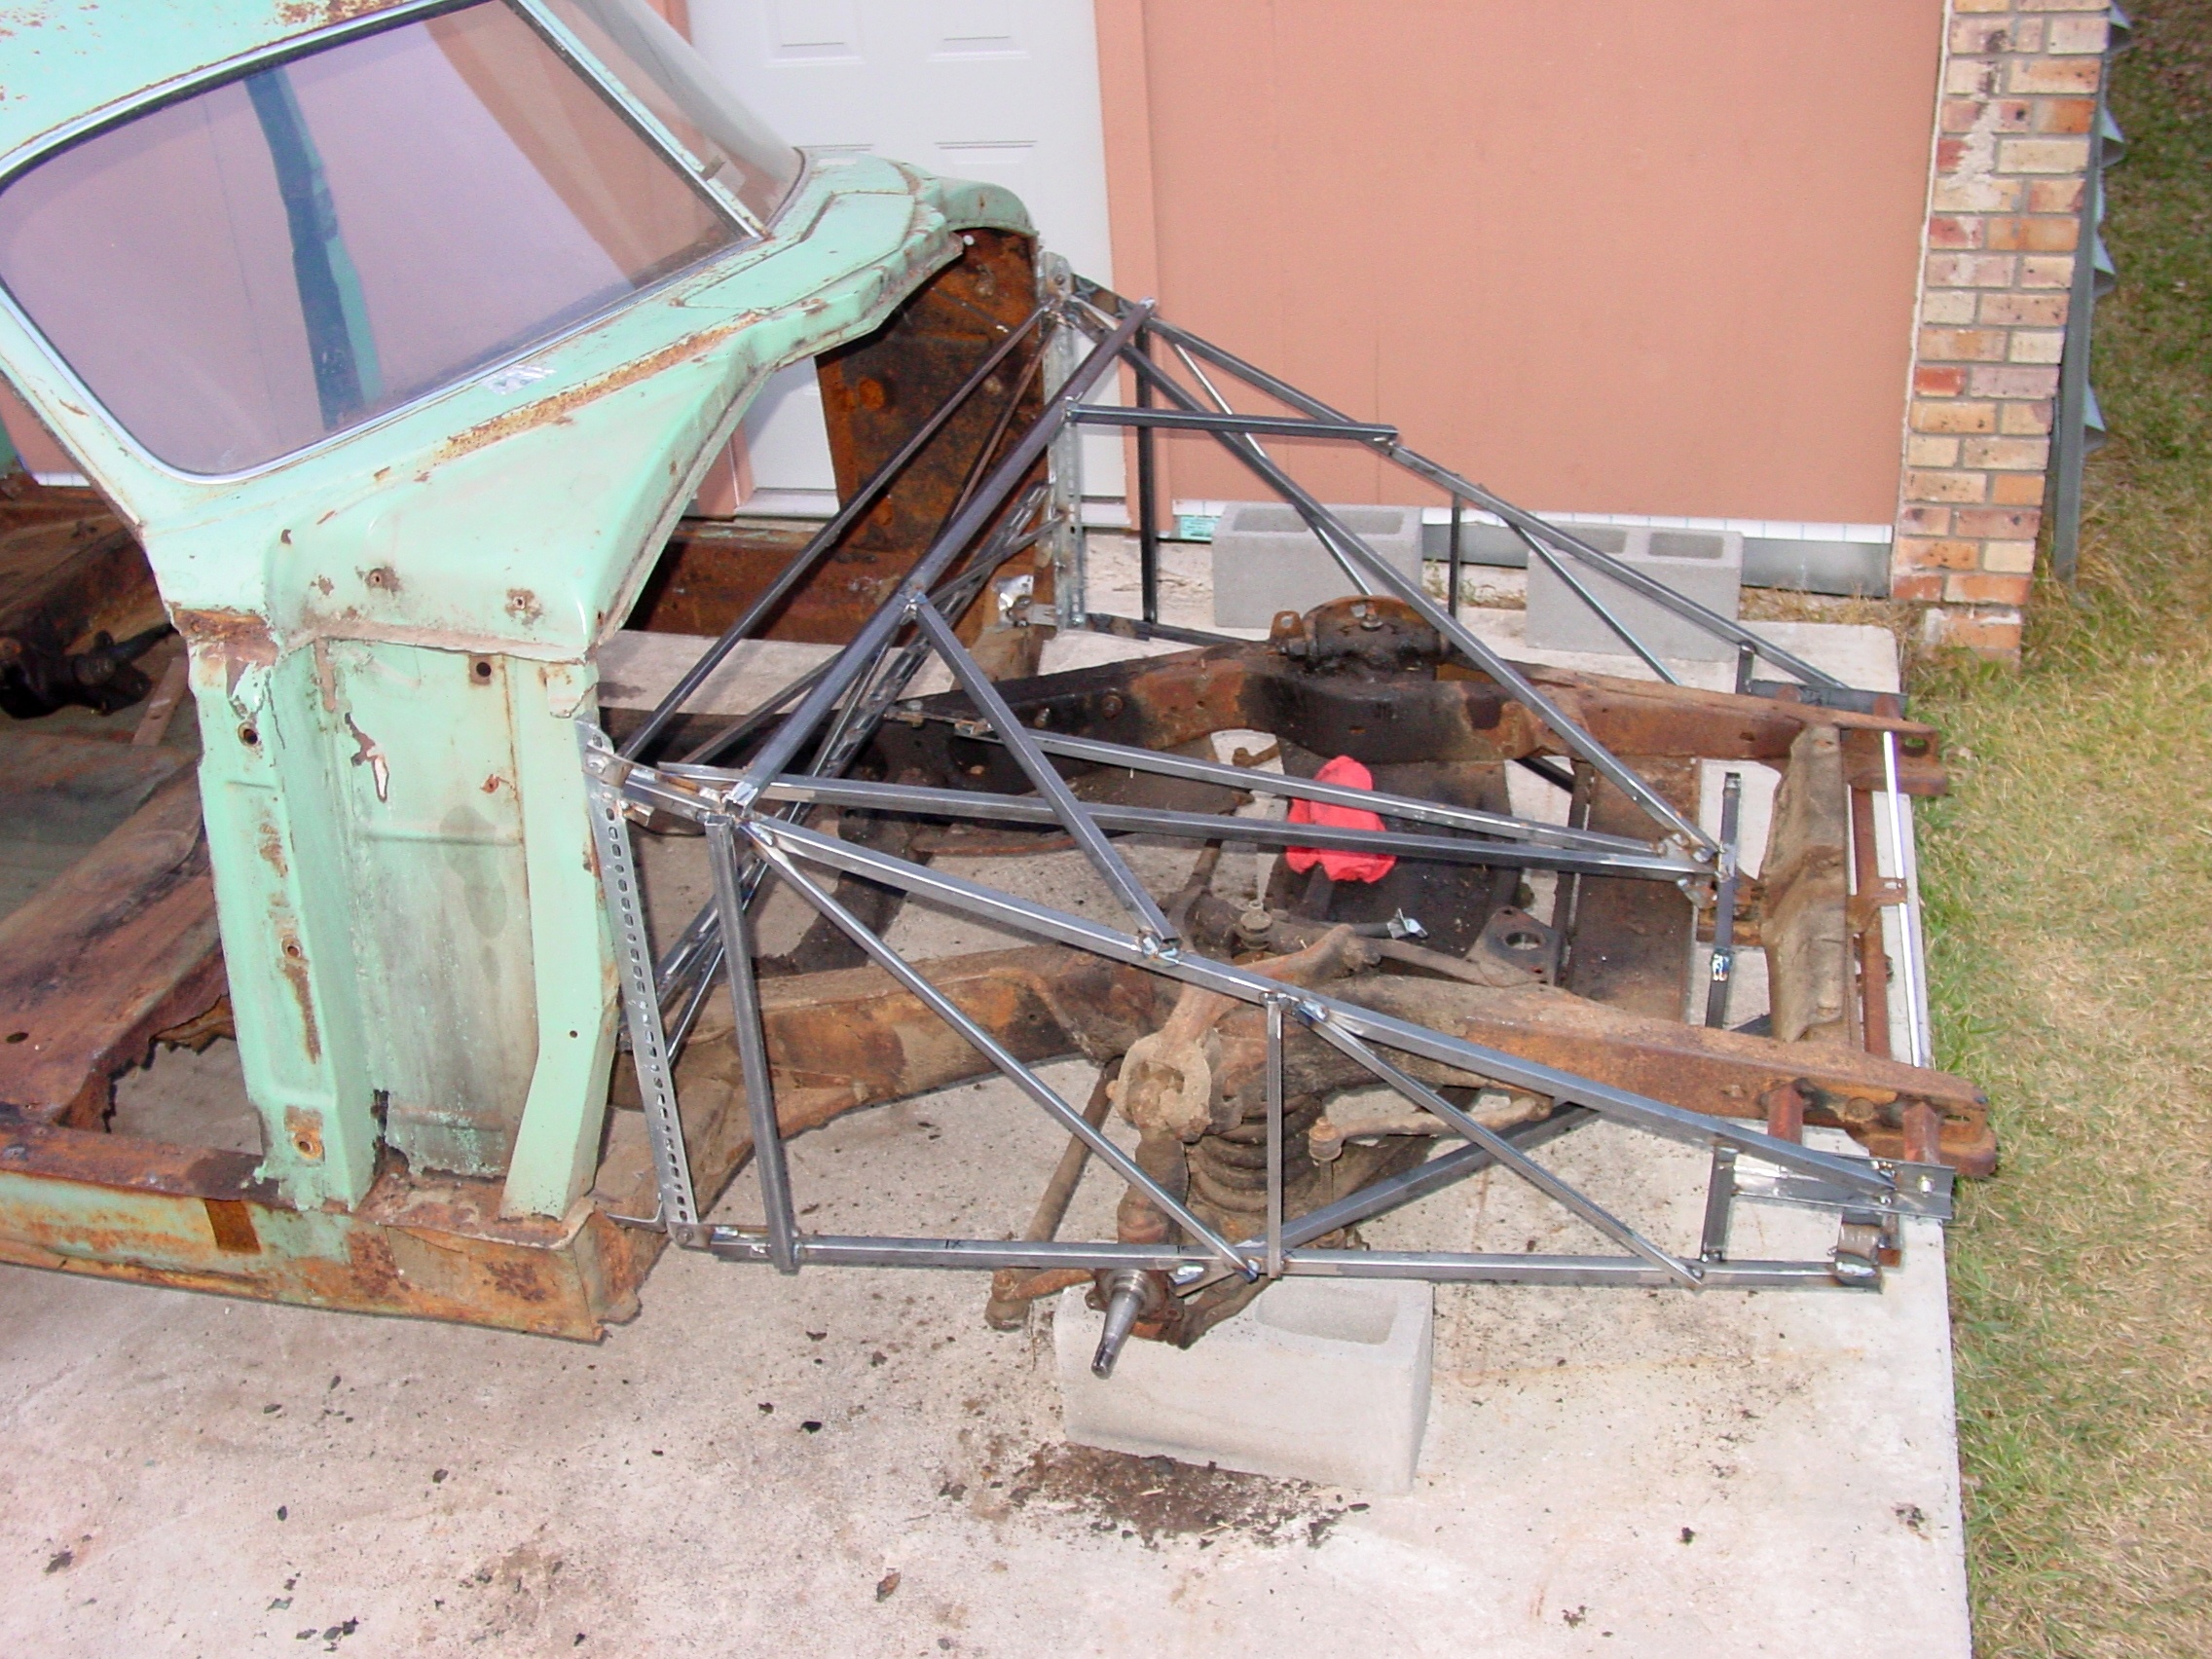
0 -
ohh nice. Looks nice and solid and well made. But that is to be expected with your work.
love that number plate.
you have not been posting much on here. time for a good update!0 -
Yes I have been remiss in updating and yes, I am slowly working on "Lola" but my artwork and writing comes first. That is what I do for a living. I've been working 10-14 hours a day trying to finish two stories so they can be published. It takes about 6 months per book to complete them. During some breaks from my work I'm rebuilding the tilt steering column so the left glove box door can open correctly to reveal an all digital instrument panel.
Peace,
Chaz
NOW YOU SEE IT!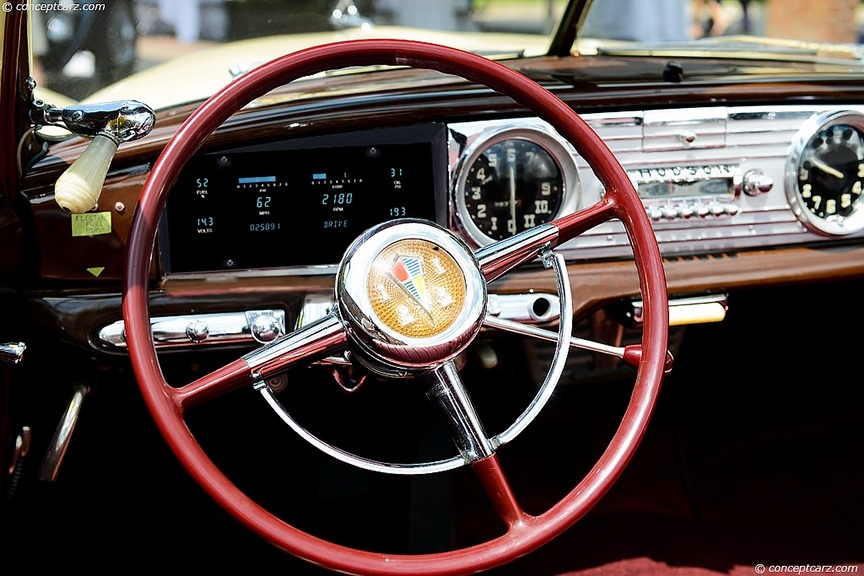
NOW YOU DON'T!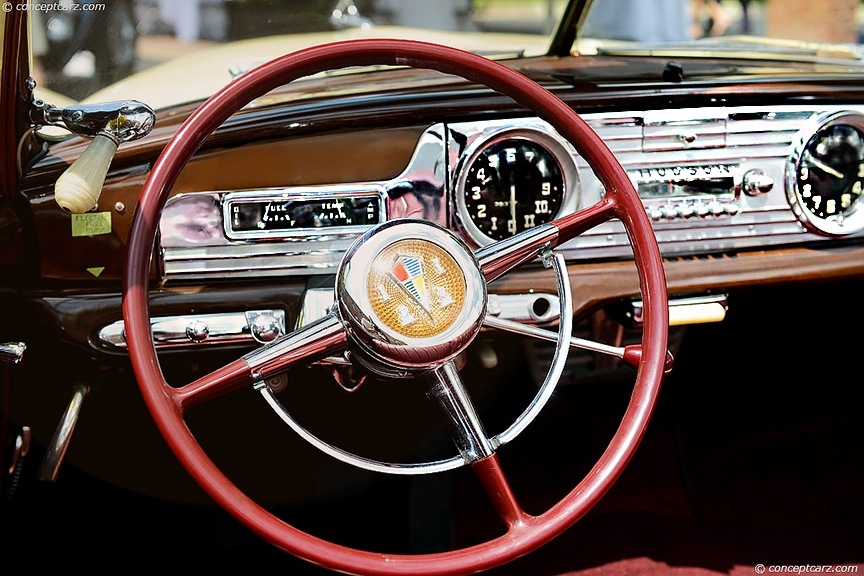
0 -
I hears ya. Got to pay the bills and doing cars aint cheap either.
im looking at doing similar to your setup I guess.
Would love a few close ups of what you have in there and how it looks from behind.
Me being me i will be stuffing up more perfectly good Hudson dash by altering it.
my drivers glove box will have a Dakota Digital analogue gauge claster on it then behind my bluetooth stereo head unit.
I have a 1940 Studebaker President chrome dash/grille. Should fit in nice to the hudsons center section. Hudson radio controls will fit in the Presidents holes. plan to cut up the speaker grill. have a clock in the center. then with a press of the grille it will fold down similar to glove box. I will 3D print off a panel that will hide the back of the clock and contain cup holders. then in the cavity I will have a tablet mounted that will control the airbags, stereo, maps, car security & tracking along with anything else as it will be connected to the internet.
If i had a nice shiny dash like yours though I would of kept stock hudson.
0 -
Just a sneak preview of what I'm working on now. It'll take a little time since I'm building the car on my porch and winter is fast approaching. No wait! It's already here!
The cables are from Control Cables Inc.
The push button emergency brake unit is from E-Stopp.
Peace,
Chaz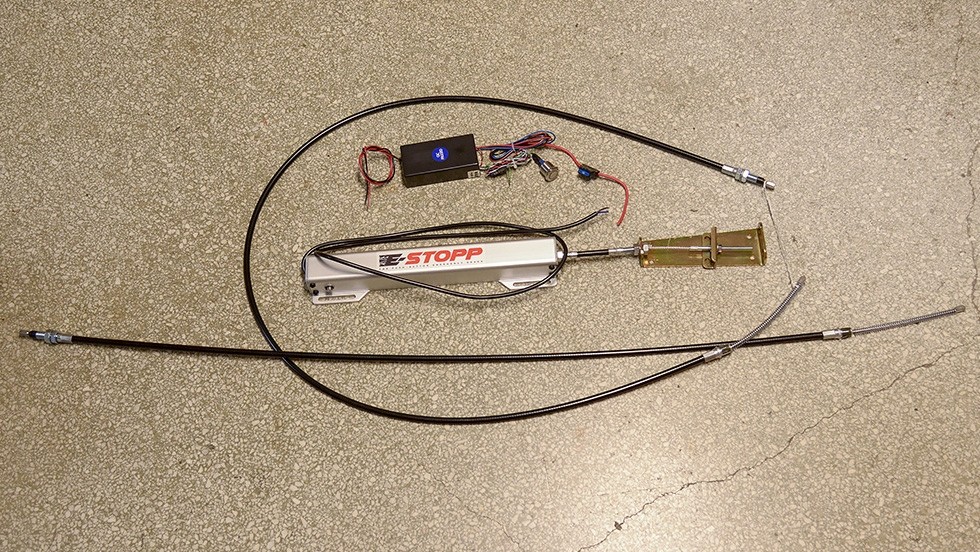
0 -
Mountain Cedar pollen count is staying around 31,000 which is not good for me working outside even if the temp is favorable. My cars are all yellow from it. Need a nice rain to wash away the pollen. While sequestered inside, I thought I might add a couple of old photos since for some reason they had disappeared from this site some years ago. I think it was a system crash of something like that. Let me know if you would like to see some more old shots of my early work. OR MAYBE start a new discussion with the early progress?
Peace,
Chaz
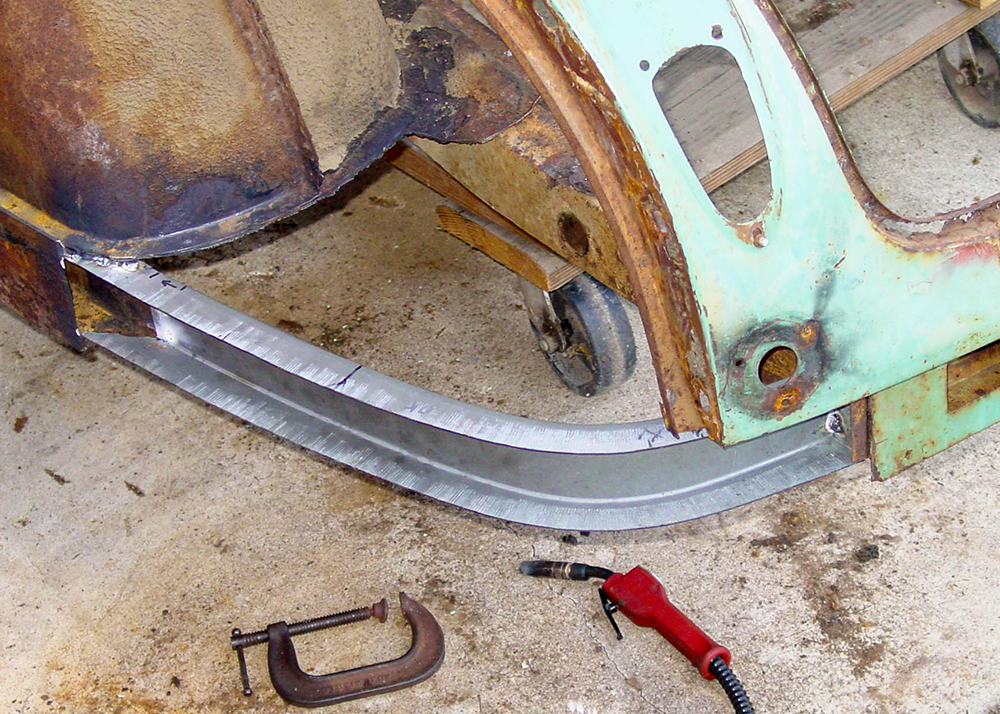
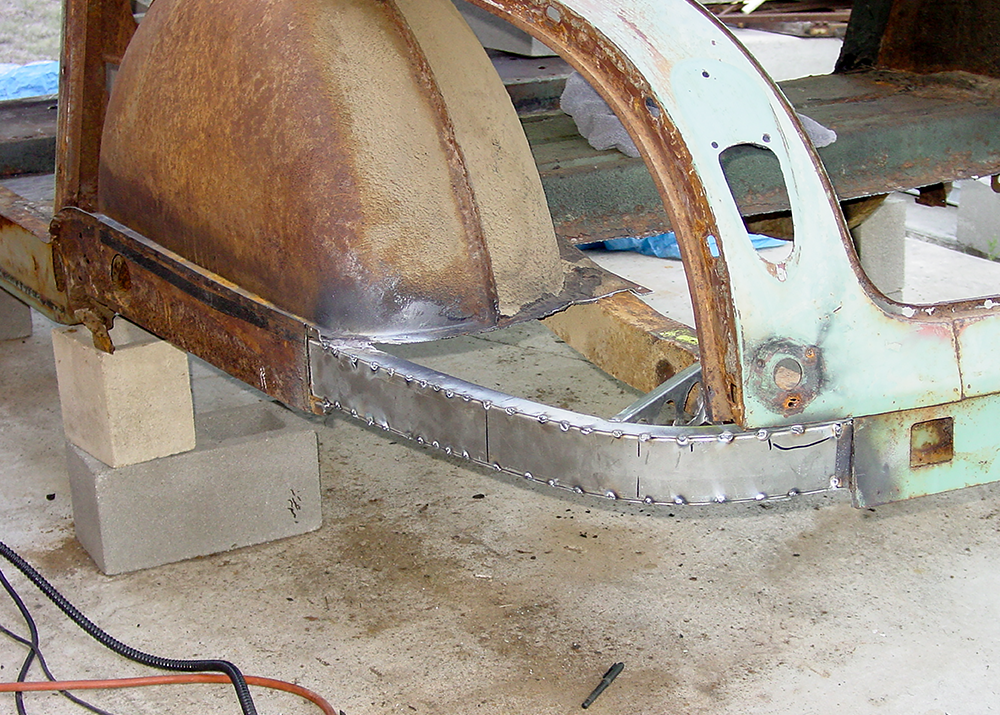
The first area that I started fabricating new metal for was the rusted out frame. About 50% had to be replaced. If I remember correctly this was 14 ga.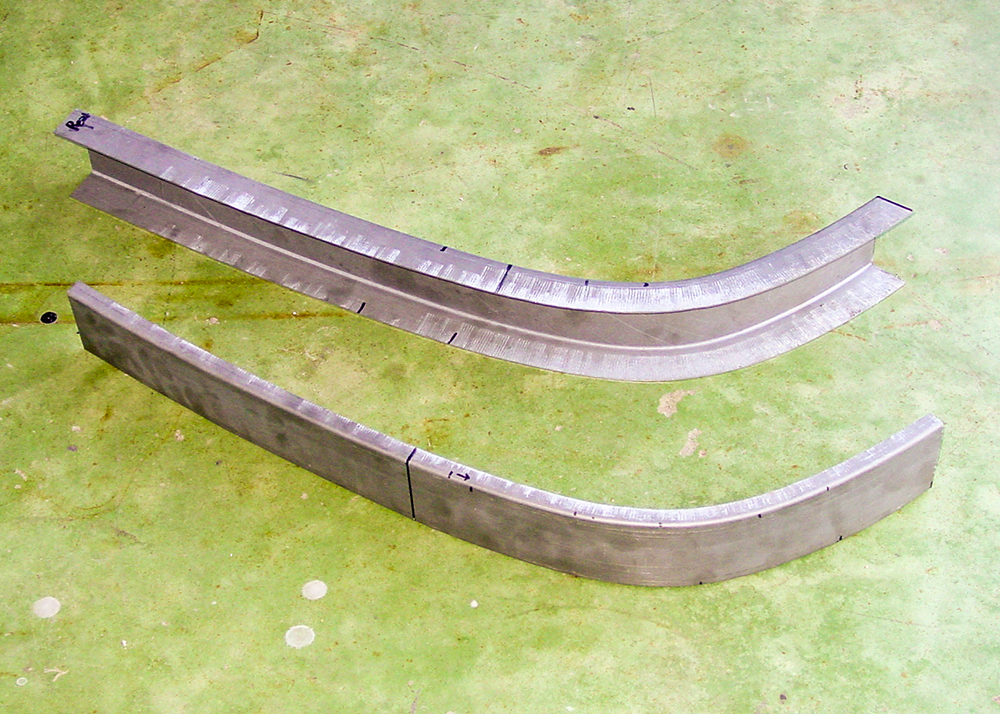
0 -
Beautiful work as always Chaz; you know "us" , the more photos the better!0
-
Finished with outer sheet metal and bumper brackets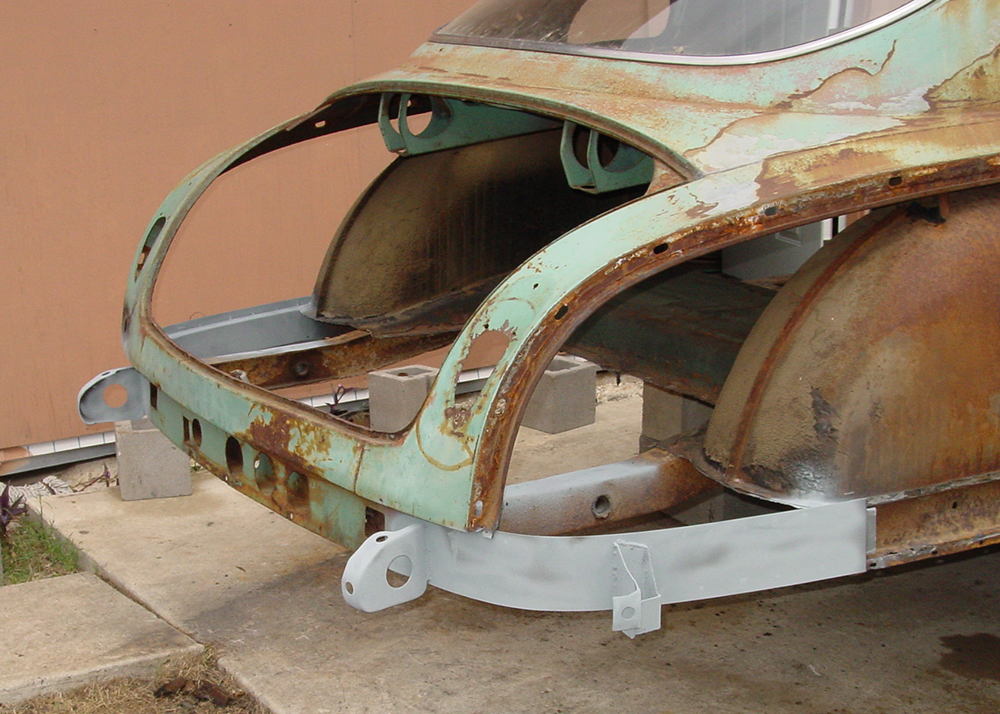
0 -
Chaz your repairs are the focus of part of my Stepdown website frame repair section. They have helped others bring their cars back to safe condition for reuse on the road! Thanks0
-
Hello Chaz!
Your work looks as impeccable as always!
I've got some catching up to do - I think you might be the only person on earth to go from 4 drs... to 2drs... back to 4drs!
What did you do with all that nice custom fabwork on those rear quarters?0 -
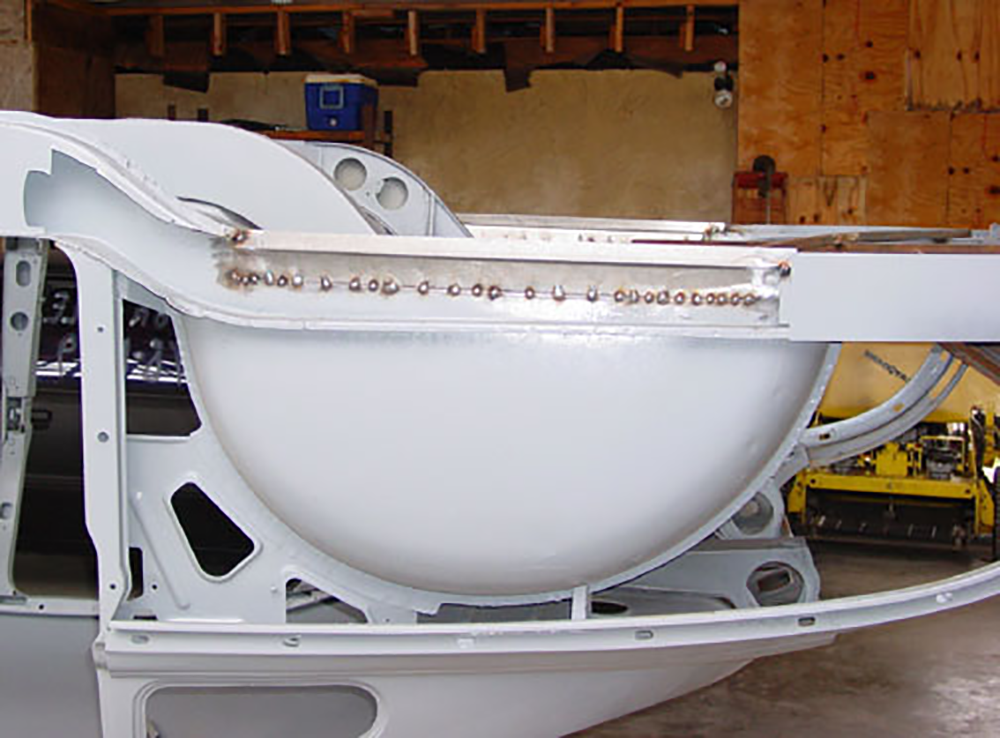
The next section of the outer frame being repaired on both sides.
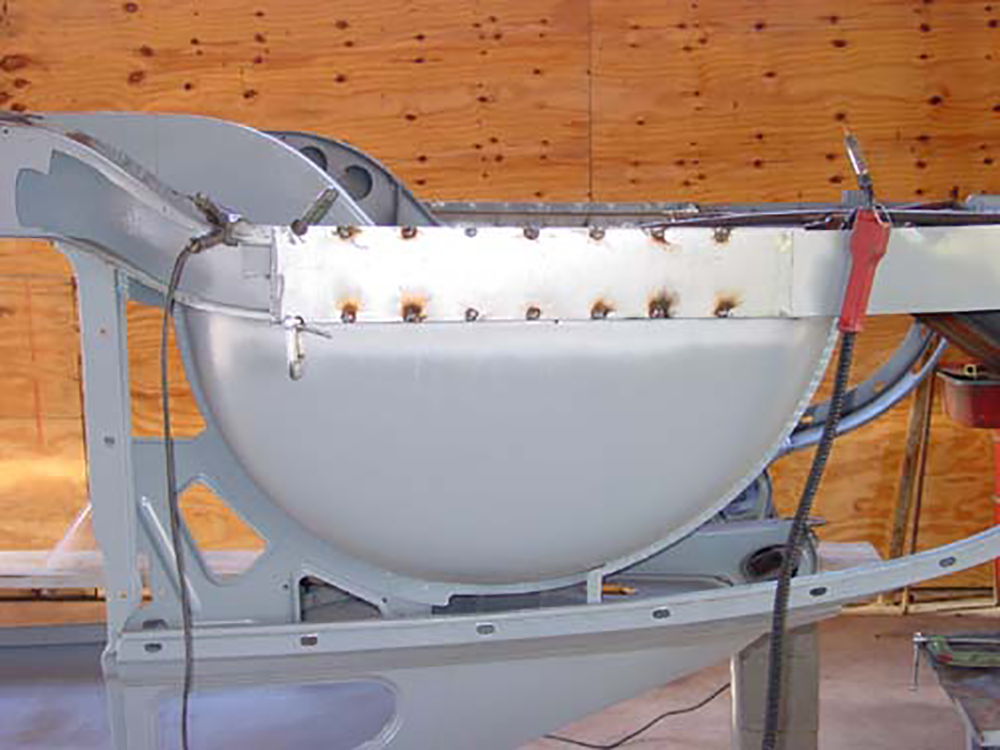
TaDaa!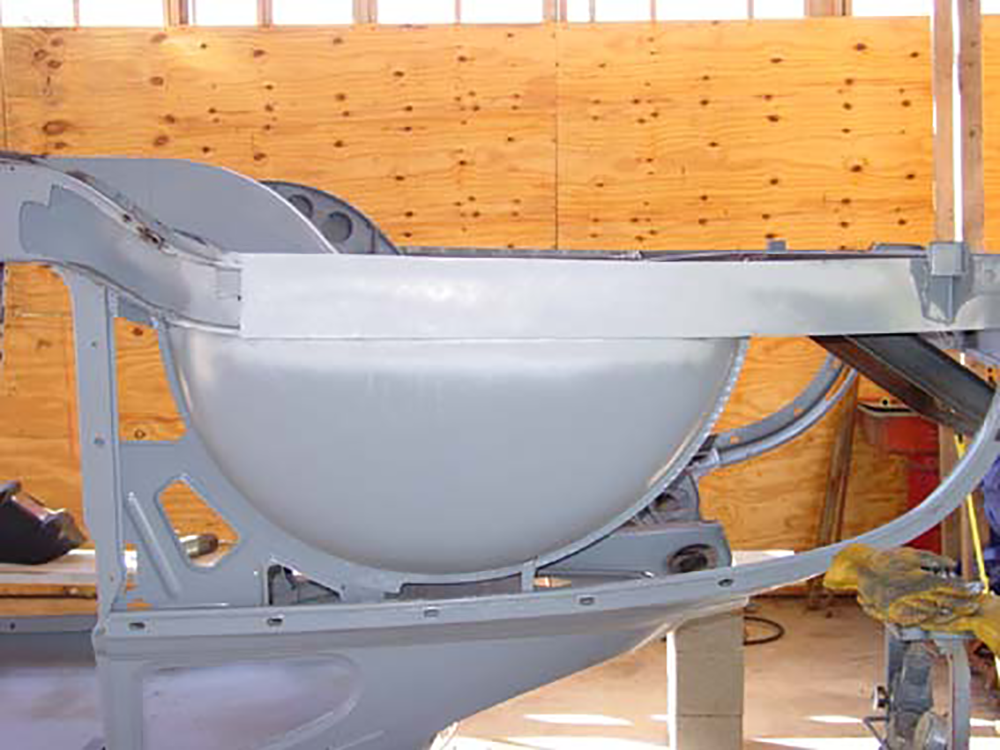
0 -
Hi Dan,
Oh my goodness! It's so good to hear from you. I did try to get in touch with you after Rambo passed away but failed somehow. It may have been because I was going to your old address. Yes I AM a trendsetter! Ha! No, not really. What really happened is that I had some serious health issues with open heart surgery. Just before that happened I had taken my 2-door panels to have them bead blasted at a company I trusted. The owner was gone for the day and this young kid he had working for him took it upon himself to SAND BLAST the panels. Needless to say, he work hardened and warped all the panels big time. You could hit the metal with a body hammer and it would just bounce off the panel making a sharp ringing noise. Then there was the issue of getting old and needing more creature comforts when traveling. But, being the eternal optimist that I am, I regrouped and reverted my beloved Lola back from a custom to a rest-mod. I'm still having FUN working on it which is the most important thing for me.
Peace,
Chaz0 -
some nice work man.
Keep it up and keep on posting your progress.0 -
mrsbojigger said:Oh my goodness! It's so good to hear from you. I did try to get in touch with you after Rambo passed away but failed somehow. It may have been because I was going to your old address. Yes I AM a trendsetter! Ha! No, not really. What really happened is that I had some serious health issues with open heart surgery. Just before that happened I had taken my 2-door panels to have them bead blasted at a company I trusted. The owner was gone for the day and this young kid he had working for him took it upon himself to SAND BLAST the panels. Needless to say, he work hardened and warped all the panels big time. You could hit the metal with a body hammer and it would just bounce off the panel making a sharp ringing noise. Then there was the issue of getting old and needing more creature comforts when traveling. But, being the eternal optimist that I am, I regrouped and reverted my beloved Lola back from a custom to a rest-mod. I'm still having FUN working on it which is the most important thing for me.
Peace,
Chaz
OMG - Open Heart Surgery nothing to gloss over - good to know you're feeling well again.
Please don't take this the wrong way but you "older" guys kick ass and give me inspiration to try and do better ~ I'm 55 and you're running circles around me on my projects!
I don't ever want to, or have a car sandblasted again in my life!
I really want to end up with one of these or larger someday - https://www.dustlessblasting.com/equipment/db150
Wet abrasive blasting with crushed glass..no heat, no warping, no residue.
They are darn spendy though..and I've watched Craigslist for years...they rarely come up for sale..most I see used for sale are mobile trailer outfits for 35k and higher.
Dan
0 -
Chaz, love your photos, really get me back in the mood. But you know how projects are, keep plugging and we will make progress. Worked on a bench for my wife’s flower project. Snow outside and temps lowwwww. Maybe next week. Great to see everybody jumping in. Bob0
-
Hi Guys,
I had a little quiet time this evening so I rustled up some more old photos of my repairing the frame. I hope this helps someone.
Peace,
Chaz
Both sides finished and primed at rear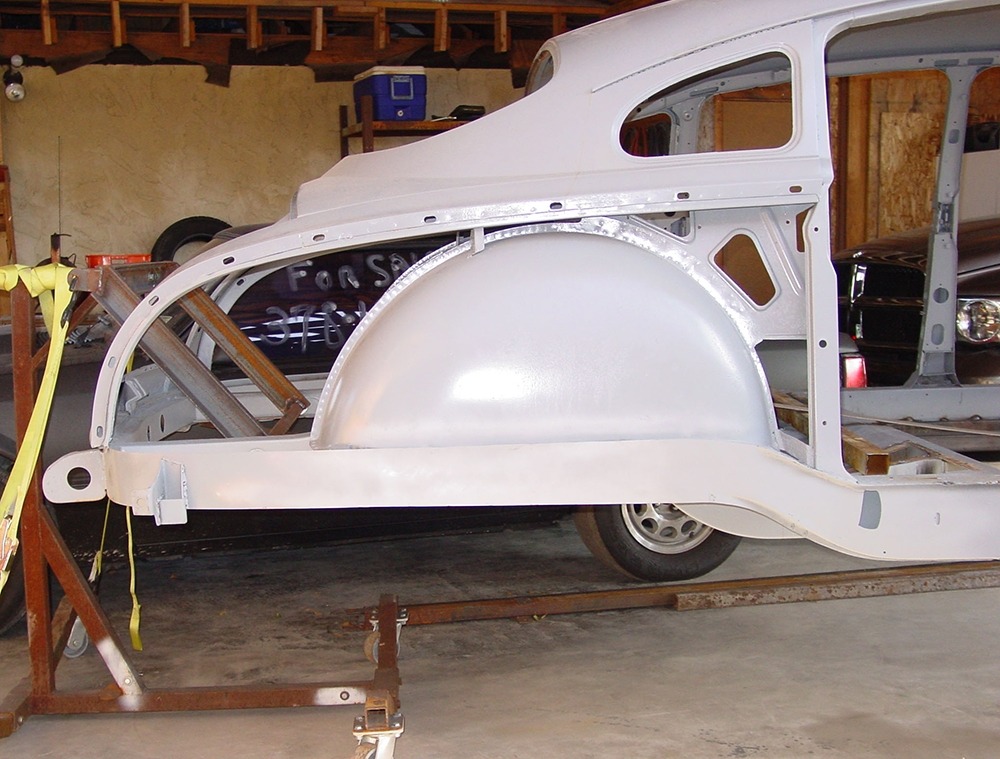
More frame rot up front. Marked for cutting at diagonal to give me a longer area for strength when welded.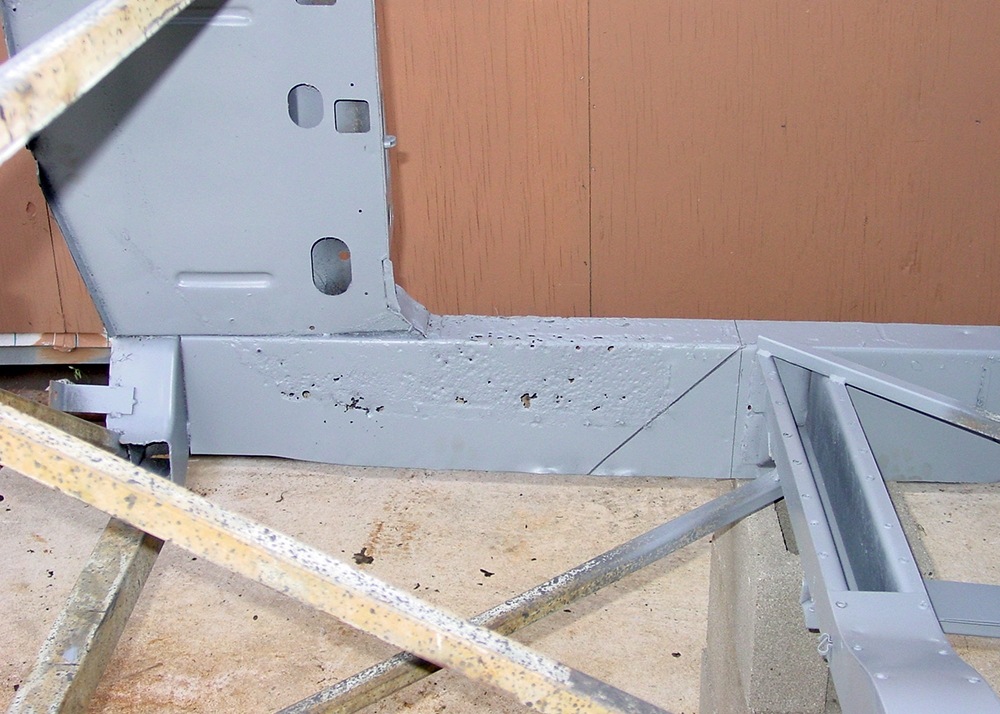
Not much left. Note the outer side of frame up front has to be replaced.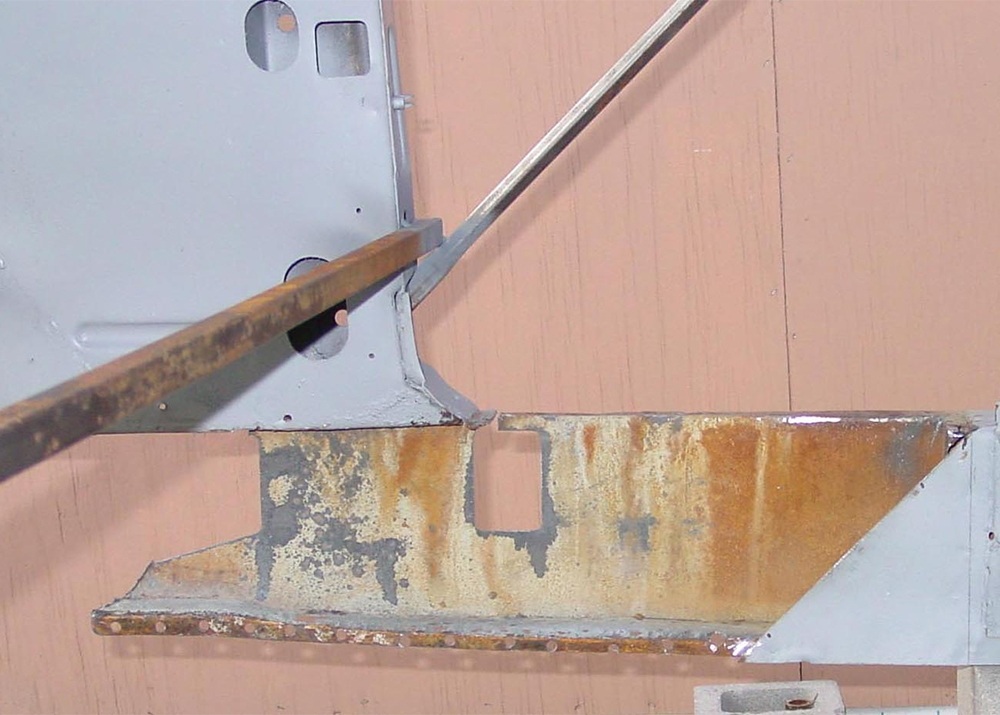
New piece tack welded in place.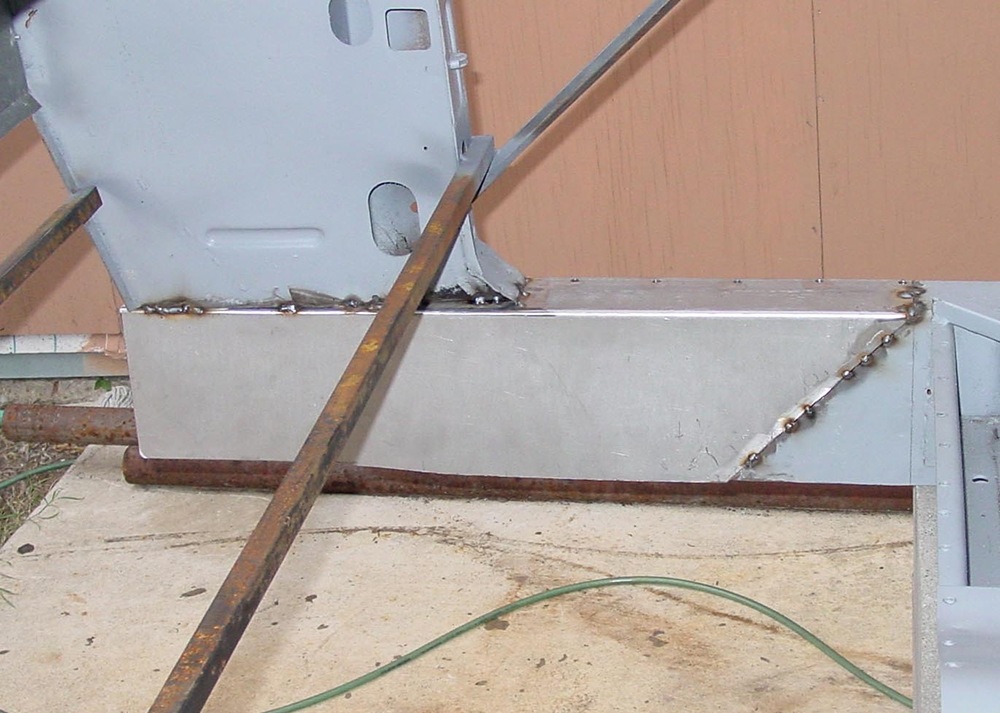
Both new front frame rails in place.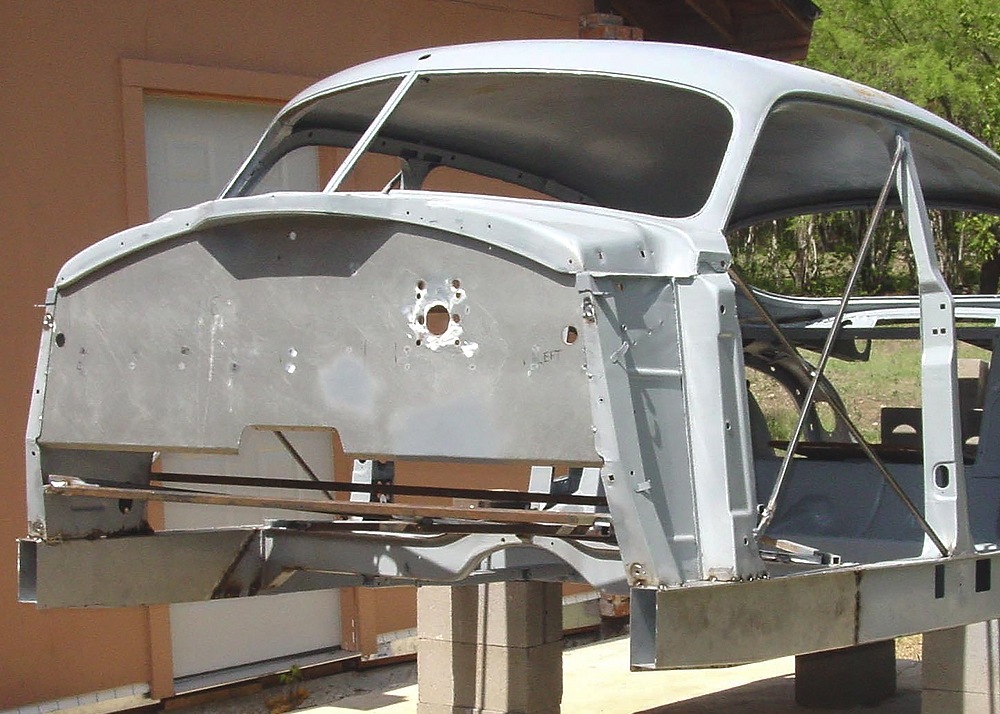
0 -
IDK with the rust - Is it a Hudson Stepdown anymore?
Looking good!
Must be nice working on a Hudson and not get covered in rust 0
0 -
Yes, it's still a Stepdown! It's just re-arranged a little. No more rust everywhere though! That's a relief.
Peace,
Chaz
Part of the pre-alignment settings for driving. Cheryl needs the seat all the way forward and up. I need it back quite a ways and lower.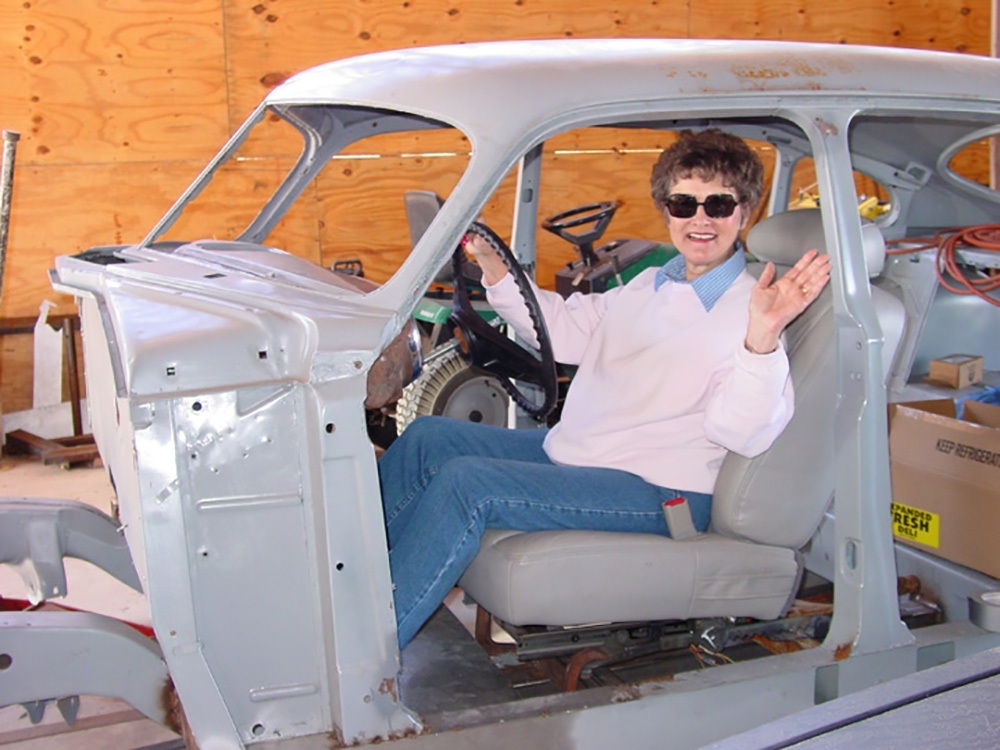
Start of the new floor sheet metal. The tunnel had to be large enough in the front to fit the new 4L60e trans. Here in the lower right corner, you can also see a little of the new inner frame rail strengtheners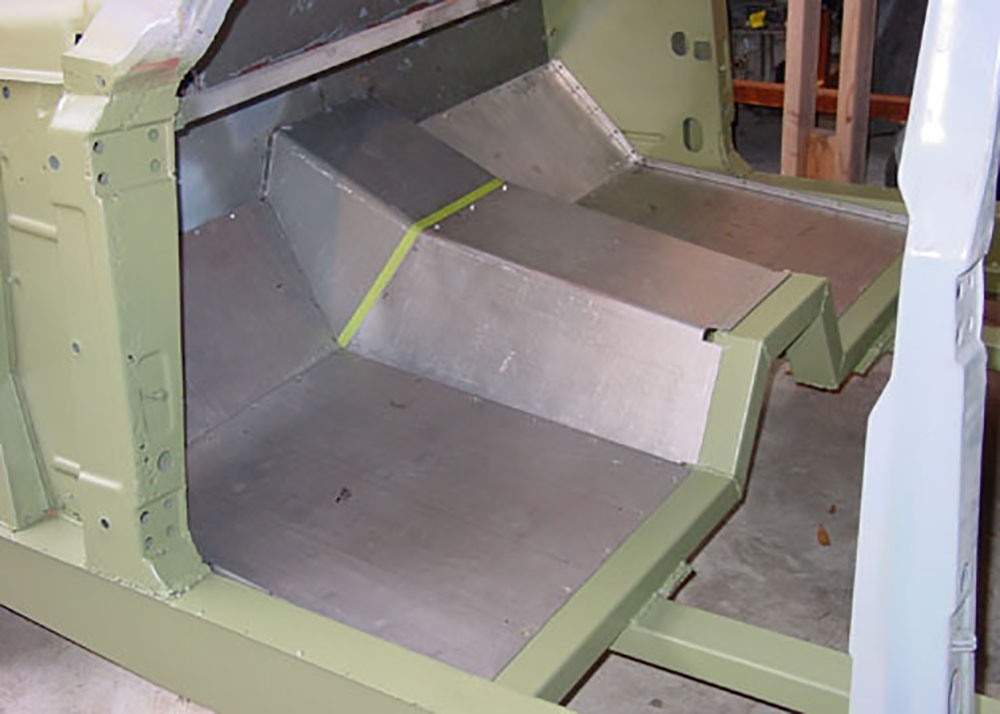
Added framework for strength to handle the new engine. The new inner frame rails tie the OEM front and rear frame clips together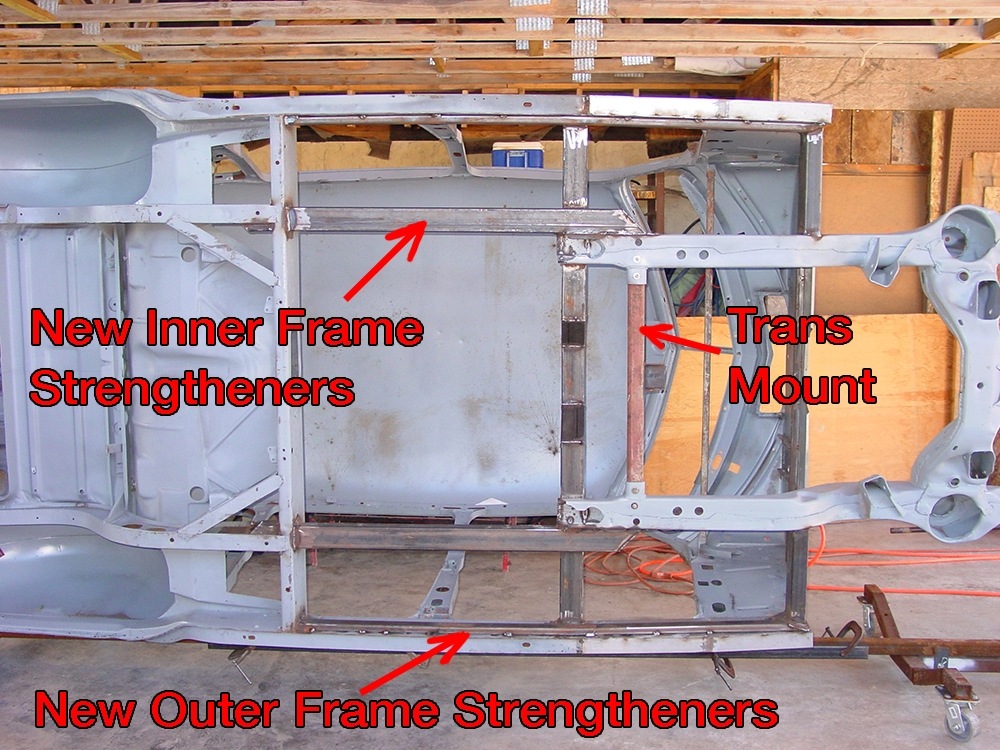
0 -
Chaz,
The lower floorpans look a bit high on the foot rest portion compared to stock.
I also see you haven't added any bead-rolling? Aren't you concerned about getting vibrations?0 -
Did it!
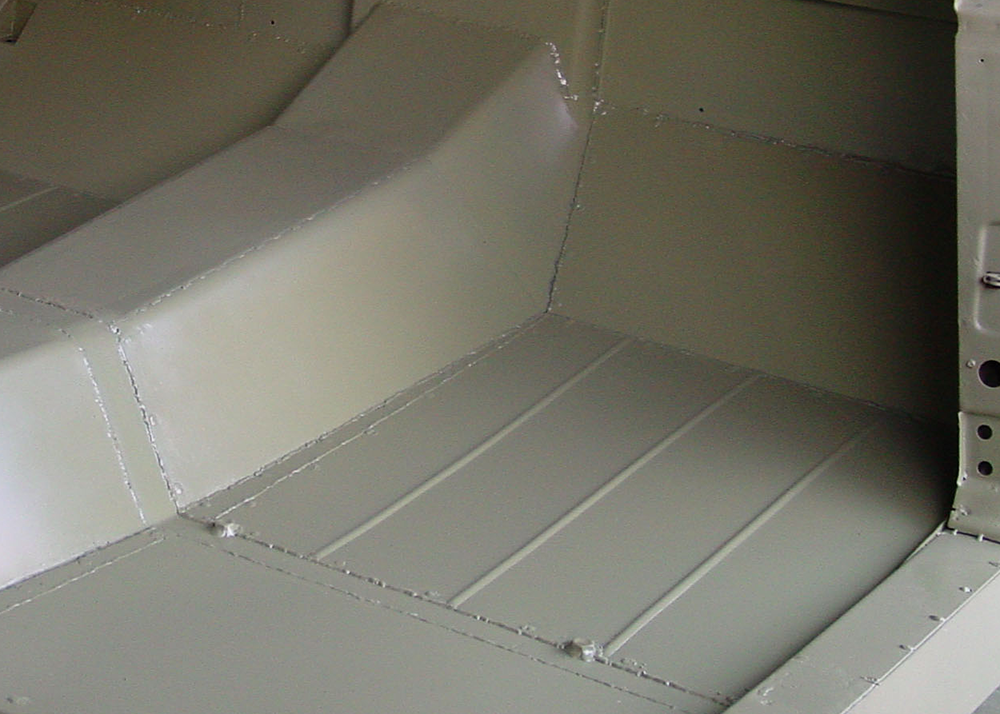
The front pan is slightly higher to suit Cheryl's driving comfort. Ergonomically, the dimensions are set up like the interior of a Ford Taurus which she can drive easily. The rear is full depth.
Peace,
Chaz0 -
There ya go!
Those larger flat pieces of sheet metal usually need some stiffening help or you'll hear lotsa strange noises as it flexes around driving!0 -
The problem with these photos in this discussion is that they are not in the correct sequence as they were the first time they were uploaded a long time ago here at the HET forum. It was done methodically as I worked on each project. Everything just disappeared for some reason during my absence so its starting over without the usual chronologic order I prefer. I still have lots of good photos of construction that might help someone if they are interested.
Peace,
Chaz0 -
Thanks, enjoyed the new/old pics, like all of them. Worked today also, but not on a car. Home projects.0
-
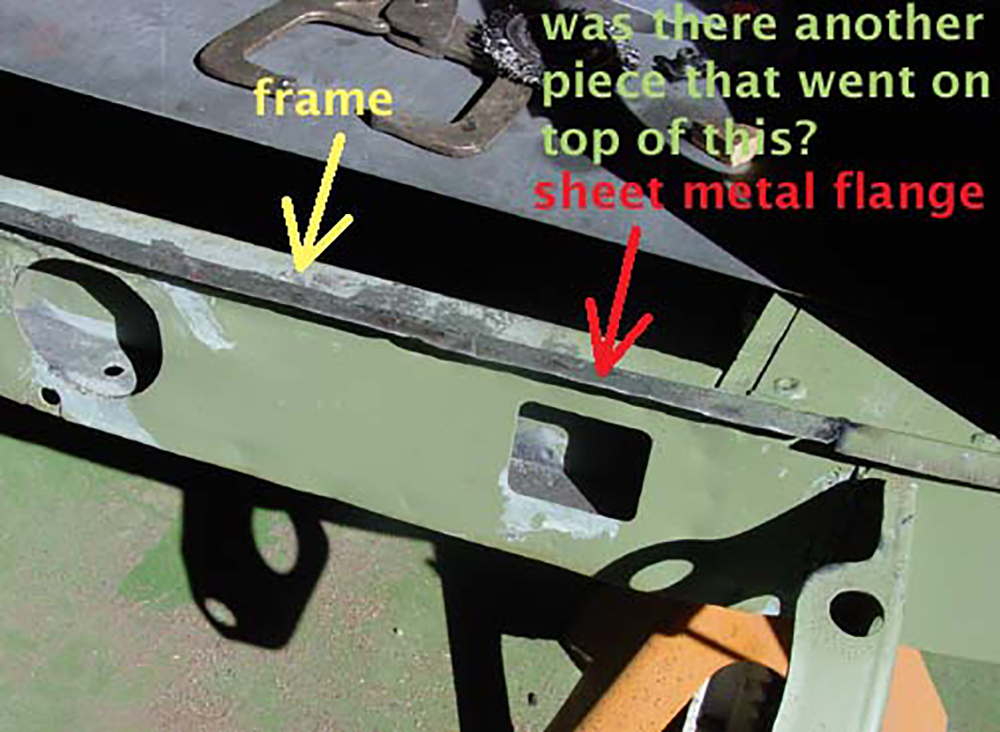
The year was 2007. Wow, has it been 11 years? I was making the body panel that fits below the trunk lid. I started by making the center long horizontal piece, then the 2 outer pieces.
Peace,
Chaz
The right side was in worse shape than this side.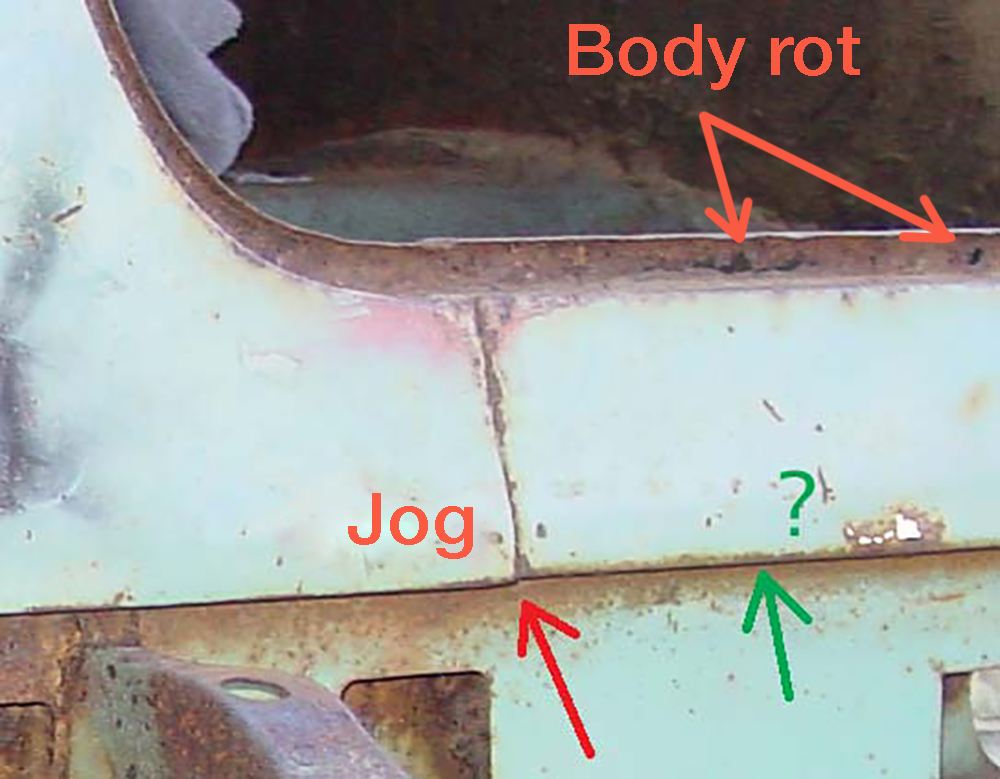
The long horizontal piece was made by creating a U-channel in flat metal.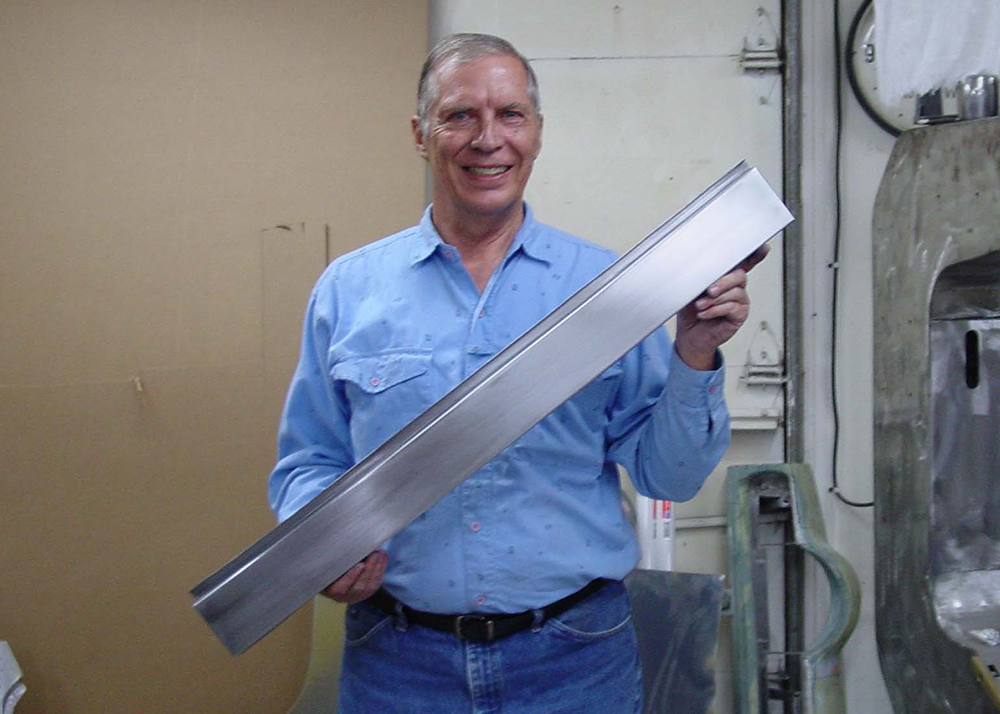
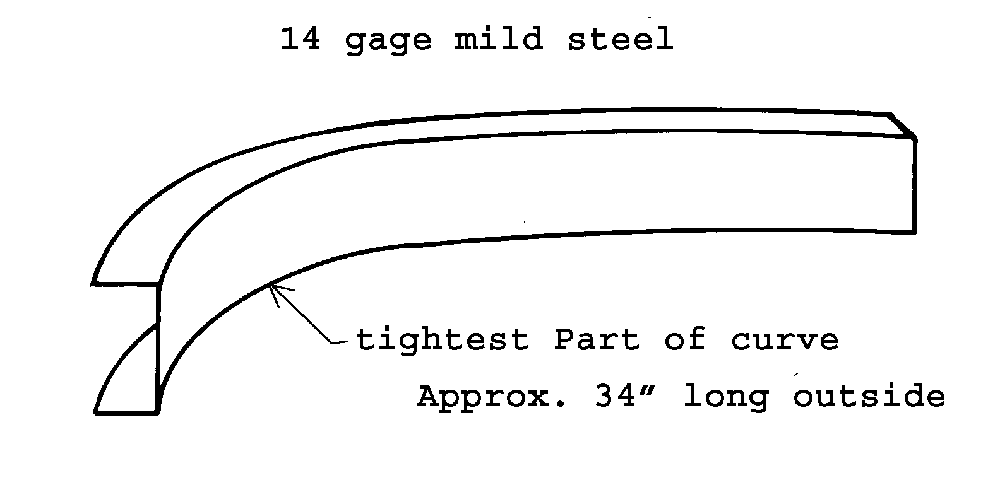
I then made a pattern for the outer left and right pieces from cardboard. Cardboard is cheap! Since the curve had such a tight radius, I first cut a strip of metal the correct width. I then made a right angle bend longways in the strip and shrunk one side to get the correct curve in it. I then made the larger flat part with a right angle folded over inwards. I then welded the 2 parts together which now formed the channel for the weather stripping. All 3 pieces were welded together to make the complete sheet metal repair part as seen in photo.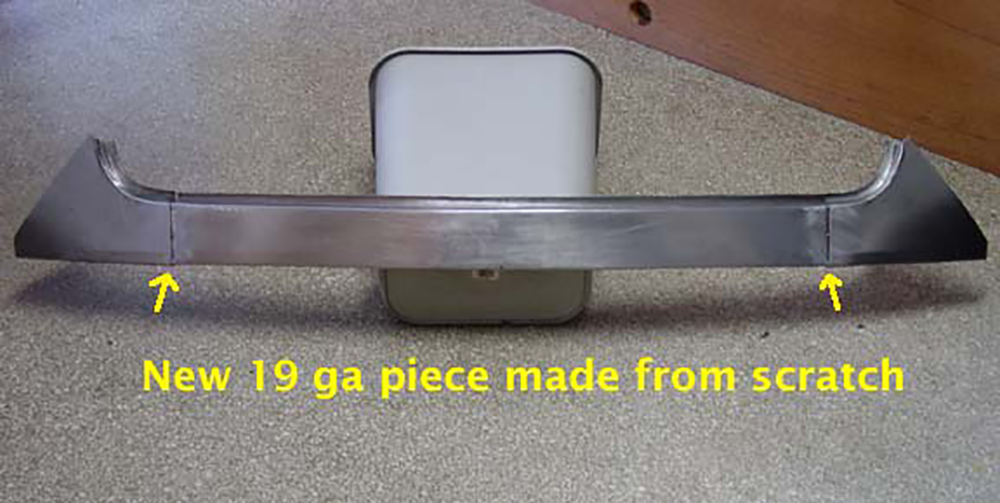
Piece now in place and ready to weld into the body. It was a perfect fit!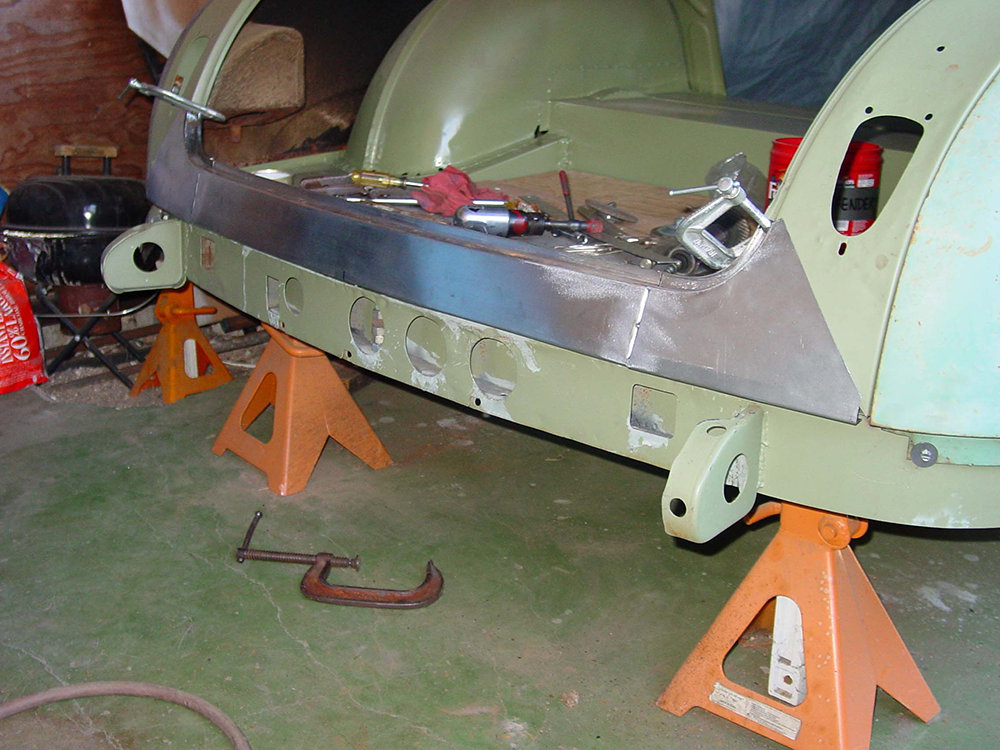
0 -
Very nice work.
 0
0 -
Chaz - I need 2 of those rear panels...you got extras right?0
-
Chaz- did you use a shrinker-stretcher to make the corner curves or just cut an weld in? What gage metal are you using? Enjoy your posts!
0
Categories
- 37K All Categories
- 115 Hudson 1916 - 1929
- 21 Upcoming Events
- 94 Essex Super 6
- 28.6K HUDSON
- 576 "How To" - Skills, mechanical and other wise
- 995 Street Rods
- 151 American Motors
- 180 The Flathead Forum
- 49 Manuals, etc,.
- 78 Hudson 8
- 44 FORUM - Instructions and Tips on using the forum
- 2.8K CLASSIFIEDS
- 609 Vehicles
- 2.2K Parts & Pieces
- 77 Literature & Memorabilia
- Hudson 1916 - 1929 Yahoo Groups Archived Photos


